

Super Fun Science Birthday Party Ideas

Sharing Blakely's Sprinkle Party from decorations to treats and all the sprinkle themed ideas in between! Get all the tips and tricks from Courtney Whitmore

Calling all ninjas young and old, this Red, White & Black Ninja Birthday Party by Andrea VandeBerg of Cherry Blossom Events, is waiting for you to behold! Filled with elements to help win the fight, this awesome bash is more than a delight! So grab your gear and set course, towards the following favorite details, which are top choice: Ninja star cupcakes Personalized headbands Ninja Cake Pops Red panel backdrop featuring a ninja star Ninja balloons Simplistic ruffle cake topped with ninja stars Pillow-seated guest table Chinese Favor Box place settings

Does your little one love painting, coloring, making sculptures or drawing? Then a fun Art Birthday Party may be the perfect theme! Here are some fun ideas.

Fun and easy fairy birthday party ideas on a cheap and thrifty budget with food ideas, activities, links to best products and more.

I love sending a sweet, silly, or fun message to anyone on their birthday, but these totally cute 7th birthday quotes are perfect for the birthday kid.

Gotta catch 'em all—birthday party ideas that is. Plan the perfect Pokémon birthday party, complete with crafts, goodie bags, games, cake and more.

From invitations and decor to party snacks and a science experiment, we're sharing step-by-step how we threw the BEST science birthday party!

Explore the beautiful pastel tones with these 20 soothing pastel color palettes; perfect for color inspiration for your next project!

It was no surprise when Big Guy told me he wanted a Lego Ninjago Birthday Party. He is obsessed with it. First off I needed to come up with an invitation. I found one I liked online and then tweaked it to what I wanted. Here was the end result. Actually when I picked these up from Walmart they told me I was going to need a copyright release form. Guess they did turn out good. Ha! Now for the banner. I wasn't sure what I was going to do and then this idea popped in my head. Big Guy really loved the way this turned out. Decorations! Decorations! I kept all those Chinese lanterns from Bear's Chinese party and thought maybe I could possibly use them again but the only problem is that they were pink and white. So I thought maybe, spray paint? Yep! It worked perfectly! After spray paint I printed out the Ninjago eyes. I had one giant lantern which I spray painted yellow and made some eyebrows and a beard to make it look like Sensei Wu. I also found some cheap gold place mats and cut out gold ninja stars. The ninjas all over the cupboards are just dollar store paper plates covered in felt. Cheap easy decorations, I'd say! Now for the table scape. This was my favorite part of the food. And for the cake. He wanted Jay and Jay is what he got. At least the best that I could do. The front room I decorated only a little for where the presents would go. This Jay was made out of poster board, felt and puff paint. This table was the "What's your Ninja Name" table. The kids had to take the letters in their names and figure out their Ninja name. When the guest arrived they were welcomed by Sensei Wu and No-ku-fu-chi-mo-to. Luckily Big Guy's birthday is right by Halloween so I was able to find a Sensei hat at the Halloween store. With a homemade beard, some thrift store pants and a white shirt, Sensei Wu came alive! After the guest were greeted the they got their personalized ninja bands that I had made each friend with scrap fabric and a sharpie. We let the kids play and run a muck until everyone got to the party. Then the fun began! I printed out this Sensei Wu picture on the computer and then made a bunch of beards so that we could play "Pin the Beard on Sensei Wu." When everyone got their beards I took a picture because I couldn't pass up on a chance to take this photo. Too funny. A training session with Sensei Wu. I had made some nun chucks for the kids out of foam tubing stuff I found at Home Depot, some duct tape and yarn Again super cheap. The training session begins. When it was time for the guest to leave they each got a Ninjago Bonezai favor. I made these from marshmallows, pretzels and chocolate covered rice krispie treats.

Lol Dolls And Macarons LOL dolls are toys. Buttercream, macarons and lots of sprinkles!

Zelda's rupees are transformed into three delicious cookies: red raspberry, blueberry, and matcha green tea! Sam Tsui joins Rosanna Pansino on Nerdy Nummies to whip up these legendary recipes! Makes 3 dozen of each cookie Things you'll need Ingredients Matcha Green Tea Cookie 2 tablespoons green matcha tea powder 1 teaspoon baking powder ½ teaspoon salt 2 ¾ cups all purpose flour ½ cup sugar ¼ cup honey 2/3 cup butter 1 egg ½ teaspoon vanilla extract ½ teaspoon almond extract Raspberry Cookies 4 tablespoons raspberry powder 1 teaspoons baking powder ½ teaspoon salt 2 ¾ cups all purpose flour ½ cup sugar ¼ cup honey 2/3 cup butter 1 egg ½ teaspoon vanilla extract ½ teaspoon almond extract 1 teaspoon red food coloring Blueberry Cookies 1 tablespoon blueberry powder 1 teaspoon baking powder ½ teaspoon salt 2 ¾ cups all purpose flour ½ cup sugar ¼ cup honey 2/3 cup butter 1 egg ½ teaspoon vanilla extract ½ teaspoon almond extract ¼ teaspoon blue food coloring Equipment 3 large bowls 3 medium bowls Food processor Hand mixer Rubber spatula Plastic wrap Rolling pin Cookie sheets lined with parchment Small offset spatula Rupee cookie cutter Matcha Green Tea Cookie Preheat oven to 350ºF. In a medium bowl, whisk together green tea powder, baking powder, salt and flour. In a large bowl, beat together sugar, honey and butter until light and fluffy. Add an egg, vanilla and almond extracts and then beat until well combined. Mix wet and dry ingredients until well combined. Form the dough into two discs and wrap in plastic. Refrigerate for an hour. Roll the dough to ¼ inch thick and use the Rupee cutter to cut out cookies (PICTURE at 6:49). Place cookies onto baking sheet and bake for 9-10 minutes. Raspberry Cookies In a medium bowl, whisk together raspberry powder, baking powder, salt and flour. In a large bowl, beat together sugar, honey and butter until light and fluffy. Add an egg, vanilla and almond extracts and red food coloring and then beat until well combined. Mix wet and dry ingredients until well combined. Form the dough into two discs and wrap in plastic. Refrigerate for an hour. Roll the dough ¼ inch thick and use the Rupee cutter to cut out cookies (PICTURE at 6:49). Place onto a baking sheet and bake at 350ºF for 9-10 minutes. Blueberry Cookies In a medium bowl, whisk together blueberry powder, baking powder, salt and flour. In a large bowl, beat together sugar, honey and butter until light and fluffy. Add an egg, vanilla and almond extracts and blue food coloring and then beat until well combined. Mix wet and dry ingredients until well combined. Wrap the dough into two discs and wrap in plastic. Refrigerate for an hour. Roll the dough ¼ inch thick and use the Rupee cutter to cut out cookies (PICTURE at 6:49). Place onto a baking sheet and bake at 350ºF for 9-10 minutes. TaDa! You’ve hit a yummy treasure chest with these rich Legend of Zelda Rupee Cookies!
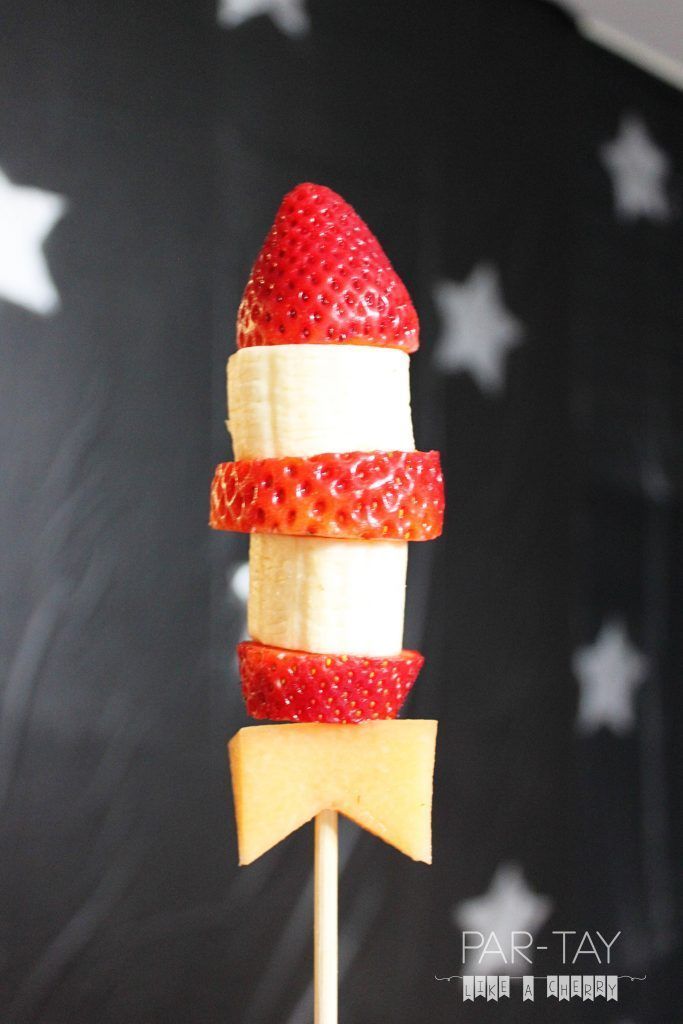
Fun and easy food ideas and free menu printable for your space party, head over to partylikeacherry.com NOW to start planning your space party.

Do you hate people? Well you're invited anyway to this Wednesday Addams Themed Birthday Party by Cynthia White of Summers in White, out of Miami, Fl USA! Filled with scenes and fun from the beloved show, this event is one you'll absolutely hate to love! So scroll on if you dare and to these details BEWARE: Box Party Invitations with Crackable Black Mini Eggs Party Hat-wearing Thing Floral Bat Cookies Wednesday Addams Birthday Cake Spooky Guest Table Birthday Spell Table Settings And other Spooky Themed Food + Sweets!

LEGO Birthday Party Inspiration! I will walk you though the elements of a 4 year old's LEGO Birthday Party, with lots of easy inexpensive ideas!

This theme... It would not be my first choice, I tell you. But a mother's gotta do what a mother's gotta do, right?! So here I am, decorating Pokeballs. They're actually not so bad. Just three colours! Yay! But that they're round. And we all know the challenges I have with symmetry! Anyway, here goes: Royal icing in three colours and two consistencies. Use a template to help define areas. Outline with detail-consistency royal icing. Flood with flooding-consistecy royal icing. Allow the white area and red area to set before piping in the black. The little white circle in the middle is done wet-on-wet onto the black icing (which I figured was the easiest way to make sure it was round!) If you've got an airbrush, add a little airbrushing with red to give the balls some depth. See - not so bad! Now I need to go decorate a Pokemon inspired cake. Give me strength! 😉 xxM

Building a Minecraft party? Don't miss this Minecraft Balloon Party featured at Kara's Party Ideas. Balloons? Yes! You can't miss these fabulous ideas!!

Planning a big Minecraft party? We have found all the best ideas for the ultimate Minecraft party of all time - find your inspiration here.

If you’ve been following the blog over the last few months, then I’m sure you noticed that the boys (and admittedly, me

Lego will always be one of the top choices for a birthday bash. Take a look at these gorgeous Lego Birthday Cakes that will simply blow your mind for ideas.

These circus theme party ideas will have you saying that was the greatest party ever! Circus party games, food ideas, decorations, and more!

Tobin is a party planner after my own heart. Shortly after last year's Space party, he'd already decided that for his next birthday he wanted a "Knights and Dragons" party. It was an easy party to put together. We got back from Texas on Sunday 3/18 and I realized that the following Sunday was really our best/only option for his party. I didn't get much else done last week other than mountains of post-vacation laundry, cleaning the house, and getting things together for the party. But a party you can get ready for in one week? AWESOME. This was Tobin's first friend party - we've always just had family in the past. And this child takes friends SERIOUSLY. We managed to limit the guest list to 12 kids - we ended up with 10, including our own 2 littles and 2 cousins. But he wanted to invite every friend we saw, and each new friend he's met since the party. Sunday we met a family with an Ethiopian born daughter, and he played with them for about 30 minutes before Luke's soccer game, while I talked adoption with the mom. And Tobin said, "Can we invite Grace & Zelly to my birthday party?" Um, honey, we don't really know them, and your birthday party was last week.... When Tobin was a baby, I had a dragon costume for him and a knight costume for Luke for Halloween. Tobin wore Luke's old costume for the party. I had a super cute knight costume I got on clearance a few years back, thinking Tobin could wear it and our next baby could be the dragon. And then we didn't ever have another baby. That knight costume is now the perfect size for Micah, but he wasn't having any of that! We used toys and things we already had for decoration (like our awesome pop up tent thingy, which was the best purchase we made last year)... Kool-aid was made fancy by plastic goblets from the dollar store, and grapes and cheese cubes with little sword toothpicks were a hit. Each kid had a shield with a special knight/lady name. To make the shields, I traced the plastic shield we had (from Dollar Store) onto foam board a bunch of times, cut them out and spray painted them silver. I used duct tape to make handles on the back. I got the idea for the knight names at Family Fun, but rather than playing a game to assign names, I just decided ahead of time (so we wouldn't have to take time in the party to write names on the shields.) I had a bunch of stickers for the kids to decorate their shields - this is what they did as we waited for everyone to arrive. Luke and I also made a ton of balloon swords... Because knights need swords, but I've lived with boys long enough to know that I wasn't handing out anything remotely sword-like in a crowd of kids. I can't even give my kids chopsticks because they use them for a sword fight! I found a couple of places that explained how to make balloon swords, but this one was the best. In case you want to make some yourself - I thought Luke & I could blow up the balloons. For these long balloons, we found an air pump to be totally necessary. Not because we got light headed (which is what I expected), but because we were physically incapable of blowing the balloons up at all by ourselves. After the sword fighting demolished most of the balloons, we headed to the back yard for our Dragon Egg hunt. I spray painted about 24 cheapo easter eggs with the same silver paint I used on the shields, then filled those along with every other egg we had. Luke loved hiding them for me, and we hid a few in easy places on the deck for our youngest knights (the rest were more challenging - Tobin continued to find eggs in the back yard for a week.) After everyone had eggs in their bags, we broke out the cupcakes. I love having cupcakes at a kid party. Luke's first party (that I was in charge of - the year he turned 6) was a pirate party. I was an overachiever back then, and made him the awesome pirate ship cake from the Family Fun site. Then I watched him blow all over it, only to have him announce just as the door shut on the last friend, "My throat hurts." Yep. He blew strep throat all over that cake. Anyway: CUPCAKES! Besides wanting to invite friends, Tobin's only other request for this party was a pinata. I was a little worried about this, since we just had a week to find one. But they had an awesome dragon pinata at the local party store - and this is what set our color scheme for the party. After we were finished with treats, we lined the kids up on the deck and let them go at it (I was happy to have a set up where it seemed like no one would get whacked with the bat...although the successful batter did throw the bat at the end, so watch for that.) We only made it halfway down the line before Mr. Dragon got busted wide open. Thankfully, Tobin DID get a turn at bat. I hadn't even thought about what would happen if the birthday boy didn't get a turn to swing... I did reserve some of the candy - it wouldn't all fit in the dragon anyway - and after the kids finished with the pinata, I dumped more candy in their bags, making sure everyone went home with a good amount. After the candy had all been snatched up, we had "jousting games." I just set up games we already had - a kickball croquet set and some other yard games. I also set up the bubble machine my parents bought for the boys while we were in Texas. I always thought those things were a racket ("back in my day, we just blew bubbles like normal people!"), but with young kids constantly spilling bubble juice everywhere? A bubble machine is a GREAT idea. It was a fun party treat too, the kids loved it. I planned the party for an hour and a half, and the kids had 20ish minutes to play at the end of the time. Easy peasy. And suitable for boy and girl guests, which is good since we have girl cousins and several of T's closest friends are girls. Yay for knights and dragons!! (I took pictures of T with each of his guests as they left...hence no pics with the cousins, since they stayed for dinner.) If you are thinking of throwing a Knight party yourself, check out my pinterest birthday board, I have lots of fun ideas pinned - some of them WAY too elaborate or expensive for me, but still super cute.

As you may have guessed from the rainbow party I threw last year ... I LOVE planning kids' birthday parties. They are just way too fun! So when my daughter, Julia, won a free princess visit from a local party company, the ideas began to run wild for her 3rd birthday party! First, Julia had to pick her princess and she chose her favorite ... Snow White. I decided I didn't want to throw a "store bought" Snow White party but rather wanted to create something unique. I chose to do Snow White's Enchanted Forest, complete with a forest themed food table, a picnic table for the kids to eat their lunch at and a variety of picnic / finger foods ... kid friendly of course! In addition, I decided to incorporate the classic Snow White colors of red, yellow and blue along with an apple motif and a few other classic elements from the Snow White fairy tale. I had so much fun being creative and putting the entire party together. I also tried to make as many things from scratch as possible in order to be cost effective ... because if you know me, that is another thing I enjoy ... saving money! :) Most importantly, Julia and her friends had a fantastic time celebrating her 3rd birthday. It was beyond adorable to see how Julia was in awe of having Snow White in her house and at her birthday party. She won't forget this day for a long time! Here are some of the party details in detail: As you enter our home we have a large black mirror that hangs across the hallway from our front door. I toyed with the idea of buying a decorative mirror to hang on the wall as Snow White's magic mirror but that would have set me back at least thirty dollars and so I decided to turn our mirror into Snow White's magic mirror. I drew a fancy mirror outline by hand on a piece of red poster board, cut it out and taped it on to the mirror. Ta da .. a magic mirror for the cost of 49 cents! Can't beat that! An added bonus was that as the guests entered the party they saw their own reflection in the mirror ... perfect since all of our guests are definitely "the fairest of them all". :) "Mirror, Mirror on the Wall, Who is the Fairest of them All?" For lunch, I wanted it to feel as if the kids were having a picnic with Snow White and so I put together a picnic table for the kids to eat their lunch at. Each of Julia's friends had his/her own place setting at the picnic table. The apples were cut out of card stock and hot glued to dollar store cups and forks. The fancy napkins I found on clearance at Party City. The table I borrow from my friend/next door neighbor, and the tablecloth I borrowed from my Mom. A great way to save money when having a party is to borrow things! Recognize those triangle banners? They are the same ones I created for Julia's rainbow birthday party last year. I simply re-purposed them by removing the green, orange and purple triangles. "Snow White's Enchanted Forest" Food Table. The backdrop for the table was dollar store streamers just twisted and then taped from the ceiling to the floor. Total cost = $3! I designed the sign for the wall and printed the birds as well. The little trees are part of my mom's Christmas decorations! :) And the giant red bow for the table I found on clearance after Christmas. The centerpiece for the table cost 50 cents. The silver bucket I already owned and I simply filled it with rocks. I then stuck greens in it that I had cut from the bushes in our yard along with twisted sticks I borrowed from my friend/next door neighbor. The 50 cents was spent on a Christmas decoration that I saw on clearance after Christmas that was made of greens, pine cones and red apples. I used it at the base of all the greens and twisted sticks to pull the entire look together. An added bonus is that I plan to use it as part of my Christmas decor next Christmas and so not only was it super cheep but it will serve more than one purpose! The food was all picnic themed food and kept as kid friendly as possible. I made the food labels on the computer and then glued them on cutout card stock red apples and then on pine cones. Made for a cute presentation. We served Sleepy's PB&J Sandwiches cut out like apples using an apple cookie cutter, Doc's Apple, Turkey & Brie Baguettes ... ... Dopey's Pasta Salad, Grumpy's Pretzel Chips, Bashful's Forest Fruit Skewers and Happy's Ham Tortilla Rollups. A big thank you goes to my Mom who was a HUGE help with the food! Then I of course had to continue the theme for drinks as well ... Wishing Well Water ... ... And Non Poison Apple Juice. For the cake, my Mom made this adorable personalized size Snow White cake for Julia using a Pyrex bowl as the cake mold and then inserting her Snow White Little Person at the top of the cake. She decorated it so that the cake looked like Snow White's ballgown. All the guests had their own personal Snow White cupcake. I found this adorable Snow White printout online (same one I used for the invitations), cut it out and taped it to a toothpick. We also served Snow White's Sugar Cookies. Made by my Mom using an apple cookie cuter. For the entertainment portion of the party, when the guests arrived, there were Snow White coloring pages and crayons on the table outside for them to color with. And then the real fun arrived. Snow White herself! She did face painting ... Taught the girls her princess dance and played a trivia game with the kids as they ate lunch. Then we played a wishing well game. I found the idea on Pinterest. The kid's threw pennies into the well (aka big white bucket with rocks at the bottom) and made wishes. They loved it! I had put ring pops on the bottom of the well and at the end of the game all the kids were able to pick out a ring pop. I was planning on doing a second game where the kids would pass around an apple like a hot potato and when the music stopped whomever was holding the apple would have to faint like Snow White. At the end of the game the plan was to have Julia pass out these little magical kisses to revive all the kids. :) A cute idea but after trying the game with Julia I came to the conclusion it was a bit too complicated for two and three year olds and so we skipped it and just handed out these little magical kisses as an additional favor. Speaking of favors, I lined them up on the fireplace mantle and they served as added party decorations. The Party Favor I wanted to send the kids home with a favor that wasn't full of sugar but rather was something they could do as a craft at home. I first found these cute woven baskets at the dollar store for 2 for $1 and thought they would be perfect to hold the favor! The red foam apples for the background were from the Target dollar bin, 4 for $1. I then saw these cute little bird houses at Micheal's for $1 each and thought they could become the fun craft for the kids to paint. I added a bottle of paint and a paint brush in each basket and then also a little bit of birdseed wrapped in saran warp and tied with a ribbon. The bird whistles I found on Amazon and thanks to a Pinterest idea put them in a clear bag with the tag "Whistle While You Work" ... free printable here. And finally the mushroom pencil sharpener and eraser were from Target and just were too cute not to include. A fun favor that hopefully the kids enjoyed when they went home! And finally the sign that said farewell to the guests ... "And They Lived Happily Ever After." Happy 3rd Birthday Julia!

This post is sponsored by Black Twine.I am excited to finally share this Modern Mad Scientist Birthday Party I styled to celebrate my son's 9th birthday!

Here are a list of fun ninja party games and ideas that would be perfect for a ninja themed birthday!

I believe I mentioned in a previous post that for quite some time Liz and I tried to be the first ones to come out with an effective crackle technique to no avail. Then they

Good morning Peeps, time for our May challenge and we have a nice and easy theme for you.......... ********Anything Goes******** We must see hand stamping as the focal element of your artwork, it can be a stamped image/s, large sentiment or quote....... the one exception are Penny Black Stickeroos. But no digi images and entries using them WILL NOT be eligible for prizes or GDT spots. It so upsets us to see names come out in the draw who are not eligible for a prize because they have not read the rules. Penny Black invite you to explore their creative world and see for yourself why their rubber stamps, stickers, beautiful papers for scrapbooking, cardmaking and stamp crafting are everyone’s favourites. Their products are designed to integrate style and colour for creating the best handicraft projects ever. If you would like to be one of the first to hear about new products from Penny Black please click here to join the free club, plus their Facebook is full of activity and news. Here are the three lovely prizes from them................... Crafts U Love was formed in 2001 by Paul Baughton and Jenny Baughton. They are one of the largest stockist in the UK of die cutting and rubber stamp products as well as a wide range of general card making and scrapbooking products. Crafty Ribbons is a ribbon emporium, we are passionate about ribbons and want to share our fantastic ribbons with others. Our range of Christmas ribbons is second to none. Remember when we only used ribbons to add a bow to our hair, or tie up a birthday parcel ? Ribbons are now a "must-have" for all types of craft. Whether your project requires satin, sheer, silk, grosgrain, gingham or polka dot ribbon we have them all! Lots and lots of different colours in a range of widths. Need a little bit of ribbon inspiration - then have a look at our projects on our blog,or visit our Inspiration blog,or maybe join in with us at our Challenge blog. Go on, have a look... It's worth it ! And don't forgot the DT are always on the lookout for our next Guest Designer from entries using Penny Black stamps, but please note as there has been some confusion in recent months, if you are lucky enough to be selected you would be not be able to join in the challenge the month of your GDT spot. An another lovely Penny Black stamp from our very own Sam who had been over buying again !! We are pleased to welcome Jose as our first Guest Designer this month with this lovely card And Tracy from our sister challenge Allsorts with this little sweetie And some more inspiration from the Desogn Team who as usual have pulled out all the stops with a lovely array of artwork........... Brenda Using Penny Black 40-217 Venetian Summer Ellie Using Penny Black 3823H Delights and 30-032 Enjoy Life Linda Using Penny Black 484C Shy Hedgehog Lynn Using Penny Black 30-342 Art Love, 2695J Dance, Sing Love and 25-018 Patina Mervi Using Penny Black 40-447 Poppy Gems Sam Using Penny Black 2084K Circus Act Shirley Using Penny Black 40-311 Poppy Trio Susan Using Penny Black 4007K Make Believe and 3756E Xmas Everyday, Tracy Using Penny Black 30-034 Teddy and Company Good luck to you all and hope you have fun with the theme. An InLinkz Link-up

An elaborate DIY Minecraft Birthday Party filled with ideas for decorations, food, games, kids activities, and party favors.

Explore Little "Miss" OC's Kitchen's 2717 photos on Flickr!

DIY Lego Ninjago Party Ideas including Ninjago party tea, Ninjago fancy dress and Lego Ninjago crafts and Lego Ninjago party bags

"Ding, ding, ding...it's HUG TIME!" Gather round to dance and sing, this "Troll-tastic" Trolls Birthday Party at Kara's Party Ideas is about to ring!

Learn how to have the best Lego-themed birthday party imaginable. Your kids will love it!

My son Zion was turning 7, so I threw him the coolest Minecraft-themed birthday "Adventure" I could.
