

Cosplay: The art of portraying a character through the creative use of costumes. Okay. You've seen a ton of awesome cosplays floating around the internet, at conventions, or you just love all those amazing costumes in movies, video games, etc., and you're dying to get in on the cosplaying action yourself. That's why I'm here: to show you all the ins and outs of getting started in cosplay by making your very first costume! NOTE: If you're looking for a pre-made (or mostly premade) costume, Etsy and Cosplay Sky are two of the best places I've found online to buy high quality, screen-accurate costumes. > > > > > > > > > > > > > > Step One: Choose a Costume Probably the easiest part of the entire process, the beginning of every cosplay begins with choosing a character, and then choose a costume worn by said character. You probably already have an idea swimming around in your head -- perfect! Choose that one. One helpful tip regarding this decision: it's best not to choose something *too* challenging or intricate for your first endeavor. Try to let the costume match your skill set. So, let's say you want to cosplay Iron Man... unless you're really ambitious, maybe pare the idea down a little and go for cosplaying Tony Stark instead -- that way, you can just make an arm of the Iron Man suit to complete the look! Here's the thing: no matter how easy your costume is to make, as long as you look good, you will be pleased with the finished product and your audience will be impressed. It's better to do something too easy than too hard -- at least for your first costume. Then, as your costume-making skills and abilities grow, you can begin to stretch them farther and farther to make super duper complex costumes. > > > > > > > > > > > > > > > Step Two: Begin Planning Though you might want to just jump right in and have at it, making a game plan for your costume will make everything much simpler and faster in the long run. This process should include: - Gathering reference photos. Scour the internet for the best high-resolution photos of the costume that you can find. Posters, movie stills, even toy versions of the character provide invaluable reference to help you in your build. I've found the best way to store these photos is to pin them all to a good ol' Pinterest board, designated for that express purpose. - Making a list of everything you'll need to buy. You might be surprised by just how many things you'll need to buy to create your costume (and how much those things can cost), so it's important to have a pretty good idea of what you'll be needing to purchase. This will also make the next part of the process much easier. - Creating a budget + calculating the cost of the costume. Now, your budget doesn't have to be calculated down to the last cent -- somewhere within $10 of the actual price is a good place to start. And since you've already made your list of things you need to buy, just add up the average cost of all those items and you're all set to go! - Drawing sketches of the costume. This one is optional, but I highly recommend it if you're planning on making any major alterations to the original costume. It also helps you get a better idea of all the different aspects of the costume, since you have to draw each one. - Deciding where you want to wear the finished costume. You might already know this, but if not, start thinking. It's so depressing to have created an awesome costume, only to realize you have no where to wear it. I recommend movie premieres, fandom conventions, or just a photoshoot as the best opportunities to do so. > > > > > > > > > > Step Three: Research + Purchase Materials So, now that you've got a pretty good idea of where you're going with your cosplay, start researching online and in brick-and-mortar stores for the things you'll need to buy -- which you've already made a list of! ;) If you're looking for a few pre-made items, such as boots or weapons (the things that look best when store bought and screen-accurate versions can be easily found), the best places to start your search are Amazon, Ebay, Etsy, and your local thrift stores -- you'd be surprised by how perfect some of the second-hand items are for cosplay, plus they can lower your budget considerably. Here are a few online stores that I've found to be perfect for finding great sewing materials, which will most likely take a large part in making your costume: - Fabric, craft foam, notions, etc: ~ Fabric.com ~ Jo-Ann ~ Hancock Fabrics - Sewing Patterns: ~ Simplicity ~ McCall ~ Butterick > > > > > > > > > > > > > > > > Step Four: Accessorize This is such a fun and integral part of creating costumes that sometimes can be overlooked. Here are the main accessories that you'll be needing to get to complete your costumed look: - Weapons. Does your character carry a weapon, and the place you're planning on wearing the costume at would accept you carrying that weapon? Definitely consider making or buying one to carry and pose with you while you cosplay -- it'll add a special touch to your costume. Amazon, BUDK and Medieval Collectibles are great places to start your search for these if you want to buy them. - Footwear. Never go with sneakers or flipflops just because they're easy -- they'll ruin everything of the costume that you worked so hard on! Thrift stores are a great place to find shoes that you'll only be wearing a few times, and you won't feel bad altering a pair that only cost you $5. A note about characters that go barefoot: You will probably want to create a pair of "invisible shoes" (tutorial by "...And Sewing is Half the Battle!"). - Wigs. Now, I have a more lenient opinion on wigs than other cosplayers, but that's just because wigs can so often make a costume look worse rather than better, unless you want to fork out the $30-$80 for a high quality, synthetic, lace-front wig. With that in mind, it might be better to completely forego buying a wig and just go with your natural hair, styled like the character's as best you can. But, if you do want to buy a wig, Arda Wigs has rave reviews, and eBay can have some pretty good finds. - Prosthetics. I've found that Aradani Costumes is the absolute best place for high-quality, inexpensive prosthetics, which can add a convincing touch to your cosplay and make people look twice. "Wait, did that girl have pointy ears??" ;) > > > > > > > > > > > > > Step Five: Create Your Costume Now that you've got all the necessary materials necessary to make your intended design, it's time to put your sewing and crafting skills to the test! Here's a few extremely helpful links to get you started in your crafting. - 12 Things You Need to Start Sewing (Fab Grandma) - Craft Foam Armor Tutorial (Penwiper Unlimited) - Foam Board Weapons Tutorial (Fire Lily Cosplay) Let me tell you something crucial for this step: Google is your friend. Don't know how to do something? GOOGLE IT. Chances are pretty good that someone else has made the same costume before you and wrote about their process of doing so. Reading about their build can be extremely helpful for your own, and they may have even made some how-tos for the creation of some of the more difficult parts of the costume. Plus, if you have a question about the costume, they might be able to answer it! Many cosplayers are very open to helping others with their costumes. You can also check out the RPF, which is a great place to find answers from experienced hobbyists. > > > > > > > > > > > > > > > > > Step Six: Have fun! You've sewn, crafted and bought everything for your costume, and now it's finally time to put it all together and show it off!! Enjoy literally stepping into your character's shoes for a day. :D And with that, you've completed your very first cosplay. Bravo, and congratulations!!! If you followed my little guide to make your first costume, post a link to it in the comments below so I can see your wonderful handiwork. :) P.S. Let me tell you: if you don't think your cosplay turned out perfectly, don't worry, because I promise that you will only get better from here on out. Also, never compare your cosplays to others -- only compare them to your previous work. That way, you will only see the improvement in costuming, and you'll only be inspired to keep getting better. ^_^

"Detroit: Become Human" Android LED Ring: Hi! I'm going to Anime Expo this weekend and I wanted to cosplay as an Android from my current favorite game, Detroit: Become Human. It's one of the simplest cosplays to make... or so I thought. You see, I tinker with stuff here and there, but when …

There are a lot of skills to learn in cosplay, and one that doesn’t get talked about as much is creating fake facial hair. Despite this, it’s an essential skill

As I make progress on the costumes that I am designing for Nate and myself for Halloween, I was puzzled over how to make a pair of Beast Mitts. I pooled over ideas of what would work, what would be comfortable for an evening of partying with our friends, what would look like a pair […]

Vishma Maharaj, conosciuta con il nome Whizical Mermaid, è un'artista multimediale Americana che crea arte assistita dall'Intelligenza Artificiale.

This is 9 yr. old David M. and he looks to me to be a GRINCH! Very cute/cool costume.. Gotta love that face. Ü My thanks to young David and...

Visit the post for more.

Ladies' eight-gored skirt with or without corselet, Ladies' Home Journal- 1908

Making Your Own Gambeson (Quilted Cloth Armor): I recently decided I needed to pad out (get it?) my historical armory, and the idea of making a gambeson came to mind. A brief bit of history: a gambeson is a padded defensive jacket, worn as armor or combined with chainmail or plate armor. They wer…

Explore Bryan Frank Photography's 5270 photos on Flickr!

Creative ideas in jewelry making, soft soldering, crafts and upcycled, innovative, repurposed art and home décor, and the upcycled garden.

Dit patroon biedt zes verschillende schouderpatronen. Ze zijn allemaal verschillend ontworpen, maar kunnen ook gemakkelijk worden aangepast aan uw behoeften. De hier aangeboden patronen zijn: -"De vechter" -"De Paladijn" -"De Ridder" -"De Barbaar" - "De geestelijke" -"De Krijger" - Plus drie verschillende nekbeschermeropties OVER HET PATROON: Deze patronen zijn ontworpen voor EVA-schuim. Ik gebruik graag 5 mm schuim bij het bouwen van bepantsering. Hoewel deze zijn gemaakt met schuim in gedachten, kun je ze aanpassen om met worbla of andere thermoplastische materialen te werken. Dit zijn PDF-patronen die u eenvoudig thuis kunt afdrukken. Er is geen fysiek item bij deze aanbieding! Als u koopt, krijgt u een bestand om te downloaden. Dit is ook slechts het basispatroon en bevat geen decoratieve patronen. ****Zodra je een van mijn patronen koopt, kunnen ze worden gedownload vanuit je Etsy-aankoopgeschiedenis! Ik raad aan om hier te downloaden en ik heb problemen gemeld in e-mails die Etsy heeft verzonden. Een fysiek item wordt niet verzonden omdat het een digitaal patroon is. LET OP: DIT IS GEEN FYSIEK ITEM MAAR EEN PATROON! IK DOE GEEN GEBOUWDE PANTSERCOMMISSIES! Mocht je toevallig iets maken met dit patroon, dan hoor ik het graag!

Here are instructions from Evil Mad Scientist about how to transform a basic black commuter Umbrella to Halloween DIY Costume.

Whether you’re cosplaying in public right outside of a convention or in your hometown, there are some common courtesy and safety rules that you’ll want to follow. Overall, cosplay is

by guest contributor Grace, Ginger Armadillo Costumes' resident metalworker and props-lady My biggest project for Geek Girl Con this year was creating Sabriel's iconic bells, the magical tools she uses to battle necromancers and lay the dead to rest. Since the bells are such an integral part of her character, I knew I wanted them to be both aesthetically pleasing and sturdy enough to endure lots of handling. (And unlike her sword, this was a project where I could use actual metal!) The first step was acquiring the bells. I purchased the majority of them on Etsy from someone's collection of vintage bells. Not appearing in the final cosplay, that terrifying clown handle in the middle of the row. I ended up choosing five of them for the mid-size bells, and had to purchase an additional larger bell from Amazon. The smallest bell I made from the end of a candle-snuffer. The bells were vintage, so they had quite a lot of tarnish and patina on them. I detached them all from the handles and clappers and went to work. I did lots and lots of scrubbing... and more scrubbing... Yucky metal water is yucky. ...until I finally had some nice clean bells! Shiny! Only one of my bells came with a wooden handle, so it was off to the thrift store to find something suitable to make handles for the rest of them. I was hoping for wood-handled silverware or maybe pegs of some kinds, but instead I found this: For gnomes, presumably. I quite unceremoniously tore apart the tiny chair for its various parts, resulting in a pretty good basis for some handles. I sawed the chair pegs into graduated sizes, and got some brass finials that I would later affix to them. (The smallest two finials are actually alarm clock feet from the Alethiometer I was making for my Lyra costume.) Sabriel's bells are explicitly stated as being silver; a necromancer's bells might be other colors, but not the Abhorsen's! This meant I had to find some way of changing the color. If you are looking to budget your money/time/effort/sanity, at this point I would recommend finding the best silver paint you can and proceed with that. If you're looking to lose money/time/effort/sanity but gain an interesting new skill, you can do what I did, and electro-plate them with nickel. I love metalworking and feel that there's a luminous, bright quality to true metal that paint can't quite capture, so going the extra mile on the bells was very important to me. That being said, this is NOT a tutorial on safe and successful electro-plating! I recommend doing your own research and making sure that you are taking appropriate safety precautions, as the process involves live wires and a poisonous chemical, nickel acetate. (I used this tutorial: http://www.instructables.com/id/High-Quality-and-safe-Nickel-Plating/ ) Pictured: not the ideal way to do this. To start plating, you have to make a solution of nickel acetate by running a current through two pieces of nickel in vinegar (I used pure nickel wire, but a solid piece of nickel would be better, since the wire degraded quickly.) I started using 9V lantern batteries, but this takes forever. I soon graduated to making my own power source out of an old phone charger, a fuse box, and some alligator clips, which was much more successful. Once the solution is saturated with nickel, it's time to plate! Ideally, you connect your bell to the negative wire and the nickel source to the positive wire and dunk them both in the solution to complete the circuit. This draws the nickel onto the surface of the bell. Of course, things were not ideal, so this whole process took me about three weeks to get right. First the solution was too weak, then the bells weren't clean enough, then the current was wrong, then I had to agitate the whole mixture... It was definitely a learning experience. But finally, after a lot of trial and error (mostly error)... Worth the work. With the bells complete at last, I went back to working on the handles. I filled the holes with wood filler, sanded it down, and drilled holes in both ends: one for the screw to hold the bells together, and one for the grub screws that the finials would be attached to. For a functional prop like this, which might see wear-and-tear, I had a strict no-glue policy. Lastly, I painted the handles with acrylic paint, sealed them with Renaissance Wax, attached the finials, and re-attached the bells and clappers. (I didn't plate the top part of Astarael, the largest bell, and left it brass so that size difference wasn't so dramatic.) The finished bells. The next step (and by far the most frustrating one) was building a bandolier to house them. This was a last-minute, night-before-the-con project, and I was very worried that all the work I had put into the bells would be wasted because I couldn't get the holder right. Although Sabriel's bandolier is describe as having full pouches, I really wanted the bells to show. The difficulty was building a system that both displayed and supported the bells, while still allowing the user to easily remove and replace them. I decided on a series of loops for the handles, and a lid and strap to hold the bell in place. (The lids have a lip on the inside that keeps the bells from moving too much.) Two belts from Goodwill, a bag of leather scraps, and a lot of grueling leather-sewing later, I had a complete bandolier! Making these bells was an amazing, informative, difficult, and altogether wonderful experience, truly a labor of love. By the end, it was as if each bell had developed it's own personality and quirks, often quite similar to those described in the book. (That means you, Kibeth. I guess "a difficult and contrary bell" means one that won't plate or hang straight or do anything I want.) Best of luck with all your cosplay endeavors, and thanks for reading!

Kudos to the kids that dressed up as Michelle and Barack Obama.

⭐ My Stars ⭐ Last week was incredibly busy, but I’m excited to share with you all my new line of star themed gear, including my new Large Adventure Packs! Now in the shop while supplies last. ^^…

Halloween, as we know it, would be nothing without the costumes. However, coming up with an original look year after year (especially if you're a dinosaur like me and were born in the last millennia) is not that easy.

If you are looking for funny Halloween costumes and fun pun costume ideas to wear this year, check out our picks!
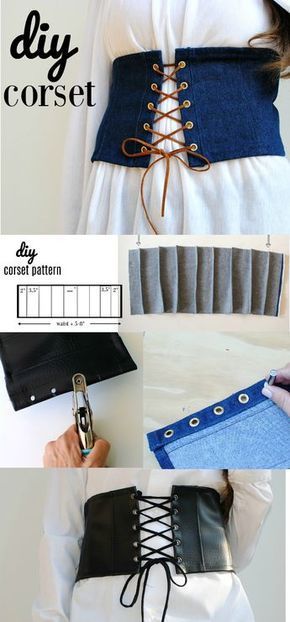
The corset trend is one of my favorites right now because of its historic background which dates back to the 1500's. Originally designed to slim the waist and exaggerate the bust and hips. The construction of a traditional corset is a time consuming process done by a skilled tailor called a corsetmaker. This involves accurate measuring and materials like leather, metal, wood, and plastic for the boning inserted into the cloth of the corset. Now most of us aren't skilled corsetiers and nor do we plan to be. I just like the look of a corset as a fashion-forward piece to add to my wardrobe. It's a great addition to a baggy top and even for cosplay costumes (Halloween's coming). Dritz products make it easy to create your own custom corset using their 2-Part Eyelet Tools and Eyelets. You can even try their Eyelet Pliers which I used for the vinyl corset. Get the details below and make your own corset. Supplies: Dritz 2-Part Eyelet Tools Dritz 2-Part Eyelets (I used the gold but they have silver and gunmetal too). 1/2 yard of fabric (I used a TÉLIO Denim and vinyl) Brother Sewing Machine XR3774 tailors chalk hammer embroidery scissors ruler thread DIY Instructions: You will need a strip of fabric that measures your waist + 5-8 extra inches. The width depends on how wide you want your corset to be. Mine was 6.5" when finished + 1.5" seam allowance (8" total width). The pattern above shows sections of 2" on each side and then 3.5" sections in between. The _" is the middle of the corset which will be the center back. This will be whatever measurement you get at the end. We're basically making an accordion with fabric by folding pleats and sewing them. Begin by marking a line down the 1/2 way point of the fabric. Then mark 2" lines out from the sides. Be sure to mark on the wrong side of the fabric using tailors chalk or a fabric marking tool. Now mark 3.5" from that point till you get to the center. Repeat the same for the other side going to the center. Any remaining space you have left should be in the center. This measurement will most likely not be 3.5". It should look like this when done. You should now have 2 center lines. Fold either one so the marked line is the folded edge and right sides are together. Pin or press flat and sew a 1/4" seam. Sewing a 1/4" seam from top to bottom. It should look like this. Now repeat for the other center line (the mark in between mine is the half way point). The 2 center pleats are wear the arrow is. Now for the additional pleats we will be sewing a curve instead of a straight line. Fold again with the marked line as the folded edge but pin the half way point. When you sew, do start with a 1/4" seam allowance and gradually sew out to about 1/2" by the middle point. Then gradually back to finish with a 1/4"...see below for the photo and you'll get what I mean. Repeat this for the rest of the sections until you reach the last lines marked on each side. For the last lines you will just do a 1/4" straight seam like we did the center (where the arrows are). Press everything nice and flat. The center folds should be going the opposite directions of each other. Press the remaining pleats so they align with the coordinating center direction. Now top stitch the folds/pleats down into place. You can use a different colored thread to get a nice detailed top stitch or use the same like I did. These folds will act as our "boning" for the corset rather than inserting metal or plastic into each section. It's a much easier process... It should look like this on the wrong side. Hem the top and bottom edges. I folded a 1/4" over and then another 1/2" over, pressed, and hemmed into place. For the sides fold over 1" and sew into place. I did sew the raw edge into the seam. It should now look like this. Mark evenly where you want your eyelets to be with a dot of tailors chalk. Mine were spread about 1/2" apart. Use Dritz's 2-Part Eyelet Tools and eyelets to create the lace up front. Applying the grommets and eyelets: Full video tutorial here Mark position of grommet by tracing around inside opening of grommet. Cut hole with scissors. Note: For fabrics with stretch, cut hole smaller than inside opening of grommet. Insert grommet (deep half) into hole from right to wrong side of fabric. Place anvil on a hard surface. Position grommet on anvil. Place insert over center of grommet. Place washer, dome side up, over insert. Insert setter into grommet; hammer using 2 or 3 forceful taps. Center of grommet will roll over to secure grommet and provide a smooth finish. For the vinyl corset everything was done the same but for the holes I used the Eyelet Pliers instead of cutting them myself. This is a great tool for leather, suede, and vinyl materials. You can even apply the eyelets with these. Finish by lacing up with string or cording through the eyelets. Make sure it's long enough to lace through and tie into a bow at the end. Mine measured a full yard. I love pairing these with an oversized t-shirt or men's shirt. They also look great styled with a loose peasant top. It helps accentuate the waist and adds some edge to my look. Great for cosplay costumes as well (Halloween inspo). *In collaboration with Dritz. I received compensation from Dritz®, and some of the materials featured here or used in this project were provided free of charge by Dritz®. All opinions are my own. SaveSave

Here is a step-by-step tutorial on DIY harem pants with slits on side. These are so cute on their own, or layer them with overskirts, hip scarves or circle skirts. :)

It's that time of year again, folks… Comic-Con!The world's biggest geek-culture festival may have started as a comics convention, but today, it's famous for its celebrity appearances, exclusives previews, and its amazing fan costumes and cosplay.Attendees try to out-do each other each year with ever more elaborate, outlandish, funny and strange costumes, and all the rest of us can do is stand back in appreciation, awe, and confusion.Let's see the best that Comic-Con had to offer.

I am short. Really short, only 5ft tall. Most of the time, I don’t care (very much), but sometimes I look like a little kid trying to play dress-up whenever

A daily dose of interesting and funny pictures. A daily dose of interesting and funny pictures.

I have just finished my week long embroidery spree as I create a jacket and gilet for my up comming Der Schauspieldirektor photo shoot. You can read about the play in one of my previous posts, or f…

Explore VitalTemptation , Etsy's 648 photos on Flickr!

Ein Blog über Handwerkskunst und Naturmode hergestellt in kleinen Ateliers in Deutschland und Europa

Triangular Shawl Knitting Pattern - Make a knitted shawl with worsted weight yarn that can be worn as a Sontag shawl.

It's time to head to the beach in style, so grab your sunscreen and don't forget your cover-up! The Callisia Cover-up free sewing pattern is so versatile, there are endless ways to wear it. Full-length, with double puff bishop sleeves, it can drape beautifully over any swimsuit or a pair of jeans. This beautiful semi-sheer cotton will keep you cute and cool as you sit by the pool! Looking for fabric options with drape? While I used Mood's exclusive Ishvara's Wisdom floral cotton voile for my cover-up, try using silk chiffon or poly charmeuse for a version that will truly flow. How do you plan to style your Callisia Cover-up? Let us know!

Myths and fantastic creatures were often used to explain the unexplainable. While modern science has unraveled many of the mysteries that once puzzled our ancestors, it’s fun to step back in time to an era where mythical beasts roamed in the dark shadows, and mystical magic could be summoned for good and evil, especially around […]

Explore solarka's 114 photos on Flickr!

2012 0428 Procession of the Species

This week in the CRAFT Flickr pool we saw: Self-Absorbed by Peggy Dembicer, Paper Moon papertoy/poster by Custom Paper Toys, and Retiradao da net by XODÓ

¨¨¨°º©©º°¨¨¨¨¨¨°º©©º°¨¨¨¨¨¨°º©©º°¨¨¨¨¨¨°º©©º°¨¨¨¨¨¨°º©©º°¨¨¨¨¨¨°º©©º°¨¨¨¨¨¨°º©©º°¨¨¨ This listing is for a CROCHET PATTERN ONLY and not the finished item. ¨¨¨°º©©º°¨¨¨¨¨¨°º©©º°¨¨¨¨¨¨°º©©º°¨¨¨¨¨¨°º©©º°¨¨¨¨¨¨°º©©º°¨¨¨¨¨¨°º©©º°¨¨¨¨¨¨°º©©º°¨¨¨ We have YARN KITS available at www.bonitapatterns.com Love more than one pattern? We have a discount deal for you! Use one of the coupon codes below at checkout. Add the number of patterns you wish, add coupon code at checkout. Click apply. Any 2 patterns use code: 2SAVE Any 3 patterns use code: 3SAVE Any 4 patterns use code: 4SAVE Any 5 patterns use code: 5SAVE Any 8 patterns use code: 8SAVE Any 10 patterns use code: 10SAVE When I launched the Embossed Phoenix Cardigan, the feedback was so amazing, that I started working on this second design almost immediately. Most of all, this new technique to incorporate the feather motif was screaming for a shawl. I chose a vortex shape not only for its wing-like shape, but because it’s a fun shape to create with simple increases and decreases. This is a generous sized shawl 43.” (110 cm) wide by 42” (160 cm) long. Let’s crochet together! The pattern includes a PHOTO TUTORIAL with many pictures showing the pattern in more details. You will receive an email confirmation after the payment has been processed with a link to download the files you purchased from your Purchases or Receipt page. If you don't receive your email within 24 hours, please, contact me. Make sure to check your Spam folder first. Pattern is written in US crochet terms. SAVE by purchasing pattern BUNDLES! Buy ANY 2 patterns here: https://www.etsy.com/listing/63298659/crochet-pattern-any-combination-of-2?ref=shop_home_active_3 Buy ANY 3 patterns here: https://www.etsy.com/listing/151687909/crochet-pattern-any-combination-of-3?ref=shop_home_active_8 Buy ANY 4 patterns here: https://www.etsy.com/listing/200924617/crochet-pattern-any-combination-of-4?ref=shop_home_active_6 Buy ANY 5 patterns here: https://www.etsy.com/listing/79653703/crochet-pattern-any-combination-of-5?ref=shop_home_active_10 Buy ANY 10 patterns here: https://www.etsy.com/listing/67724123/crochet-pattern-any-combination-of-10?ref=shop_home_active_9 ¨¨¨°º©©º°¨¨¨¨¨¨°º©©º°¨¨¨¨¨¨°º©©º°¨¨¨¨¨¨°º©©º°¨¨¨¨¨¨°º©©º°¨¨¨¨¨¨°º©©º°¨¨¨¨¨¨°º©©º°¨¨¨ This pattern gives you PERMISSION TO SELL your finished items. It is appreciated if you credit the design to Bonita Patterns and list the shop link: bonitapatterns.etsy.com ¨¨¨°º©©º°¨¨¨¨¨¨°º©©º°¨¨¨¨¨¨°º©©º°¨¨¨¨¨¨°º©©º°¨¨¨¨¨¨°º©©º°¨¨¨¨¨¨°º©©º°¨¨¨¨¨¨°º©©º°¨¨¨ Text and images Copyright ©2012 by Bonita Patterns & Lianka Azulay, all rights reserved. No pattern may be reproduced or distributed — mechanically, electronically, or by any other means, including photocopying, without written permission. Finished products created with this pattern may be used for commercial sale.

There are no black cats on this inspiring list!

In the annals of pop culture couture, the extraordinary scarf worn by the Fourth Doctor on Doctor Who stands out as a triumph of both whimsicality and comfy-ness. Luckily for us non-Gallifreyans, the BBC was kind enough to release a pattern, so you can knit your own! A cosplayer named 93Fangshadow received the instructions from their […]

Knit Crochet Shawl Pattern: Crochet shawl, knit shawl for cool evening and coming fall.

For every Whovian in your life.
