
Bonnets & chapeaux aux points fantaisies , accompagnés de leurs grilles gratuites trouvés sur la page facebook de " Imelda Castillo " et présentés sur mon facebook " Le Crochet de Anne " . Douceur pour ce bonnet blanc et rose , orné d'une fleur Chapeau...

Superbes chapeaux pour femmes , aux jolis points ajourés , trouvés sur le site de " Liveinternet.ru/Marisha54 " , avec ses grilles gratuites ! Clic sur l'image pour l'agrandir Fans de crochet d'Art , je vous propose des modèles et grilles gratuites...

Bonnet au tricotbonjour,pour les froids qui sont là, un bonnet qui se réalise à 2 aiguilles, et en fait vous en aurez deux, en effet il me manquait quelque

Fans de crochet d'Art , je vous propose des modèles et grilles gratuites trouvés sur le net et que j'ai plaisir à partager . Bonne visite et excellent crochet à toutes !

Adorables bérets , aux jolis points fantaisies , trouvés sur le site de " Clubmasteric " , avec leurs grilles gratuites !

Des modèle du n° 12 de l'encyclopédie des doigts d'or de 1976 : des chapeaux printaniers réalisés en mailles serrées au crochet n° 3. Fournitures : 3 pelotes Coton Relais n° 5/317 de Phildar ou 150 g en tout à répartir dans le nombre de coloris choisis ; crochet n° 3. Point employé : maille serrée (ms) : piquer le crochet dans la maille correspondante du tour précédent, 1 jeté et le tirer en boucle au travers de la maille, 1 jeté pour couler les 2 boucles. Chaque tour se commence par une maille en l'air et se termine par une maille coulée faite dans la maille en l'air du début après avoir passé la maille coulée du rang précédent ; maille en l'air (ml) ; maille coulée (mc). Échantillon : 23 mailles = 10 cm = 24 rangs. Réalisation : Faire une chaînette de 4 m en l'air et fermer en rond par 1 mc faite dans la 1ère ml. Travailler en rond : commencer par 1 ml puis, en piquant le crochet dans le rond obtenu, faire 5 ms et fermer. 2ème tour : faire 2 ms dans chacune des 5 m du tour précédent = 10 m, fermer. 3ème tour : faire 2 ms dans toutes les m = 20 m, fermer. 4ème tour : faire 2 ms dans chaque m impaire et 1 ms dans chaque m paire = 10 augmentations (30 m obtenues), fermer. 5ème tour : faire 10 augmentations régulièrement réparties = 40 m, fermer. du 6ème tour au 20ème tour : faire 5 augmentations régulièrement réparties à tous les tours, en les plaçant en quinconce pour éviter d'obtenir un pentagone. 21ème et 22ème tour : sans augmentations. 23ème tour : faire 5 augmentations régulièrement réparties = 120 m. Continuer en travaillant 2 tours sans augmentations et au 26èm tour faire 5 augmentations régulièrement réparties ; ceci encore 1 fois pour avoir 130 m à la fin du 29ème tour. Continuer droit. Pour le bord, au 41ème tour, faire 10 augmentations régulièrement réparties puis continuer à augmenter tous les 2 tours 8 m régulièrement réparties, ceci 5 fois (fin du 51ème tour). 4 tours droit et arrêter. Modèle 1 : tout rayé, dans les coloris : écru 32, paille 75, turquoise 91 et cosmos 26. Chaque rayure est de 4 tours. Modèle 2 : calotte et bord unis en coloris chanvre 22 ; le bas de la calotte est rayé sur 12 rangs, chaque rayure est de 4 tours dans les coloris turquoise 91, rose 84 et cosmos 26. Modèle 3 : uni en coloris poterie 81, avec 2 rayures de chacune 4 tours, en bordure, dans les coloris nègre 64, chanvre 22 et savane 86.

Un modèle publié dans Mon tricot M 147 de 1977 : un bonnet de meunier tricoté en rond, aux aiguilles n° 3 et 5, en côtes 2/2 et jersey. Fournitures : 350 g de fil Dim-dam moyen acrylique et laine 4 fils, soit 150 g rouge, 50 g violet, 50 g rose indien, 50 g vert, 50 g bleu ; un jeu de 5 aiguilles n° 3 1/2 ; un jeu de 5 aiguilles n° 5. Points employés : jersey en tournant : toujours à l'endroit ; côtes 2/2 en tournant : * 2 m endroit, 2 m envers *. Échantillon : un carré de 10 cm en jersey avec les aiguilles n° 5 = 21 mailles et 27 rangs. Réalisation : monter 112 m avec le fil rouge et les aiguilles n° 3 1/2, tricoter en tournant en côtes 2/2 ainsi : 6 tours rouges, 2 tours violets, 5 tours rouges, 2 tours roses, 5 tours rouges, 2 tours vers, 5 tours rouges, 2 tours bleus, 5 tours rouges. Continuer en jersey ainsi : 1 tour rouge en y répartissant 14 diminutions. Il reste 98 mailles. Prendre les aiguilles n° 5 et travailler ainsi : * 4 tours violets, 4 tours rouges, 2 tours roses, 4 tours rouges, 4 tours verts, 4 tours rouges, 2 tours bleus, 4 tours rouges, 4 tours roses, 4 tours rouges, 2 tours violets, 4 tours rouges, 4 tours bleus, 4 tours rouges, 2 tours roses, 4 tours rouges, 4 tours violets, 4 tours rouges, 2 tours verts, 4 tours rouges, 4 tours roses, 4 tours rouges, 2 tours bleus, 4 tours rouges, 4 tours verts, 4 tours rouges, 2 tours violets, 4 tours rouges, 4 tours bleus, 4 tours rouges, 2 tours verts, 4 tours rouges *. Répéter de * à * en répartissant 12 diminutions à la 3è rayure rouge, 10 diminutions à la 7è rayure rouge, 9 diminutions à la 10è rayure rouge. Il reste 67 mailles. A 115 cm du début (40è rayure rouge), répartir 9 diminutions. Répéter ces diminutions à la 41è rayure rouge. Il reste 49 mailles. Au dernier tour de cette rayure, tricoter les mailles ensemble 2 par 2 puis passer le fil dans les 25 m restantes et serrer. Faire un pompon en enroulant autour d'un carton de 7 cm de large, quelques centimètres de chaque coloris. Fixer le pompon au bout de l'écharpe.

Partage de modèles gratuits , trouvés sur le net . Tout l'univers de bébé autour des layettes , des bonnets , des chaussons , des robes , des modèles pour filles .... Bon crochet et excellente journée à toutes !

Un bonnet en crochet complétera votre tenue d'hiver de façon adorable et vous trouverez aussi des modèles pour l'été aui ajouteront du chic à votre look.

Bonnets et chapeaux , ornés d'une fleur , accompagnés de leurs grilles gratuites trouvés sur la page facebook de " Free Cool Knitting/Crochet " Japanes Patterns " et présentés sur mon facebook " Le Crochet de Anne " . Bonnet aux rayures pastels , orné...

Superbes chapeaux aux jolis bordures fleuries , trouvés sur le site de " Liveinternet.ru/Tanza " , avec ses grilles gratuites ! Clic sur les images pour agrandir les grilles ! Clic sur les images pour agrandir la grille ! Clic sur l'image pour agrandir...

Fans de crochet d'Art , je vous propose des modèles et grilles gratuites trouvés sur le net et que j'ai plaisir à partager . Bonne visite et excellent crochet à toutes !

Floral Mesh Bonnet I can proudly state that this is my first-ever matching product; in fact, it goes with last week's design, the Floral Mesh Scarf. And while I haven't ever used the same stitch pattern week-to-week before, I just couldn't resist with this one since, as soon as I saw the scarf completed, I knew it had to have a bonnet. I also sized it for children through adults for a super-fun, multi-seasonal look that will fit most everyone in your family. Why? Well, 'cause they're all going to want one! Sizes: Child's Small (Child's Large; Teen/Adult Small; Adult Large) (as far as the child's small and the child's large are concerned - think maybe 2 - 5 years for the small, 6 - 12 or so for the large) Yarn: Schoeller + Stahl Pantino (60% Cotton, 40% Acrylic; 98 yards [90 meters]/50 grams); #0007 Egg Yolk (that color name is still made up) - 2 skeins A close-up of the pattern. I left in the creepy eyes because I could. Needles: Straight needles in size US 5, 16" circular needle in size US 5, and one set of dpns, also in size 5 Notions: Tapestry needle, two stitch markers Gauge: 17 stitches = 4 inches So let's make a hat, shall we? First, then, we'll start with the brim of this bonnet, which is knit back and forth. So, using your straight needles, cast on 84 (98; 112; 126) stitches loosely. Then we'll knit a few edging rows, as follows. Notice you'll be placing two stitch markers on your third edging row. Edging Row 1 (right side): purl Edging Row 2: knit Edging Row 3: p8 (p11; p14; p17), place marker, p69 (p77; p85; p93), place marker, purl until end of row And once these three edging rows are done, it's time to work in our Floral Mesh pattern, which is from 218 of Barbara G. Walker's A Fourth Treasury of Knitting Patterns, as well as some decreases. I have written two sets of instructions for this pattern - Set 1 has decreases every other right side row, Set 2 has decreases every right side row. Which sets you'll be knitting and how many depend on the size of the hat you're making. See below for details. Child's Small - Knit rows 1 - 12 of Set 1 twice Child's Large - Knit rows 1 - 12 of Set 1 once, then knit rows 1 - 12 of Set 2 once Adult's Small - Knit rows 1 - 12 of Set 1 twice, then knit rows 1 - 12 of Set 2 once Adult's Large - Knit rows 1- 12 of Set 1 once, then knit rows 1 - 12 of Set 2 twice Set 1: Set 1 Row 1 and all wrong side rows: purl, slipping extra markers when you reach them Set 1 Row 2: ssk, knit until you reach first marker, slip marker, k2, * k2, yo, ssk, k1, k2tog, yo, k1; rep from * until you have three stitches left before marker, k3, slip marker, knit until you have 2 stitches left in row, k2tog (-2 stitches) Set 1 Row 4: knit until you reach first marker, slip marker, k2, * yo, slip 2 together knitwise-k1-p2sso (sl2-k1-p2sso), yo, k3, yo, k2tog; rep from * until you have three stitches left before marker, yo, ssk, k1, slip marker, knit until end of row Set 1 Row 6: ssk, knit until you reach first marker, slip marker, k1, yo, * sl2-k1-p2sso, yo, k2tog, yo, k1, yo, ssk, yo; rep from * until you have 4 stitches left before marker, sl2-k1-p2sso, yo, k1, slip marker, knit until you have two stitches left in row, k2tog (-2 stitches) Set 1 Row 8: knit until you reach first marker, slip marker, k2, * k1, k2tog, yo, k3, yo, ssk; rep from * until you have 3 stitches left before marker, k3, slip marker, knit until end of row Set 1 Row 10: ssk, knit until you reach first marker, slip marker, k2, * k2, yo, k2tog, yo, sl2-k1-p2sso, yo, k1; rep from * until you have 3 stitches left before marker, k3, slip marker, knit until you have 2 stitches left in row, k2tog (-2 stitches) Set 1 Row 12: knit until you reach first marker, slip marker, k2tog, yo, * k1, yo, ssk, yo, sl2-k1-p2sso, yo, k2tog, yo; rep from * until you have 3 stitches left before marker, k1, yo, ssk, slip marker, knit until end of row Set 2: Set 2 Row 1 and all wrong side rows: purl, slipping extra markers when you reach them Set 2 Row 2: ssk, knit until you reach first marker, slip marker, k2, * k2, yo, ssk, k1, k2tog, yo, k1; rep from * until you have three stitches left before marker, k3, slip marker, knit until you have 2 stitches left in row, k2tog (-2 stitches) Set 2 Row 4: ssk, knit until you reach first marker, slip marker, k2, * yo, slip 2 together knitwise-k1-p2sso (sl2-k1-p2sso), yo, k3, yo, k2tog; rep from * until you have three stitches left before marker, yo, ssk, k1, slip marker, knit until you have 2 stitches left in row, k2tog (-2 stitches) Set 2 Row 6: ssk, knit until you reach first marker, slip marker, k1, yo, * sl2-k1-p2sso, yo, k2tog, yo, k1, yo, ssk, yo; rep from * until you have 4 stitches left before marker, sl2-k1-p2sso, yo, k1, slip marker, knit until you have two stitches left in row, k2tog (-2 stitches) Set 2 Row 8: ssk, knit until you reach first marker, slip marker, k2, * k1, k2tog, yo, k3, yo, ssk; rep from * until you have 3 stitches left before marker, k3, slip marker, knit until you have 2 stitches left in row, k2tog (-2 stitches) Set 2 Row 10: ssk, knit until you reach first marker, slip marker, k2, * k2, yo, k2tog, yo, sl2-k1-p2sso, yo, k1; rep from * until you have 3 stitches left before marker, k3, slip marker, knit until you have 2 stitches left in row, k2tog (-2 stitches) Set 2 Row 12: ssk, knit until you reach first marker, slip marker, k2tog, yo, * k1, yo, ssk, yo, sl2-k1-p2sso, yo, k2tog, yo; rep from * until you have 3 stitches left before marker, k1, yo, ssk, slip marker, knit until you have 2 stitches left in row, k2tog (-2 stitches) Knit the given row combination for your size. At this point, you should have two stitches before your first marker and one after your second. It's also time to join this bad boy in the round. So, transfer work to your 16" circular needle, removing your markers when you do so (to be fair, I've been using my circulars the whole time, but if you are using straight needles than it's time to switch). Place marker, and join in round. Knit for 2" (2.25"; 2"; 2.25") in stockinette. Now we're ready to begin our decreases. Again, these differ slightly for the sizes, but only because you'll be beginning on a different row for each size. See below. Child's Small - begin on decrease row 7 Child's Large - begin on decrease row 5 Adult Small - begin on decrease row 3 Adult Large - begin on decrease row 1 And the decrease rows themselves: Decrease Row 1: * k10, k2tog * (88 stitches) Decrease Rows 2, 4, 6, 8, 10, 12, 14, 16, 18, & 20: knit Decrease Row 3: * k9, k2tog * (80 stitches) Decrease Row 5: * k8, k2tog * (72 stitches) Decrease Row 7: * k7, k2tog * (64 stitches) You may want to switch to your dpns about now... Decrease Row 9: * k6, k2tog * (56 stitches) Decrease Row 11: * k5, k2tog * (48 stitches) Decrease Row 13: * k4, k2tog * (40 stitches) Decrease Row 15: * k3, k2tog * (32 stitches) Decrease Row 17: * k2, k2tog * (24 stitches) Decrease Row 19: * k1, k2tog * (16 stitches) Decrease Row 21: * k2tog * (8 stitches) Knit your given start row through decrease row 21, clip yarn tail, and thread through final 8 stitches. Pull tight, thread to inside of hat, and knot. Using your dpns, pick up 5 stitches along one of the bottom corners of hat, and work an i-cord until it measures 8" (9"; 10"; 11"). Bind off and repeat on other corner. Tuck in ends and block.

23 modelos de chapéu de crochê para você escolher um ou vários ^.~. Gráficos de lindos modelos para fazer o seu. Confira!

Bobbin Lace Bonnet and Irish Crochet Gloves like the ones my maternal great-grandaunt Graziela Lea Schnirer used to wear back in the 1920’s. I love experimenting and exploring new grounds and…

.......................................1ère partie!!!! la galette: Bien suivre le schéma des augmentations, tout en brides sauf les 2 premiers rangs en mailles serrées je vous rappelle que la croix dans un V est une augmentation Attention: les tours...

Joli chapeau en laine tissé et crocheté à porter sans modération, crée par mes soins je tricote ou crochète mes chapeaux, bonnets ou bérets en laine filée main ou pas . j'y insère selon mes envies, rubans, dentelles, perles cet accessoire est une création unique. taille 56/57/58/59

un chapeau enfant pour l'été : parfait pour nos petites têtes, à décorer comme vous voulez, je vous propose toutes les explications

Avec son design original tout en spirales, je suis heureuse de vous présenter mon nouveau – Bonnet Twister au Tricot – qui est un patron gratuit ici sur...

Bonnet pour celles qui ne savent pas ... tricoter à 4 aiguilles, ce n'est pas toujours facile, alors je vous propose ce bonnet tout simple à faire

Un snood et son bonnet au point reliefbonjoursi vous aimez les dessins qui sortent de l'ordinaire vous allez être ravie avec celui-ciil me fait

un chapeau enfant pour l'été : parfait pour nos petites têtes, à décorer comme vous voulez, je vous propose toutes les explications


Bring out your inner Parisienne in this charming set featuring a beret, triangle kerchief, and fingerless wristlet gloves. Made in a weightless, airy mohair blend, these accessories feel light as air, soft, and feminine all at once.

Cooler temperatures abound, and now is the perfect time to start thinking about keeping your ears warm. An adorable crochet hat keeps your body heat where it belongs (in your body) and lets you express your ...

Parce qu’il n’est jamais trop tôt pour préparer l’été, j‘ai envie de vous proposer aujourd’hui de confectionner ce chapeau-cloche, dont la base pourra vous servir pour réaliser d’autres types de chapeaux, comme la capeline ou le chapeau-melon.

Richiesti da Egidia, ecco alcuni schemi di cappellini e baschi all'uncinetto...

Why head out and buy a panama hat for the little lady in your life when you can whip up this amazing hat at home for next to nothing? There’s nothing

Joli chapeau en laine tissé et crocheté à porter sans modération, crée par mes soins je tricote ou crochète mes chapeaux, bonnets ou bérets en laine filée main ou pas . j'y insère selon mes envies, rubans, dentelles, perles cet accessoire est une création unique. taille 55/56/57

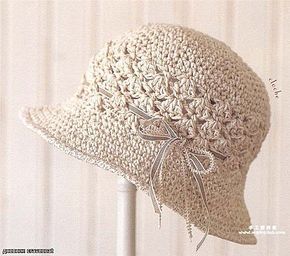
On aime ce chapeau frais et léger idéal pour les vacances. Il est réalisé au crochet avec un fil raphia. Le matériel : Fil à tricoter qualité Raphia, coloris “Wood Pulpe” coloris 53 : 1 pelote, Katia . Crochet n° 4 Points employés : Maille chaînette,...

Ma passion du crochet pas à pas projet en commun de crochet

chapeu de croche para menina

Crochet un très beau chapeau : je vous propose ce chapeau et mes réflexions pour le faire, vous trouverez toutes les explications
