

These home library examples can guide individuals in selecting design elements that resonate with their personal style.

UNIQUE DESIGN & DECOR: Another way to store and display your favorite books. Stacking books on the sturdy metal shelf, the shelf will become hidden behind the books which looks like books are floating on your wall. SPACE-SAVING: Our floating shelves allows you to utilize empty wall space. One shelf can hold many books. Perfect for small spaces that are not quite large enough for a traditional bookcase. DURABLE: Made of strong steel with stainless steel coating, each bookshelf can support up to 15 lbs of books; Size: 6.42" x 4.59" x 4.92" MULTI-USE: This not only for books, but also can stack other things like toys, art works, pot plant, DVDs and etc. which make your room neat and distinctive. QUICK TO INSTALL: All necessary hardware are available in the package, you just need to mount the bookshelf on the wall.

These home library examples can guide individuals in selecting design elements that resonate with their personal style.

5+ months in the making, but I did it! I finally finished this blog post! I’m not going to tell you how much I wanted an office that put off European-esque vibes. I am also not going to give you a lengthy story as to why I decided to tackle this project. Instead, let’s just jump into the tutorial. Because let’s be honest. That’s what you are here for. 😉 But first, before pictures. This is what the office looked like in the listing. This is what the office looked like after we moved in. And this is what the office looked like after a fresh coat of paint. From the first time we looked at the house, I had a vision of what this space would be. Given the fact that I was several months pregnant when we moved in, I knew my vision would have to wait so I settled for a fresh coat of paint until I could bring my complete vision to life. To not lose any of the details I sketched out my vision. I highly recommend doing this. By the time I actually started this project, I had sketched this space out at least 6 times. Looking back, I am glad I had all that extra time to perfect this space because it came out better than I ever had anticipated. My final sketch is shown below. Also, the misshaped books on the sketch is the handy work of our 6 year old. I think he did a great job! Now let’s get into the cost breakdown and supply list. Cost breakdownIKEA Billy Bookcases (4) – $196Wood – $269Paint + primer – $95Paint supplies – $37Appliqués – $26Knobs (pack of 8) – $11Inset hinges – $48Total cost: $682 Materials4 – billy bookcases from IkeaPaint & paint suppliesPrimerPaint of choice (I used Lemon Leaves by Magnolia Home)Angled paint brush4” foam rollers (specifically for cabinets and doors)Blue painters tapeTarpPaint stir sticks If you have a paint sprayer, I recommend using that in place of paint brushes and rollers. However, I didn’t have one at the time (I do now) so I tackled it the old fashioned way. AppliquésRose appliqués above archesRose appliqués on center frame pieces Wood4 – 2 x 4 x 12’3 – 1 x 3 x 8’1 – 1 x 10 x 8’ 2 – 1 x 2 x 8’1 – 1 x 4 x 8’ birch plywood sheet For all frame and visible wood pieces (with the exception of the arches) I used poplar wood. Note, I am not going to give you exact measurements since your space will be different than mine. But I did provide the wood dimensions I purchased/used before cutting them to size. ToolsTape measurePencilLevelSafety gogglesN95 maskImpact driverPhillips drill bitCircular sawJigsawMiter sawOrbital sander80 grit sandpaper (optional)120 grit sandpaper220 grit sandpaper220 grit handheld sand blockLint free clothBrad nailer2” finishing nails1” finishing nailsWood glueWood fillerPutty knifeCaulk gunCaulk Step 1: Remove the baseboards and trim then measure your space. Step 2: Build the base for the bookshelves. I used 2 – 2 x 4 x 12’ for the outside base and 12 – 2 x 4 x 8” planks for the crossbars. I secured the base using 3” exterior deck screws. I also secured the base to the back wall using the same 3” deck screws. I personally like using deck screws as they are easy to work with and I’ve never had to deal with the screws stripping. Tip: I cut the planks to 8” because the outside base pieces were 1 1/2” each which made the frame 11” total in width. That is the same width as the bookshelves. Note, there are a couple of height options. Make sure to get the bookcases that fit your space/look you are going for. Our ceilings are 8’ so we purchased the 79 1/2” ones. That left 16 1/2”, which was plenty of room to add arches. Step 3: Assemble the bookshelves if you have not already. Place them on the frame and determine where you want them to be permanently. Then measure the remaining space. You should really do all the math up front to make sure you buy the right amount of bookshelves for your space. For example, our space in total is 135”. The 4 bookcases are 126” total. That left 9” of space. I couldn’t evenly distribute the bookcases, so I spaced them by 1” on the inside which left 3” on the two ends. Note, I knew I wanted cabinets at the bottom, so I measured the tallest item I planned on storing in the cabinet and based the placement of the shelf nearest to the floor on that. Step 4: Add the backboard insert (that came with the bookshelf) or add your own. Then secure the bookcases to the wall. I used 2 – 2 x 3 x 6’ on each end to create the 3” gap and cut 1” pieces for the center. I had to custom cut the 1” pieces using 1 x 3” scrap wood I had on hand since 1” really means 3/4” when using nominal wood. Tip: Make sure to cut out the outlet holes on the backboards before securing the bookcases to the wall. We had two outlets. I used my jigsaw to cut the holes. If you don’t plan to paint the bookcases or fill in the holes then you can completely skip the next step. Step 5: Determine where you want to put the shelves permanently then fill in the remaining holes. I used light weight spackling paste and a putty knife to fill the holes. After the spackling was dry, I used my orbital sander and 120 grit sandpaper to sand all the bookcases. Sanding the bookcases before priming + painting is critical when using these bookshelves. They are crazy inexpensive because they are made out of particle board with a laminate casing. That means no sanding and priming will result in the paint easily scratching and ultimately peeling off. After sanding everything, I wiped the bookcases clean with a damp lint free cloth. Step 6: Make the arch template. I had to make two templates since the 2 arches on the ends had wider outer frames. Actually, I made 5 total. See below. Tip: I used the cardboard boxes the bookcases came in to create a template. I wasn’t 100% sure what I wanted them to look like. After cutting 4 different styles I ultimately went with the classic arch. I cut the cardboard to the size I needed the actual arch. I tied twine to a pencil, found the bottom center of the cardboard, held my finger down on the twine, traced the arch, then used a box cutter to cut out the arch. There are also tools out there designed to give you the perfect arch. I chose to do it the hard way. 😅 Step 7: Cut the arches out using a jigsaw. I used a new wood blade with 12 TPI. I cut the 4 x 8’ birch plywood sheet into 4 sections with my circular saw first. Then used the arch template to trace onto each of the 4 pieces. Note: You should wear safety goggles to prevent debris getting in your eyes. Step 8: Secure a 2 x 4 to the ceiling directly above the bookcases using 3” exterior deck screws. The 2 x 4 is what you will secure the arches to. You’ll want to use a level to make sure the 2 x 4 is flush with the bookcases. Step 9: Sand the arches using an orbital sander and 220 grit sandpaper. If the area where you cut the arches is a little rough, use 80 grit sandpaper to level it out then 220 to give it a smooth finish. Step 11: Cut the frame pieces. Step 10: Secure the arches to the 2 x 4 and bookcases using a brad nailer with 2” finishing nails. I cut the bottom frame piece first to use as a guide for the vertical trim. I sanded it with 220 grit sandpaper, then secure it before measuring and cutting the remaining frame pieces. I used 1 – 1 x 8 x 12’. There was a small gap at the bottom, so I used 1” half moon trim to hide it. I secured the bottom frame piece where it was level with the bottom shelf of the bookcases for a smooth transition. I then cut the remaining frame pieces. I had to custom cut the 2 outer frame pieces to 3 3/4” wide using 1 – 1 x 10 x 8’. I used my circular saw. I used decorative trim I found at Lowe’s for the ends. This is what the bookcases looked like after adding all the trim. If you are adding cabinet doors you’ll need to cut 1 x 2” pieces to size to secure along the lip of the bottom shelf. Because the shelf sits a little more inside the bookcase I had to use paint stir sticks to ensure the 1 x 2” trim pieces sit flush with the rest of the frame. If you do not plan to add doors, you can skip this step. Step 12: Sand all the frame pieces with 120 grit then 220 grit sandpaper for that ultra smooth finish. I secured the frame to the shelves and base using my brad nailer and 2” finishing nails. Step 13: Add wood filler to all cracks, crevices, and nail holes. Allow the wood filler to dry then sand with 220 grit sandpaper. Step 14: Use caulk to seal the space between the ceiling and frame as well as any visible gaps. Step 15: Prime everything and allow the primer to dry overnight. I cannot stress this step enough. Step 16: Paint the bookcases. I applied two coats of paint total. Allowing the first coat to dry before applying the second coat. I went with Lemon Leaves by Magnolia Home in Eggshell finish. Tip: Lightly sand in between paint coats with a handheld 220 grit sand block for that ultra smooth finish. Step 17: (Optional) Prime, paint, and secure the wood appliqués to the bookcases where desired. To secure them you’ll need wood glue and then a brad nailer with 1” finishing nails. I used THESE appliqués above the arches and THESE appliqués on the center frame pieces. Step 18: Style your new shelves! After waiting for 2+ months we finally got an electrician here to install THIS overhead light. Isn’t it a dream? I filled the shelves with things that I love. Old and new books, candles with character, a portrait of a horse, an original painting of flowers, a photo of my dad, Linnea candles, plants, and moody vases. For those wondering, I built the desk. Tutorial coming soon! For video content and BTS on this project visit my Instagram @acarriedaffairdesigns I saved all my stories to my story highlights titled “Office built-ins” For the tutorial on the DIY shaker style cabinet doors click HERE. I linked some of the items I used to style the shelves below + the chair. And that’s a wrap! For those that have been asking for this tutorial, I am sorry it took me 5 months. Hopefully you find this inspiring to create a space that you love. For more DIY follow me on Instagram @acarriedaffairdesigns Until next time friends. Xo Shop This Post

Need book images for your content creation needs and creative projects? Discover free images you can use in this curated gallery of media assets.

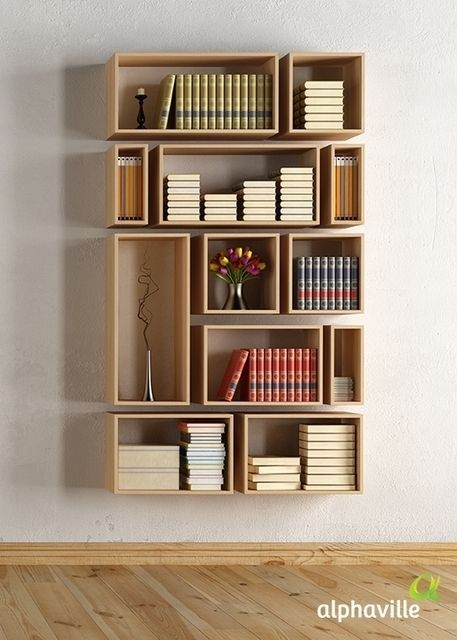
These home library examples can guide individuals in selecting design elements that resonate with their personal style.

Just here enjoying the plant hobby. Plants • Aquariums • Cats TikTok} chrisfoliage 📍West Michigan 1998

Showing off your book collection is never goes out in style. Book brings color, warmth and personality to your space and it is also fun to curl up with. You can store your book with a simple open-backed shelving unit that is unique and could be a useful for a room divider. It is offer the illusion of a separate space without completely closing it off visually and it is allow light to flow through to both sides of the room and provide storage at the same time.

Happy Friday! What do you have going on this weekend? Our weekend looks pretty quiet so my goal is to finish this book (which I’m really enjoying) and test drive this recipe which looks amazing for summer. Beautiful pics of an amazing kitchen. I ordered these organizers for my dresser drawers and wow…what an improvement....

Are you a fan of simple constructions, clean, geometric shapes and lines? Then this wall bookcase is made for you! Showcase your favorite books and decorations and see how it fits them ♥ The wall shelves can be made in different shades as you can see in the color palette. The depth of the shelves is 15 cm, there is the possibility if you wish to modify it (there will be some charge on the price),the width and the length can also be modified. the wall shelves are adjustable, you can if you want to create 2 separate wall bookcases (one set of the top 5 shelves and one set of the other 7 shelves) the dimensions is 130cm*188 cm Without international custom fees! if you have any questions contact me Specifications: * Made of high quality 16mm or 18mm thick, durable and time resistant melamine. Available in natural color. Package includes: screws You'll receive it in pieces and you will need to assemble it by yourself. You will only need a black and decker. OTHER BOOKCASES: https://www.etsy.com/shop/WoodmadeCreation?ref=hdr_shop_menu§ion_id=17661571 Ready to ship in 7-12 business days with hellenic post. I will email you a shipping notification Please click on the link to see other project: https://www.etsy.com/shop/WoodmadeCreation?ref=hdr_shop_menu

There are nine key elements to decorating a cabin or vacation retreat. See these cabin decor ideas that will get you on your way to a cozy retreat.

Image 5 of 25 from gallery of Rosa Apartment / CoDA Arquitetura. Photograph by Júlia Tótoli

This lumber/scaffolding modular shelving system, specially developed by us, is extremely versatile and varied and will last a lifetime! Less is more! For orders of 5 elements or more, please ask for a special price: Please state the place of delivery! Side by side - on top of each other - as a stool - as a bench - as a sideboard.... Also suitable for hanging! (Requires additional equipment - please inquire!) Pure handwork - pure natural wood - from sustainable German forestry. Visibly connected with heavy-duty screws. Natural retro or vintage charm. You can choose from 3 heights and 9 widths: Depth: approx. 28 cm (also possible in 15/20/38 cm) Outside height: approx. 40 cm / inside height approx. 32 cm Widths: 25, 33.3, 40, 50, 60, 75, 80, 100, 120 cm Alternatively: Outside height approx. 30 cm / inside height approx. 22 cm Outside height approx. 50 cm / inside height approx. 42 cm Surface: Used look due to natural vinegar stain, sanded smooth, otherwise untreated Also available with base. We offer you this system for easy self-assembly. Supplied with: shelves, heavy-duty screws, assembly and care instructions. Please inquire about the material required for invisible wall mounting. Depending on the wall and the desired type of installation, different materials are required here. You will need the following tools/material for assembly: A cordless screwdriver or drill with bits, if necessary screw clamps Cracks, holes, discolouration, rust and traces of tools or insects are typical of reclaimed wood/lumber and upcycled products. (Explanation: All deviations that are to be expected if no new / carpentry material is used). Deviations from straight lines and even angles are also possible. This does not represent a defect, but emphasizes the origin / reuse of the wood and is a distinctive, decorative element. This also applies to deviations in wood grain, wood color and also the use of different / different aged woods, metal parts and similar constructive elements.

We’re back and excited to share another project and all of it’s details. Meet: The Cypress Project. We wrapped up this project over a year ago and like all of our projects, we’re just getting around to sharing it. Our team definitely could use more hours in the day. We get loads

【Modern Design】These decorative bookends will add a unique look to your desk or shelves while keeping book organized and in place so heavy books don't easily tip. Cute hug ducks book ends are both functional and decorative. 【High Quality】Our decorative book holders were crafted from a high quality resin material. These book ends with anti-slip bottom won't cause any scratches to your shelves. 【Multipurpose】These cute bookends will look fantastic in your home and add life to any boring shelf. 【Home Decoration】Can be placed in the living room, bedroom, bookshelf, office, bedside table, dining room, countertop, etc. 【Ideal Gift】Cute duck figurine bookshelf decoration, the perfect gift for friends, family and kids for housewarming, birthdays, holidays and more.

My Inspiration board of book lovers to die for. Book shelves Inspiration board, all of the lovely places you would like to read and a shelf to keep it!

These home library examples can guide individuals in selecting design elements that resonate with their personal style.
You’re going to need somewhere to put all those new books.

I am not a "kindle" person. I love books. I love reading them, holding them, and even the smell of them. I love brand new books, middle of the road books, and I especially have a passion for very old books. There is something about books that is very calming to me. So when I see a room adorned with book cases, I am immediately drawn to the warmth of the room. Yesterday, during my lunch break from being a supermodel trophy wife, I watched a TV show on HGTV that featured homes that formerly had other purposes in their past life such as a half-way house, church, and library. The owner of the house that was a former library boasted that her home still smelled like books. I understood her feelings. Forget my creme brulee candle, I would much rather have my home reek of the saltiness of a great novel. The ironic thing about my fetish for books is that if you asked KTG or Dude, they would testify that I spent very little time in school with my nose stuck into a book. Oh well, some people are late bloomers. booklover.tumbler.com I would need to wear all-white and lose 20 lbs. to read in this gorgeous room. booklover.tumbler.com Checks + books = love everythingfab.com Love the looks of art thrown in with book shelves. Not sure what's going on in that picture but oh well..... google.com Great entryway. pinkpersimmon.tumbler.com topiaries + books = heaven coffeepearlsandpoetry.tumbler.com Have always loved the looks of ladders in libraries. Maybe because I am height-challenged. Apartment therapy I never lived in an apartment that looked like this! book shelf porn I could use a ladder in this room. pinterest Hope your Thursday if filled with great reading!

Reclaimed Wood Bookshelf Built In Wall Mount Bookcase Optional customization: -Add a desk area -Opening for TV/ Artwork in center or on either end -Pipe diameter (1/2” or 3/4”) -Pipe supports (under shelf or through shelf) -Shelf dimensions -Wood species/finish -Number/location of supports •The standard unit will have 3/4” pipe and 5 full-length shelves. All other units are custom-message us prior to ordering to customize! •This unit does not require floor mounting-the flanges simply rest on the floor for added stability. It does require wall mounting at the top, and for larger units, at the midpoint. • Each unit may have 2-6 vertical pipe sports, depending on the size of the piece. •Standard spacing between shelves is 11.5", with the first shelf 20" from the floor. •Shelf depth varies up to 1" from listed dimensions due to material variances (7-9" or 9-11"). Shelf thickness varies from 3/4” to 1.5” depending on the reclaimed material on hand. •Wood species may vary from unit to unit and may include Douglas fir, oak, maple or pine. Please message us for custom options! •We can customize this piece to suit any space. We offer lengths up to 20’. •For all custom orders, please message us before ordering to confirm the size of your TV or the configuration of spaces you would like! •Check out all of our color options here: https://www.etsy.com/listing/215804327/stain-samples-example-finishes •••Please note that colors may look different than shown in the examples due to wood species differences••• •Add a personalized engraving: https://www.etsy.com/listing/226027174 •By their nature, salvaged wood planks may change slightly over time, further enhancing their rustic one-of-a-kind character; small cracks, nail and bolt holes, stains, knots and other imperfections may be present. •Due to the variety of wall types and mounting situations, this item does not include wall mounting screws or anchors. •Assembly and secure wall mounting is required. Customer assumes all responsibility for correct and safe installation and use. Professional installation recommended. ORDER CANCELLATIONS • Custom orders and/or “made to order” items can be cancelled up to 48hrs after ordering. After this time, cancellations are not accepted • Acceptance of all cancellation requests are subject to shop discretion and order processing status. • Cancelled orders may be subject to a 20% restocking fee. RETURNS We do not accept returns on custom orders, or personalized products. • Returns are only accepted within 7 days of product delivery. • Returns requests must be initiated via Esty messaging, no other method will be honored. • Buyer is responsible for all return shipping costs. If the product(s) qualified for free shipping, buyer is also responsible for the actual outbound shipping or freight costs, and that amount will be deducted from the product refund. • We recommend you insure your return as we are not responsible if a shipping vendor misplaces your return. • All items must be returned in original, unused condition in the original packaging with all packing materials. • All returns are subject a 20% restocking fee in addition to shipping fees. • All returns will be inspected upon receipt by our shop, and only after the inspection is complete will the appropriate refund balance be issued.

Tiwimakes Bookshelf - DIY plans (digital download) *** This is a digital download for plans to build your own bookshelf. The file include plans for assembly, individual parts and instructions *** Are you dreaming of having your own home library? Look no further! With our detailed plans, you can now easily build a large wall-mounted bookshelf that adds storage space and a touch of elegance to your interior. Our plans include easy-to-follow instructions and a materials list so you can build your bookshelf in no time. Whether you're a beginner DIYer or a seasoned pro, our plans are designed to help you successfully complete your project with ease. So don't hesitate and add our wall-mounted bookshelf plan to your DIY project collection today! Finished product is 9.25” x 72” x 86.5”H

Make organizing, tidying, simplifying, and decluttering your kid's bedroom fun and easy with these must-have children’s bedroom organizers. They are simply the best products to organize a kid's bedroom!

Nobody puts Franklin in the corner. Wait. Everyone does! However this is a two trick pony. It can also be mounted on an outside corner! Crafty little guy. Of course, because it’s made by Tronk, this award nominated shelf uses only the finest solid hardwood and miter joints with traditional mortise and tenon joinery. Dimensions: 23.75"H x 20"W x 20"D Shelves are 5"D and 10"H Includes mounting hardware Handcrafted in the US Solid wood corner shelf Ships in 2-5 business days Spec Sheet Order Free Swatches Install Instructions Wood Walnut Maple Cherry Wood Walnut Maple Cherry Qty Add to Cart Share:

Confira nossa seleção de dicas e inspirações de estantes de livros para quarto e leve essa peça para a sua casa dando um toque a mais na decoração.

I'm sharing the best places to buy wooden crates in case you want to make an epic DIY crate wall like I did!

Merüljünk el a polcok világában! Ma már olvashattatok a rendkívül izgalmas polctartókról. Posztunk...

You’ll swoon over #6!

Место для хранения книг. Как Вам идея?

Move over neutrals. Right now, we’re falling for colourful kitchen cabinetry and from sherbet-pink to seaside blue, draw inspiration from the iconic beach huts of our south coast and prepare to paint the rainbow in the heart of your home with 6 colourful kitchens to inspire you.

With winter right around the corner, it’s time to crank up the heat in your workshop and build some woodworking projects that will improve your indoor spaces.

We don't do a ton of house tours around here, but I couldn't help but show you the bright, minimal yet warm home of EHD alum Samantha Gluck.

A little creativity goes a long way.
