

Unlock a world of costume ideas and unleash your inner dragon with our downloadable Dragon Wings template. Transform cardboard and paper into magnificent dragon wings and create your very own DIY dragon costume. Follow our step-by-step illustrated instructions and watch the walk-through video to bring your mythical creature to life!

EVA foam is a versatile material commonly used in creating costumes and props for cosplay. It’s lightweight, flexible, and can be shaped into complex forms, making it ideal for simulating

If you’re cosplaying as a Dragon Age character, you can carry around the ultimate prop by making drinkable glowing Lyrium potion. Cosplayer Arkady made the drink and put together a tutorial d…

How to build a sword out of wood, then make it look metal and battle-worn. This sword was made for a Nazgul costume for a Lord of the Rings Halloween.

The needs and demands of cosplay are vast, and you never know what sort of skills you’ll need to learn next. You could have to make extra limbs to wear around your waist. It happens. Cosplaye…

Ignite your creativity and embark on an enchanting adventure with our downloadable Dragon Mask template. Transform a simple cardboard box into a captivating dragon costume with this downloadable pattern, step by step instructions and walk through video. Dive into the world of DIY costumes and bring your inner dragon to life.

Using cosplay hacks is a great semi-from-scratch way of creating an incredible cosplay without needing to drive oneself crazy in order to do it.

Crafting tiefling horns for your cosplay ensemble isn’t just about adding a striking visual; it’s about embodying your character’s otherworldly charm. It’s easier than you might think to create your

Day to Night-Light Skirt: One of the most amazing things about LEDs is that they give you endless options when it comes to color and lighting effects. Adding lights to an ordinary piece of clothing lends that garment transformative, chameleon-like powers. I believe illu…

So I’ve been asked more than a few times how I made the fins for Undyne, and I actually compiled a tutorial to our facebook cosplay page a while ago. Full instructions under the cut, or you can go to...

Foam & Sharpies: two of the biggest weapons in my cosplay arsenal! Did you know that you can use Sharpie markers for coloring plastic gems? It works beautifully, it doesn’t cut down on their...

It’s a lot of fun to put together a costume and cosplay at anime and comic conventions. You get to share your creativity and love for your favorite characters with

Creating cosplay costumes with EVA foam is super fun and affordable! This material is just perfect to make amazing projects on a budget!

The Purple Wizard from Diablo 3 was a passion project! I absolutely love the class and this was already my 4th Wizard cosplay!

Embarking on the journey of cosplay can transform you into any character you adore, but to get that authentic look, mastering the art of makeup is crucial. As a beginner

Related Tutorial: How to Make Moveable Talons You can attach claws directly to your fingernails for a beast-like effect. The type of claws you make will depend on the overall

Whether you’re going for a look that’s cute, scary, or utterly otherworldly, perfecting your face paint is key to nailing your cosplay. But if it’s your first time, or you’re

Just as a heads up, this pattern is not really recommended for beginners. There is not a whole lot of explanation of the basic techniques, and it requires a fair bit of precision, two types of fusible...

Here is the tutorial for my Uraraka boots! I hope you find it helpful😊👍

Super Magical Awesome Armbands of Light: When you're creating illuminated costumes, there's no better diffuser for LEDs than faux fur. It really distributes light evenly and hides the hot spots from individual pixels. When used right it can really turn your costume project into something …

OK, so I look at a lot of DIY ideas... I look at thousands a month and these are officially some of the most genius and lovely creations I have seen. I love my trusty glue gun but I had no idea you could make all these incredibly creative things with it. After all, glue

Svetlana Quindt, a.k.a. Kamui Cosplay, decided to make a costume inspired by one of her childhood idols for Connichi: Xena. Kamui did a wonderful job pulling the Warrior Princess ensemble together.…

Cosplay photography is something that wasn’t really popular just a decade ago. Nowadays, costume play (cosplay) is everywhere, thanks to the overwhelming number of video games and movies. In most

You had a blast wearing your costume to the latest anime convention or comic con, but now you realize that your costume stinks. In fact, most of the time the

Check out Kamui's Cosplay Costumes! All our collected work since we started in 2003. Cosplay armor, sewing, LEDs. It's all here!

Ignite your creativity and embark on an enchanting adventure with our downloadable Dragon Mask template. Transform a simple cardboard box into a captivating dragon costume with this downloadable pattern, step by step instructions and walk through video. Dive into the world of DIY costumes and bring your inner dragon to life.
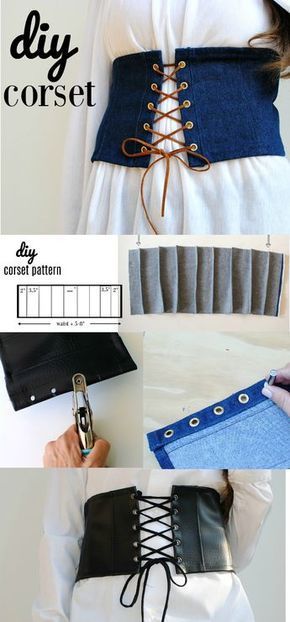
The corset trend is one of my favorites right now because of its historic background which dates back to the 1500's. Originally designed to slim the waist and exaggerate the bust and hips. The construction of a traditional corset is a time consuming process done by a skilled tailor called a corsetmaker. This involves accurate measuring and materials like leather, metal, wood, and plastic for the boning inserted into the cloth of the corset. Now most of us aren't skilled corsetiers and nor do we plan to be. I just like the look of a corset as a fashion-forward piece to add to my wardrobe. It's a great addition to a baggy top and even for cosplay costumes (Halloween's coming). Dritz products make it easy to create your own custom corset using their 2-Part Eyelet Tools and Eyelets. You can even try their Eyelet Pliers which I used for the vinyl corset. Get the details below and make your own corset. Supplies: Dritz 2-Part Eyelet Tools Dritz 2-Part Eyelets (I used the gold but they have silver and gunmetal too). 1/2 yard of fabric (I used a TÉLIO Denim and vinyl) Brother Sewing Machine XR3774 tailors chalk hammer embroidery scissors ruler thread DIY Instructions: You will need a strip of fabric that measures your waist + 5-8 extra inches. The width depends on how wide you want your corset to be. Mine was 6.5" when finished + 1.5" seam allowance (8" total width). The pattern above shows sections of 2" on each side and then 3.5" sections in between. The _" is the middle of the corset which will be the center back. This will be whatever measurement you get at the end. We're basically making an accordion with fabric by folding pleats and sewing them. Begin by marking a line down the 1/2 way point of the fabric. Then mark 2" lines out from the sides. Be sure to mark on the wrong side of the fabric using tailors chalk or a fabric marking tool. Now mark 3.5" from that point till you get to the center. Repeat the same for the other side going to the center. Any remaining space you have left should be in the center. This measurement will most likely not be 3.5". It should look like this when done. You should now have 2 center lines. Fold either one so the marked line is the folded edge and right sides are together. Pin or press flat and sew a 1/4" seam. Sewing a 1/4" seam from top to bottom. It should look like this. Now repeat for the other center line (the mark in between mine is the half way point). The 2 center pleats are wear the arrow is. Now for the additional pleats we will be sewing a curve instead of a straight line. Fold again with the marked line as the folded edge but pin the half way point. When you sew, do start with a 1/4" seam allowance and gradually sew out to about 1/2" by the middle point. Then gradually back to finish with a 1/4"...see below for the photo and you'll get what I mean. Repeat this for the rest of the sections until you reach the last lines marked on each side. For the last lines you will just do a 1/4" straight seam like we did the center (where the arrows are). Press everything nice and flat. The center folds should be going the opposite directions of each other. Press the remaining pleats so they align with the coordinating center direction. Now top stitch the folds/pleats down into place. You can use a different colored thread to get a nice detailed top stitch or use the same like I did. These folds will act as our "boning" for the corset rather than inserting metal or plastic into each section. It's a much easier process... It should look like this on the wrong side. Hem the top and bottom edges. I folded a 1/4" over and then another 1/2" over, pressed, and hemmed into place. For the sides fold over 1" and sew into place. I did sew the raw edge into the seam. It should now look like this. Mark evenly where you want your eyelets to be with a dot of tailors chalk. Mine were spread about 1/2" apart. Use Dritz's 2-Part Eyelet Tools and eyelets to create the lace up front. Applying the grommets and eyelets: Full video tutorial here Mark position of grommet by tracing around inside opening of grommet. Cut hole with scissors. Note: For fabrics with stretch, cut hole smaller than inside opening of grommet. Insert grommet (deep half) into hole from right to wrong side of fabric. Place anvil on a hard surface. Position grommet on anvil. Place insert over center of grommet. Place washer, dome side up, over insert. Insert setter into grommet; hammer using 2 or 3 forceful taps. Center of grommet will roll over to secure grommet and provide a smooth finish. For the vinyl corset everything was done the same but for the holes I used the Eyelet Pliers instead of cutting them myself. This is a great tool for leather, suede, and vinyl materials. You can even apply the eyelets with these. Finish by lacing up with string or cording through the eyelets. Make sure it's long enough to lace through and tie into a bow at the end. Mine measured a full yard. I love pairing these with an oversized t-shirt or men's shirt. They also look great styled with a loose peasant top. It helps accentuate the waist and adds some edge to my look. Great for cosplay costumes as well (Halloween inspo). *In collaboration with Dritz. I received compensation from Dritz®, and some of the materials featured here or used in this project were provided free of charge by Dritz®. All opinions are my own. SaveSave

Here are instructions from Evil Mad Scientist about how to transform a basic black commuter Umbrella to Halloween DIY Costume.

Modified Cosplay Helmet for a Celty Sturluson of Durarara! What you’ll need: Helmet to use as a base OR make your own! Painters Tape Lightweight cardboard/tagboard Gesso Sand-paper Paper Clay or air-drying clay Woodglue Yellow and Blue Paint Clear Enamel spraypaint Steps 1-3: Prep-work Get a Helmet Take off the visor and tape off stuff you don’t want to mess up Make sure the helmet is clean and dry before beginning Step 4-5: Form the ears 4. Using tag-board and […]

First off, let me just say that this blog HAS RISEN FROM THE GRAVE! Been so busy with school for the past few months that I had to go on hiatus for a little while. Anywaaaay, in my previous post Horny Girls, we had a little photoshoot showcasing our below P100 DIY costume which won in our Fine Arts - Mindworks costume parade. Haha. And as promised, I will be showing you the DIY Tutorial I used as guide to make my horns + my DIY on how I created mine. And how timely, Maleficent the movie is coming up! SO HERE IT IS: Horns tutorial by MonkeyNumber5 Initially I had planned on making the horns out of a wire armature + paper mache. But I imagined it would be heavy and I didn't have the time and patience to work with wire; the parade was in 2 days, bub. So I looked for a lightweight alternative and ta-da I found this clever tutorial! So I followed the tutorial, adding my own design to the horns. I wanted something that looked tough, like the horns of a Taurus or the Chicago Bulls. But I also wanted it to be feminine at the same time. So I gave my horns 2 body curves and a sharp tip. The bigger segments were easier to do compared to the smaller ones. When the curve got sharper, I had to do trial and error until I was contented. This is the result: Best part is they're hollow and lightweight! And then I painted them with a black latex base. The bulk of the time making this was spent on trial-and-error ing the angle of each segment. Total work hours estimate: 3 hours If you like your horns that way, you can stop there. But I wanted to add texture to my horns so it would appear to blend in with the hair. So I cut some fiberfill (stuff used to stuff pillows) strips and glued them on each segment. Tried a different editing style with this photo. So after I layered the fiberfill, I spray painted it black for the final look. The color and texture is intended to imitate hair. Now you can sew them unto a headband if you have the time. I didn't, so the quickest thing I could find at home were tie wires. I tied them tight into the headband. Much better though if the wires were the same color as the headband. But it didn't bother me since it was going to be covered with hair anyway. And yes, that is a headband that is shaped like eyeglasses; pretty advantageous for this improvised design, so the tie wire has more to grab on. And that's it! The method is pretty simple and the possibilities are limitless with what you can create. Next time betches, Shari

Savannah made a prosthetic hand for her cosplay costume out of InstaMorph. We asked her for some details about how she made such an amazing, working model. “The tendons are 1 mm braided dyneema cord, which is used for parasailing kite lines and other utility applications. It was ideal for this because it’s extremely st

I am compiling a tutorial for making mecha/ gundam costumes. Please note that this is not pepakura and that I do not use pepakura and I have no...
