

Make your own handmade square crochet potholder that has a beautiful texture with this free crochet pattern that uses the even moss stitch.

Pin it for later: If you are someone who loves to cook, this crochet potholder pattern will be a great project for you. Even if you hate to cook like me,

Create one or all of these crochet potholder patterns and crochet hot pad patterns to use in your own kitchen or gift to friends and family!

Do you love a good Anthropologie dupe? If so, you'll love this Waffle Stitch Crochet Dishcloth Pattern, which is similar to the oh-so-popular Market Dishcloths.

Dishcloths or washcloths are very quick and easy to crochet. Making a few of them could be a great way to practice your stitches. This crochet pattern uses a simple repeat to

Explore Your Crochet's free patterns blog and discover inspiring ideas to ignite your creativity. Read our post, 'Ribbed Potholder Free Crochet Pattern'.

Discover the free Double Thick Crochet Hot Pad Pattern, a delightful DIY project to elevate your kitchen decor. Crafted with the paired extended single crochet stitch for added durability, this hot pad blends functionality with style. Perfect for personal use or as a charming homemade gift. Get started on your crochet journey today with this free pattern!

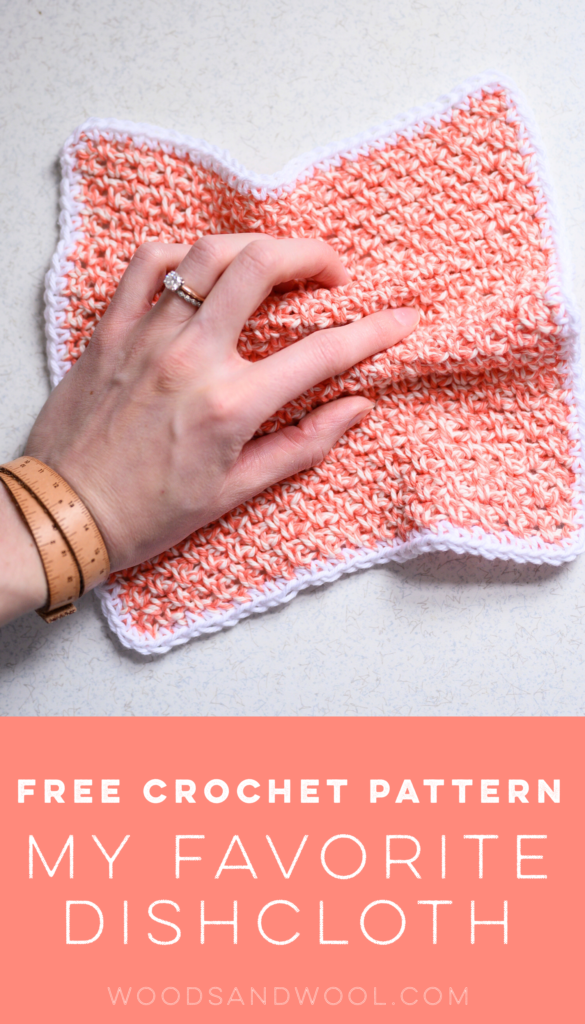
The Farmhouse Pot Holder crochet pattern is quick and easy! Follow along with the free crochet pattern and video tutorial!

Pattern Center

Pin it for later: https://www.pinterest.com/pin/51087777006963624/ Dishcloths or washcloths are probably the first items a beginner crocheter would make. Make a few of them using this crochet pattern and you have an eco-friendly towel for all your

Explore Your Crochet's free patterns blog and discover inspiring ideas to ignite your creativity. Read our post, 'Swap Potholders Free Crochet Pattern'.

Learn how to crochet the magic square potholder. Double-thick and easy to make, this hot pad is just what you need in your kitchen!

Take a look at these crochet Dishcloths! I don't know about you, but I love to combine the pleasant with the useful.

It's so fun to play with kitchen accessories like crochet potholders. Change them from time to time, they will make your kithchen so fun!

Easy and practical crochet potholder patterns are a zero waste way to craft a kitchen essentials for every home.

Explore Your Crochet's free patterns blog and discover inspiring ideas to ignite your creativity. Read our post, 'Double Thick Potholder Free Crochet Patterns'.

Use this simple crochet dishcloth pattern to create a beautifully textured cloth for your bathroom or kitchen.

Pin it for later: If you are someone who loves to cook, this crochet potholder pattern will be a great project for you. Even if you hate to cook like me,

Fish Potholder Free Crochet Patterns

Free Crochet Pattern for THICK Crochet Potholders. These are made with beginner techniques and an in-depth video tutorial for easy crocheting.

I once got a crochet kit as a gift. At first, I didn't know what to make. Then, I thought about making something practical for my kitchen. That's how I found crochet potholder patterns. These patterns were free and easy to follow. They covered a range of designs from simple squares to ones with fun shapes. It felt great to make something that I could use every day. As I worked on my first potholder, I realized how relaxing crocheting can be. It was also exciting to choose different colors for my projects. By the end, I had made several

Looking for a dishcloth pattern to try? This bean stitch crochet dishcloth pattern is a great one to try. Learn how to make the bean stitch.

Fish Potholder Free Crochet Patterns

Easy Double Thick Potholders Free Crochet Ideas – How to make these Easy Double Thick Potholders. They are so thick and cushy, your hands will feel protected from the heat ... Read more

Its amazing what can be created with an aluminum hook and a ball of string...But one of my favorite things to make with it is dishcloths. Not only are they useful and practical, you can whip them up fairly quick and they are inexpensive. The tedious job of washing dishes may seem even less so, when you are washing them with one of theses crochet dishcloths.

This easy crochet dishcloth is a fun project for beginners. The texture is beautiful yet easy to work.

Free quick and easy textured crochet dishcloth pattern using the single crochet stitch. Easy to make crochet dish cloth project that is great for beginners.

Create one or all of these crochet potholder patterns and crochet hot pad patterns to use in your own kitchen or gift to friends and family!

Explore Your Crochet's free patterns blog and discover inspiring ideas to ignite your creativity. Read our post, 'Blooming Crochet Dishcloths'.

This Flower Power Dishcloth Crochet Free Pattern is a simple and easy pattern that's a perfect decoration. Make one now with the free pattern provided by the link below.

Crochet this beautiful diagonal striped potholder using the single crochet. It's a fun and easy textured crochet potholder for beginners!

The Thermal Stitch is by far the best stitch (that I know of) you can use to make a thick crochet potholder. Free pattern and video tutorial!

Crochet this beautiful diagonal striped potholder using the single crochet. It's a fun and easy textured crochet potholder for beginners!

Crochet potholder free pattern with a video demonstration. Thermal stitch is one of the thickest crochet stitches and is great for potholders

Use this awesome crochet scrubbie free pattern to make dish scrubbies that you can unroll to clean and dry. Made with cotton yarn, they will be easy on your hands.

Create your own modern crochet potholder with this potholder pattern that uses a unique crochet stitch to give it a beautiful texture.

It's so fun to play with kitchen accessories like crochet potholders. Change them from time to time, they will make your kithchen so fun!

Explore Your Crochet's free patterns blog and discover inspiring ideas to ignite your creativity. Read our post, 'Easy Square Crochet Potholders'.

Learn to crochet a double thick fish hot pad with this free pattern.
It all started when I was a kid. I remember sitting on the floor in the living room at my grandparents’ house and learning how to crochet. My first crochet project was a mauve dishcloth. I don’t have it anymore, but one thing I remember about it was how uneven the edges were. My crochet...

Easy and practical crochet potholder patterns are a zero waste way to craft a kitchen essentials for every home.

The Thermal Stitch is by far the best stitch (that I know of) you can use to make a thick crochet potholder. Free pattern and video tutorial!

Discover how to create a stunning dishcloth with this easy hdc+sc crochet dishcloth pattern. This quick and easy crochet project combines single and half double crochet stitches for a durable and beautiful textured dishcloth. Perfect for beginners

Create one or all of these crochet potholder patterns and crochet hot pad patterns to use in your own kitchen or gift to friends and family!

This easy crochet dishcloth is a fun project for beginners. The texture is beautiful yet easy to work.

Explore Your Crochet's free patterns blog and discover inspiring ideas to ignite your creativity. Read our post, 'Easy Square Crochet Potholders'.

Crocheted Potholders are one of the basic essential accessory to have in your kitchen. They help you hold hot dishes and keep your hands safe. There are many pattern varieties and shapes of Potholder which you can crochet up .Often these Crochet potholders are quick and easy to make. You can easily make one in no time at all. Here is a simple pattern for Crochet Potholder Pinch Mitts. These Pinch mitts are different in shape from the usual Potholder Patterns which are round , square or rectangle in shape. You can use these pinch mitts to grab and hold the handles of the cooking pots. These pinch mitts fits and will over your fingers. You can use bulky and thick yarns to make them easy to use. These would also make great housewarming or holiday gifts. Materials Used:- 10 Ply Yarn 6 mm Crochet Hook AD-FREE, PRINTER-FRIENDLY PDF PATTERN: The written pattern and photo tutorial is given below along with a free video tutorial. This pattern is also available as an ad-free, printer-friendly pdf pattern that can be purchased on Ravelry. Please click the link below to purchase the PDF Pattern. Here is the Video Tutorial:- You can follow along with this tutorial video. Please be sure to subscribe too! PIN it and Save for Later:- Let's Start...!!! Part 1:- Round 1:- Start with a slip knot. Chain 6. 1 Single Crochet in the 2nd chain from the hook. 1 Single Crochet each in the remaining stitches untill the last stitch. 3 Single Crochets in the last stitch. Turn your work and start working on the opposite side. 1 Single Crochet each in the remaining stitches untill the last stitch. 3 Single Crochets in the last stitch. Slip stitch on top of the 1st Single Crochet. Round 2:- Chain 1(Not Counted as a stitch. Start the next stitch in the same stitch) 2 Single Crochets in each stitch around. Slip stitch on top of the first Single Crochet. Round 3:- Chain 1(Not Counted as a stitch. Start the next stitch in the same stitch) 1 Single Crochet in each stitch around. Do not make a slip stitch at the end. We will be working in continuous rounds. Round 4 to Round 8:- 1 Single Crochet in each stitch around. Remember not to work in continuous rounds. At the end of Round 8 , make a slip stitch on top of the first Single Crochet and weave off. Part 2:- Round 1:- Start with a slip knot. Chain 5. 1 Single Crochet in the 2nd chain from the hook. 1 Single Crochet each in the remaining stitches untill the last stitch. 3 Single Crochets in the last stitch. Turn your work and start working on the opposite side. 1 Single Crochet each in the remaining stitches untill the last stitch. 3 Single Crochets in the last stitch. Slip stitch on top of the 1st Single Crochet. Round 2:- Chain 1(Not Counted as a stitch. Start the next stitch in the same stitch) 2 Single Crochets in each stitch around. Slip stitch on top of the first Single Crochet. Round 3:- Chain 1(Not Counted as a stitch. Start the next stitch in the same stitch) 1 Single Crochet in each stitch around. Do not make a slip stitch at the end. We will be working in continuous rounds. Round 4 to Round 8:- 1 Single Crochet in each stitch around. Remember not to work in continuous rounds. At the end of Round 8 , make a slip stitch on top of the first Single Crochet.(do not weave off) Joining:- Turn both Part-1 and Part-2 inside out. Join One Side of Part -1 to One Side of Part-2 with Slip Stitches. Hanging Loop:- Chain 10 and Make a Slip Stitch into the bottom stitch and weave off. Here is the Summary of the Pattern:- Part 1:- Round 1:- Start with a slip knot. Ch 6. 1 SC in the 2nd Ch from the hook. 1 SC each in the remaining Sts untill the last stitch. 3 SCs in the last stitch. Turn your work and start working on the opposite side. 1 SC each in the remaining Sts untill the last stitch. 3 SCs in the last stitch. SL on top of the 1st SC. Round 2:- Ch 1(Not Counted as a stitch. Start the next stitch in the same stitch) 2 SCs in each stitch around. SL on top of the first SC. Round 3:- Ch 1(Not Counted as a stitch. Start the next stitch in the same stitch) 1 SC in each stitch around. Do not make a SL at the end. We will be working in continuous rounds. Round 4 to Round 8:- 1 SC in each stitch around. Remember not to work in continuous rounds. At the end of Round 8 , make a SL on top of the first SC and weave off. Part 2:- Round 1:- Start with a slip knot. Ch 5. 1 SC in the 2nd Ch from the hook. 1 SC each in the remaining Sts untill the last stitch. 3 SCs in the last stitch. Turn your work and start working on the opposite side. 1 SC each in the remaining Sts untill the last stitch. 3 SCs in the last stitch. SL on top of the 1st SC. Round 2:- Ch 1(Not Counted as a stitch. Start the next stitch in the same stitch) 2 SCs in each stitch around. SL on top of the first SC. Round 3:- Ch 1(Not Counted as a stitch. Start the next stitch in the same stitch) 1 SC in each stitch around. Do not make a SL at the end. We will be working in continuous rounds. Round 4 to Round 8:- 1 SC in each stitch around. Remember not to work in continuous rounds. At the end of Round 8 , make a SL on top of the first SC.(do not weave off) Joining:- Turn both Part-1 and Part-2 inside out. Join One Side of Part -1 to One Side of Part-2 with Slip Sts. Hanging Loop:- Ch 10 and Make a SL into the bottom stitch and weave off. *********
