

Learn how to build a simple DIY mobile Tool Cart with Pegboard. Check out step-by-step tutorial with picture. Free printable PDF plans are available.

Organizing your garage is a daunting task, but we've got you covered with the best garage storage solutions to reduce clutter.

Tame your tank with this easy-to-make DIY air compressor cart. Built-in storage keeps tools close, hoses tangle-free, and wheels make it portable.

Save your back with this handy shop cart

I'd been thinking about how to reorganize my shop, which takes up half of my two-car garage. This rolling cart helped me consolidate both tool and lumber storage, so I…

Finding a place to store lumber and sheet goods can be challenging. This lumber cart keeps them all organized with shelves to store long boards, upright bins for shorter pieces, and a large area to hold sheet goods. Plus, the cart rolls, so you can push it wherever you need to in your work space.

Learn how to build a simple DIY mobile Tool Cart with Pegboard. Check out step-by-step tutorial with picture. Free printable PDF plans are available.

DIY Tool Cart / Kitchen Island: In the workshop, it's a tool cart. In the kitchen, it can be a small island. It's a very practical tool.

We all need more space for all that stuff that we have in our garages, so these DIY storage ideas will definitely blow your mind once you see them. For
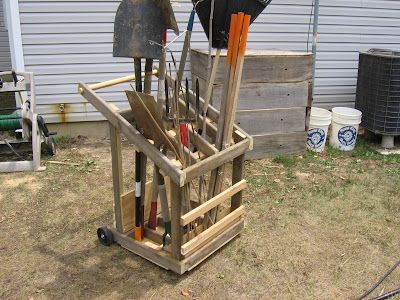
I’ve wanted to build some kind of rack that holds the garden tools – shovels, hoes, rakes, stakes – and can be moved around. For years the garden tools have leaned against the house. Now that I have put flower beds along the sunroom and moved the compost bin to the gable end of the house the tool clutter has gotten even worse. I checked on the internet and found a standard design, basically a square rack that didn’t look like it could be adapted to move easily. I saw a similar rack at Lowe’s holding a bunch of shovels. It’s sturdy but not what I want. I came up with a rough design of a cart with trapezoidal sides and wheels so the cart could be tilted back and rolled. Designing a cart is not so easy as it may seem. I can design a shed in detail, since the height of benches and doors is standard. But a cart that rolls is different. I don’t know what lengths and angles of the frame will make a cart that can be moved easily and feels right. That takes some trial and error. So I came up with a rough sketch then designed it as it was built. This is a prototype that has to be good enough for my own use. I wanted to built it as much as possible from scrap materials on hand. I also wanted the cart to be as light as possible but structurally sound. That means not using heavier wood than necessary. For the framing I settled on deck flooring ripped on the table saw into two equal pieces, and I just happened to have some deck flooring in the lumber pile. This gave framing wood about one and one-eighth inch thick by two and three-quarter inches wide. I started by building a bottom frame, just a rectangle extended at one end for the wheels. I notched the upright posts where they attach to the frame to make it look less bulky. Everything is put together with screws. Screws are not only stronger fasterners than nails, but can be removed easily with a cordless drill if things need changing at a later time. Here’s where the guesswork as to “feel” entered in. The upper members of the side frames were attached to make a trapezoid. Since a handle will be attached at the upper end of the sidearms I had to experiment a little with the angles and heights of attachment to get what I thought would be an ergonomically comfortable shape. I left the pieces extra long so they could be trimmed back later if needed. The trapezoid shape on the sides puts the handle at a comfortable height while the rack itself should be tall enough in back for large tools and short enough in front for smaller tools and stakes. Unlike a rectangle which can be racked into a parallelogram a trapezoid resists racking, although not as well as a triangle. That means the sides shouldn’t need additional bracing. The next picture jumps ahead after a number of steps were completed. (It was really hot and I couldn’t motivate myself to stop and take pictures). The upper crossmembers were attached to give the basic frame. A dowel was screwed to the upper arms as a temporary handle. And the crosshatching was put in the upper frame to give slots for individual tools. The next day I looked at this and decided it was all wrong. The upper frame should match the footprint of the lower frame. The notched uprights had to go. First I moved the crossmembers of the bottom frame inside the uprights. Then I unscrewed each upright, cut off the notch and put an angle cut on the top to match the angle of the upper frame. The upright post was then reattached to the top and bottom frames. The bottom frame was raised a few inches at the front so the upright protruded several inches below the frame. This way the cart rests on the wheels and the front uprights. Getting close! You can also see that a temporary diagonal brace was put on the back face of the cart. This rectangular face was large enough to go out of square so it had to be locked into square. Wheels were attached using ½ inch bolts. Dividers were set in the upper and lower frames to separate tools. The cart was taking shape, but the next morning I looked at it and thought it was too bulky. The front uprights on the outside just weren’t right. I removed them and put them inside the frame. After that a piece of plywood was put on the back face to replace the temporary brace. Plywood was attached to the bottom of the lower frame as a floor for the tools. The floor slopes toward the back and has weep holes in the frame to drain water. I think the cart looks a lot leaner now. It was getting near completion, but the finish work in a project always seems to drag on. At one point I thought it was close enough. I loaded it with the tools and found it need a few more tweaks. The small pitchfork had a handle grip that would not fit between the dividers. This is the almost finished cart, with the handle attached. A place was made at the front to hold short bamboo stakes. The back of the cart has a pocket for small tools or gloves. And yes I used whatever wood I could find. I had to buy a cedar 1x4 and the bolts for the wheels, that’s it. The cart tips back easily and feels balanced when I move it. My main complaint is the lawn mower wheels are too small and tend to catch any stick or bump. Here it is loaded up with gardening implements of destruction. What a relief to get those tools in one spot! After I use this for awhile I’ll see if any more changes are needed. Then I plan to build a more finished cart from new wood and see if there is any demand for this kind of product. With all the measurements at hand, building the second cart will take a fraction of the time it took to make this one.

Buy PDF & Cut List Roll it to your work zone for instant access; park it in a corner for space-saving storage.

Get the job done, and keep your space in order, wherever you are, with these multipurpose projects that will streamline your life.

Learn how to build a DIY Rolling Grill Cart with these free plans and in-depth tutorial by Jen Woodhouse.

Buy PDF & Cut List Roll it to your work zone for instant access; park it in a corner for space-saving storage.

All Purpose Shop Cart: I have a peculiar living situation, that certainly is to my advantage. I live in an apartment, which makes projects difficult to complete. Recently, my landlord gave me access to his old workshop on the property, in return for cleaning it out! The s…

I built this rolling tool cart with storage for my air compressor, nail guns, drills and other tools that I use on daily basis.

Buy PDF & Cut List Roll it to your work zone for instant access; park it in a corner for space-saving storage.

Build this mobile tool chest and take all your tools to the job in just one trip!

This DIY workbench can store the basic tools needed to build most of HomeMade Modern's DIY projects. Watch the video on the HomeMade Modern YouTube Channel for additional instruction and design ideas. Watch this build on YouTube!

Workbench and tool organization - Garage workshop

This DIY workbench can store the basic tools needed to build most of HomeMade Modern's DIY projects. Watch the video on the HomeMade Modern YouTube Channel for additional instruction and design ideas. Watch this build on YouTube!

Learn how to build a simple DIY mobile Tool Cart with Pegboard. Check out step-by-step tutorial with picture. Free printable PDF plans are available.

Organizing your garage is a daunting task, but we've got you covered with the best garage storage solutions to reduce clutter.

Buy PDF & Cut List Roll it to your work zone for instant access; park it in a corner for space-saving storage.
