
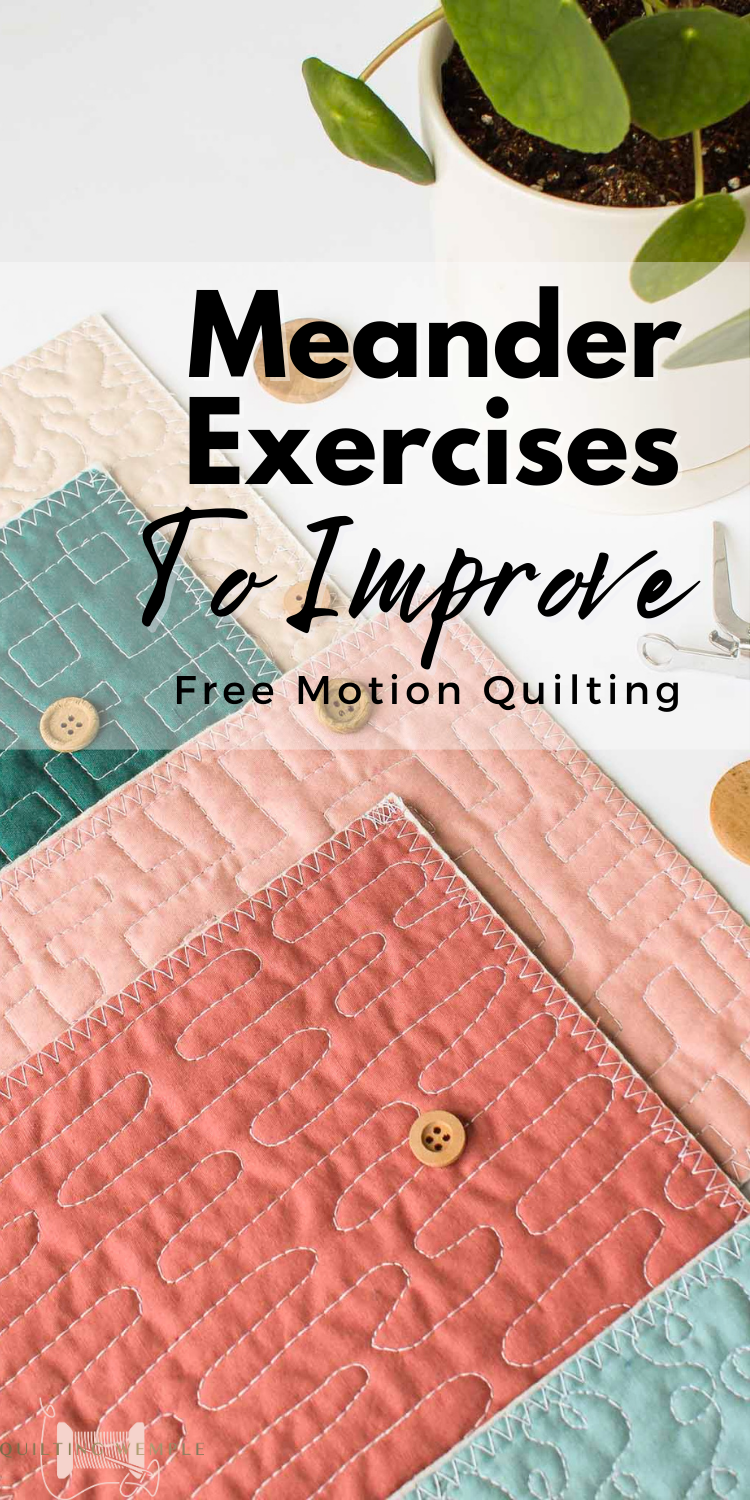
Continue reading for 5 meander practice exercises that will help you learn to put FMQ skills on autopilot so you can focus more on quilting.

I'm teaching a Free Motion Quilting class starting in April at my LQS, Heartstrings and Heirlooms. I finished up the class sample over the weekend. In the class the students will do larger samples, but I needed a small book of designs to advertise the class. As you can see in the above end view, I used three different types of batting for my sample book - Quilter's Dream 100% Cotton, Hobbs 80/20 (80% cotton and 20% polyester), and a 100% wool. I used a tutorial from a recent Quilting Arts Magazine issue (the February/March 2014 issue) to make my little book. The instructions involved drawing some lines on a piece of fabric, then sewing on the lines with a walking foot to make a larger sheet and baste the layers together. Then you quilt your designs and cut the "pages" apart. The tutorial in the magazine was very good. If you are interested in making a book like mine, I suggest you get a copy of the magazine. Below is a collage of designs I plan to cover in the class. Along the top of each page I wrote the name of the design, the batting type and page number from the book I will be using for the class. In case you are interested, I'm using the book Free Motion Quilting with Angela Waters. It has become my go-to book for quilting ideas as of late.

In this new showcase I present you Marla Varner, Paola Machetta, Irina Malyukova and Iva Steiner enjoy their stories and amazing quilts.

Back in December last year, I hosted a giveaway for a roll up of blue Cotton Couture fabric from my wonderful sponsors Polka Dot Tea fabrics and Danielle and Jeanette generously sent me a roll up as well. It's no secret that I'm a massive fan of cotton couture - I first used it last year when I made Galaxy and it was love at first touch. Needless to say, I was pretty excited to work with the roll up! Around the same time, I bought Karlee Porter's self published Grafitti Quilting book (which is excellent), and instantly wanted to give grafitti quilting a try - and what better way to feature quilting than working on an all-solids quilt? This idea percolated away for a while, and then when I came back from QuiltCon I came up with a solid plan for how I wanted to approach it. I started by sorting the strips by value (using the black and white function on my camera), attempting to have a smooth transition from dark to light across the quilt top. I nearly managed it, but I think I accidentally switched a few strips around while I was piecing it so there are a couple that don't quite transition smoothly - but it's close enough for the effect I wanted ;o) Once it was pieced and basted I dived straight into the quilting. I was lucky enough to attend a class with Krista Withers (one of my quilty heroes) at QuiltCon, and I came home full of ideas I wanted to try. One of the best things I came away from Krista's class with was ideas for how to approach breaking up negative space with quilting, and I wanted to incorporate some of that into the quilting on this quilt. So I decided to use a combination of grafitti quilting and Krista's ideas and hope for the best. I decided to use this as a learning experience, and just go with it - no ripping stitches, no self-criticism but just have fun and play. As a result it was one of the most enjoyable quilts to quilt - and I'm delighted with how it turned out. It was a brilliant learning quilt - finding some new (to me) shapes and combinations of designs, and getting LOTS of ideas for future quilts. I made this quilt for my baby nephew, who lives in a house with polished boards, so I used a double layer of wool batting on this quilt thinking it would be a lovely quilt for wriggle time (and to play on as he gets older). The resulting texture is pretty incredible - I think it will be a really great sensory quilt as he gets older and starts to explore things more. I'm using a double layer of batting more and more on smaller quilts - I just can't get enough of the texture it gives. I don't think I'd do it on anything much bigger than this (it's about 40" x 60") due to the added weight, but as I'm becoming more confident with my quilting, I'm really loving the added puff two layers gives. The quilting is all Aurifil 50wt thread - a variegated blue in the darker area of the quilt, and then a light variegated grey in the lighter area. Overall the thread has blended beautifully and has just left all the glorious texture. The combination of cotton couture, double layer batting and all that quilting makes for a pretty luxurious quilt - it's silky soft to touch and it is very comfy to lie on (as this little cutie can attest!) I can't promise I'll have two posts in such quick succession again by the way - but these wintery nights are much better suited to sitting on the couch with my laptop than braving my freezing cold sewing room, and I have lots of things I need to share, so I might actually become a regular blogger again ;o) xx Jess

Fear of not liking your quilting plan often contributes to large WIP piles. Continue reading for 5 ways to not over-do FMQ on your next quilt

I think we can all agree that as quilters we have this deeply implanted love of creating and being creative, and that creativity doesn’t just stop at piecing a quilt top. Doing the actu…

Continue reading for 5 meander practice exercises that will help you learn to put FMQ skills on autopilot so you can focus more on quilting.

Baseball quilt - posted in Quilt Pictures, Patterns & Inspiration...: Just finished making a baseball quilt for my daughter. She is hosting a ball reunion this fall so I made a baseball quilt to raffle off to off set some costs. This was a fun project that I did mostly on the long arm sashed a plain fabric and marked the stitching line with a frixion pen then put on my Maxine my Millie and applied the chenille strips now for the secret to fluffing it up.......Take your shop vac and vac...

For all of us machine quilters who are looking for some new ideas for quilting designs, this is a wonderful new book by Cindy Seitz-Krug, an award winning quilter and teacher who uses her home machine for quilting, published by AQS. What is great about this book and a bit different is how effortlessly the "workbook" idea leads you through all kinds of lovely designs, shows you how to break them down into simple do-able elements that are controlled by a marked grid. Sometimes in the end you see the grid, others times only curvy lines and designs that make the viewer ask "how in the world was that done???" Below, details of Cindy's quilting: The designs are great, but all the options she shows us with size, color of thread, scale of design, where and how to use them really help when trying to figure out what design to use where in a quilt. There are tons of illustrations, diagrams, quilted samples to help you achieve these designs. The workbook idea insures you will be able to start at the beginning, follow along, and get a quilted design by yourself! One of the first grid designs I tried years ago when I was looking for a simpler method for a design of overlapping circles was one I called "Diane-shiko" (below) as it was a new way to mark and quilt an old Sashiko design. When the marked lines are removed the circles emerge so it looks as if you quilted circles. This is the basic idea Cindy uses to create all sorts of designs with the grid to guide you. Above you can see the 1/2" marked grid, and the stitching around the lines to form this timeless design. Below, the design used in one of my quilts, "Shadows of Umbria," which Cindy also has featured in her new book. A grid design will showcase curvy designs with its formality and regularity. These designs look difficult but many are absolutely beginner level and with some practice you'll be adding many of Cindy's designs, methods, ideas to your own quilts. Visit Cindy at her website and blog to find out more: www.quintessentialquilting.com Below, one more peek at her quilting: If you were in some of my last classes I taught a design called "Ginkgo." In Cindy's quilt above she uses it as fill around larger scale designs. Below is one of my samples of this lovely design, and Cindy includes a much easier way to mark and quilt it called "Twisted Ginkgo" in this new book. It's one of my favorite designs ever in the way it looks, and how much fun it is to quilt. I experimented and tried Cindy's method to quilt this design, and it worked perfectly. I'm thrilled she could explain it so well, and the diagrams and photos are exactly what you need so you too can add this design to your skills. Congratulations to Cindy on a great book and for her recent award at Road to California for Excellence in Machine Quilting for her wholecloth quilt "Blush." Hope winter is giving you lots of time to quilt, and to play with ideas on your sewing machine. Keep quilting! Your work gets better every day! Diane

May is here and finally is is nice to be outside. Our weather has gone from 40's to 70's in a matter of 2 weeks. It's pretty nice out there. But, I am stuck inside for a few more weeks, at least mos

Create impressive geometric quilting patterns with these straight line quilting designs and foolproof walking foot quilting designs.

This pattern features the Dream Big and Supernova panels from Hoffman Fabrics. Size is about 59in x 59in

I just got back from my favorite quilt show, Road to California, late yesterday. This is a fabulous show full of some of the most amazing q...

Using a walking foot is the easiest and quickest way to quilt borders. Continue reading for 7 easy border quilting ideas using a walking foot.

I am delighted to have Patsy Thompson as our December FMQ Expert, for the 2012 Free Motion Quilting Challenge. Whe...

Progressive Detail Quilting by Judi Madsen for iquilt.com/madsen0003

Its been awhile since I've shared client quilts, and I have quite a few for you to enjoy. Here are some of my favorites. - Bridget - It was so fun to take this basic pinwheel baby quilt and add lots of detail and textures. The fabrics are so soft and sweet. Love this! Inside the pinwheels I wanted to quilt some petal like designs, which are topped of by adding the line with the three dots. Inspired by another machine quilter. On the back those lines and dots form a chain on point. One of the great parts of quilting is seeing how the design comes together, especially on the back. Unfortunately, I don't have a picture of the back anymore. I used a cream thread and an 8020 batting on this quilt. I love how the light catches the textures. I finished it off with a free hand back and forth rope design in the inner border and a loose swirl on the outer border. - Jane - After I pinned on Jane's quilt on the machine canvas...before even starting to quilt, I posted a picture on instagram...it was instaloved instantly. Her fabric choices and colors were spot on. Jane's request was lots of detail. As I look at each quilt, I try to figure out something that will enhance the fabrics and blocks...the background was begging to have these oval uneven stone like pebbling everywhere. Yes, on a quilt this size it takes awhile, but it was so work it. The "Spin Cycle" blocks just pop! I also wanted to detail the points and add something to keep it cohesive throughout the quilt. And, it was sure fun to do. The finished result is...perfect...or at least I think so, this is why its one of my favorites. Love how the light enhances the fabrics and quilting. I used a tan perma core thread and an 8020 batting. - Jean - Isn't this quilt amazing?!?!?! I has specific instructions to add a ton of detail to this quilt. The wool batting that Jean provided allows the quilting to pop and prevents the quilt from being stiff. Love the wool!! The hours that this took to even decide what to do were long, and I'd show you my drawing but its not too great...so I'll stick with these pictures. Enjoy! Its quilted with a cream perma core 30 tex thread. Here is a close up of one of the blocks. Do you see the block inside the block?? Yeah, amazing! When figuring out a detailed pattern, I try to use some of the same quilting designs in different parts of the blocks to tie whole design together. You can see that here, with the two blocks together. Love this! The borders. Here are a couple pictures of the back...love to see all that detail together. - Jeanette - This was a fun little wall hanging to quilt. This was Jeanette's first quilt, and she did an awesome job! I wanted to crackle the background to give it some texture, because there is so much wide open space. Then, I added a swirl and feather design to the tree to give it a fancy look. One of my most favorite parts though is this wood grain trunk. I used coordinating thread colors and 8020 batting. -Jeanne- This was another instahit on instagram. By pebbling the background it made the circles and how they are quilted pop. A side view. I used 8020 batting and a white perma core thread throughout. - Jen - Jen made this quilt for her lucky son! To keep it masculine I wanted to add all the lines. The lines in the grey add extra dimension to the chevron. And, who doesn't love this color combo! I used an 8020 batting, grey and cream perma core thread. - Karen - This quilt is made up of a simple quilt block, and was begging for some detail. Thankfully the block allowed this orange peel design to dress it up. I used a 8020 batting, and a cream perma core thread. - LaReen - LaReen made this gorgeous table topper out of one of my favorites fabric lines. She gave it to her mom for Christmas lucky, huh! I wanted to do something simple in the background that would enhance the star. Also, something fancy in the red border to dress up all that space. It turned out lovely. When a client gets their quilt or topper back and says now they need to make one for themselves, its quite a compliment. Thanks, LaReen! I used a 8020 batting and coordinating threads. - Lisa - This was another instahit! Can you believe all of these 1" squares...its king size and there is no border, which means there are 10,368 squares. This is an amazing one! Lisa asked for simple cross hatching, and I love it! 8020 batting and a cream perma core thread was used. This gorgeous spool quilt is one that I think Lisa made with a guild. I saw a few other of my clients names signed next to their spool. I wanted to add some detail to the spool to make them stand out, so I just did a simple echo line outside of each spool in the background. Look at all of that amazing hand embroidered wool work. Lisa, you are amazing! I wanted to add something that would make the wool pop and would dress up the background and open space, this all over swirl feather design does that. 8020 batting was used, with a cream perma core thread. Lisa made this for one of her lucky friends, for her birthday. The colors and fabric choices, make this one of my favorites. Because this quilt has minky on the back I needed to do a loose all over design in the center. This one is super fun to do, and I can add just about anything to it. I thought crackle quilting would enhance the appliques that Lisa did. Love those stems and flowers. 8020 batting was used and coordinating threads. - Maho - Maho always makes amazing quilts and does a fabulous job each time. This is a perfect example, normally I cringe inside when someone brings a quilt with really large borders (because they grow and ripple out of control) , especially when the inside is pieced on the bias...but not Maho! She is excellent at cutting and sewing exactly! Thanks, Maho! This is a quilt that she made for her daughter. She wanted some detail...So, I did an all over pattern in the background...which was the easiest way to get around the ric rac. I thought the lines and feathers would add great texture to the chickens. This quilt is amazing!!! The light catching all the details. Maho's husband came with her to pick this quilt up and was in awe...I've heard he raves about it to some people that we both know. 8020 batting used and a cream perma core thread. - Sandy - These are called the "Shinning Star", and my mom made these three in a long weekend sewing getaway we had last year. Even though the fabrics are the same for two of them, I'm showing them to you because the quilting is a little different in the backgrounds. This is quilting example number 1. This is one she made for my grandma. A close up of the feathers. This has feathers all over it! This is quilting example number 2. She made this one for my aunt Kris. I quilted a very tiny cross hatch in the inside of the feathered circles. Feathered swirls in the star and feathers in the border. Close up view. This is quilting example number 3. This one my mom made for my sister in-law, Brooke. She is the classiest person that I know, so I wanted to keep it as simple and classy as possible. The background has lines, the star is a feather swirl and the border is also feathered, with a back and forth rope design in the inner border. These soft golds went well with Brooke's Christmas décor. Love the light catching the details. Another view. All three stars I used 8020 batting and coordinating threads. - Wendy - I'm sad I didn't keep more pictures of this quilt! This is the first quilt that Wendy has made, and she gave it to her mom. It turned out gorgeous! Love love love, this fabric line. I do want to show you the quilting though. We talked about adding some details to this border to show off all the piecing that she did while sewing...I love how this one turned out! It even awesome on the back, look below. The quilting on the center of the quilt. This quilting on the backside of the border. Fun to see how the pattern comes together. I used an 8020 batting a cream perma core thread from A&E. Lots of beautiful quilts, huh?!?! Which one is your favorite??? Hopefully I can do this more often, its inspiring for everyone to see all these different unique patterns. Hope you enjoyed this, and happy sewing! ~ leisha

Love pearls. Love pearl earrings. Love pearls bracelets. Love pearl necklaces. Love pearl embellishments. Love pearls. Yes, even the fake ones, since those are the only ones I can really afford. Costume jewelry? I'm on it! What doesn't look good in pearls? Jeans? Pearls. Sundress? Pearls. Comfy tee? Pearls. Name-brand suit? Pearls. Wedding dress? You've got it...PEARLS! So what do pearls have to do with quilts and quilting? Not so much. Unless you love both. Then you find a way to incorporate one into the other. A little inspiration... The last several designs come from a blog I discovered while writing this post. Shala lives in AK and posts mandalas on her lovely blog, Don't Eat the Paste, and Pinterest, which is where I found her work. Please visit her here and here. (And say thank you from Mary at Fleur de Lis Quilts!) Have a great week!

When I started long arm quilting nearly 11 years ago I never thought quilting would evolve to what it is today, and I'm so excited to see what the future holds. In the beginning there weren't very many quilting tools or tutorials on how to use them. Now, wow! I'm blown away at the talent I come across on a daily basis. The quilting and machine quilting community is booming and it is so exciting!! I would like to do a series of posts and share my favorite go to tools that I use to either long arm quilt or to sew. First up, my great friend Linda Hrcka (who has a heart of gold) is an outstanding long arm quilter, and she has created some long arm rulers that I recommend to any and every long arm quilter. I won't need a different set of curve or straight rulers ever! Let me tell you why... I love rulers that are created for quilters by quilters. They understand the need for the right curve, length, line markings...on the rulers themselves, the durability, the functionality and so forth. Linda has taken the time to develop and perfect them, which makes my job as a quilter easier. I can rely on the curve or measurement to be consistent, which creates something rather beautiful in the end. My favorite curve rulers of Linda's are the #10, #12, #15, and #20. They each have different lengths and curves; which makes them perfect for quilting designs in sashing, borders, blocks and so on! The possibilities are endless. Head over to instagram and check out the hashtag #theqpcurvetemplates to see all the amazing designs quilters from all over the world are creating. Here are a few designs that I've come up with on client quilts and one of my own... This is a quilt of my own. I used Gooseberry fabric by Vanessa from Lella Boutique, from Moda. The quilt pattern is called Moda Love, and is a free pattern from Moda. I used the #15 curve ruler from Linda for the corner of the blocks, and the #10 curve ruler for the sashing. I love love love the look that these curves create! This very center part of the quilt, which is actually where the sashing meets is my favorite part of the whole thing. I was hoping for something awesome when I was finished, and I couldn't love it more. Those curves created from Linda's rulers...I'm speechless at the result. This stunning quilt was made by Barbara, one of my clients who has become a dear dear friend! Love her, and felt so privileged to quilt this for her. The pattern is by Pam Buda and is called, Prairie Gathering. Wow, huh?!?!?!!!! I knew I wanted to use Linda's curve rulers throughout, starting with the borders. Its difficult at times to figure out what to quilt in those on point triangle blocks that are often in quilt borders. I saw Linda and Kathleen (from Kathleenquilts.com) create this design and knew I wanted to replicate it. Linda's #20 ruler was my first choice! I think that one is my favorite curve and ruler length! I'm exciting to use it on one of my own quilts soon. Right next to the freehand outside border (on the right) is that long straight border...this design happens to be one of my favorite ways to dress up a border or sashing! I used a #15 curve ruler from Linda...love it! A couple more pictures of Barbara's quilt! Julie made this simple half square triangle quilt, and I had the opportunity to quilt it a couple of weeks ago. I wanted to make the white background around the block pop! So, I used #10 ruler with a half inch spacing, I couldn't love it more. I used the #12 ruler for the inside curve on the echoed petals on the green block. It's fun for me to see the difference quilting can make on a simple quilt block. Love love love quilty curves! Have I convinced you yet these rulers are worth every penny!!! Head over to Linda's shop: http://thequiltedpineapple.bigcartel.com/ and check them out, and the price is pretty great!!! Her curves and straight rulers are sold individually or as a set, or you can get all of her rulers in one big set. I didn't mention the two smallest curve rulers. The smallest called the BFF is created to help you quilt around applique or the like. It fits right in your hand, and it the perfect little ruler for guiding your machine into those tight spots. The #8 ruler is the second smallest and is great for those slight small curves, perfect for inside blocks. Here is a short youtube video of me using the #12 ruler, enjoy: Linda recently created a set of 3 straight rulers!!! Of course several quilters, myself included were excited! Look at all those awesome lines...I'm super excited to use them more and more! I was more than thrilled when Linda sent me a set the other day, perfect timing too... I have only used the longest ruler, a 16" length once, and I already know this is going to be my go to straight ruler set. The most important thing when using rulers is to avoid having them slide on you while your quilting. In the past I've attached some grip dots to the bottom of my rulers. With this ruler I didn't have to, why you might ask...Linda added an extra 1/2" to the width of the ruler. Which may not seem like it would make much of a difference, but it does! My hand was able to grip it better, yay! I used this straight ruler to do the 1" border, in the white, and the on point diamonds on the first inner border. (pictured above) I'm excited to use the grid lines on the rulers in the future. Linda just made measuring for cross hatching so easy with the on point measurements!!! And, in case you were wondering...I used the #20 ruler in the red inner border. Thanks, Linda! I love what I do, and its a treat to use your rulers. Creating new designs with your rulers has taken my quilting up a notch! I appreciate all you do, Linda, to make such an amazing impact on the quilting world. So proud of you, friend! (the corner of the border...love what straight lines can do) Linda's straight ruler set is also available at: http://thequiltedpineapple.bigcartel.com/ Which quilting tools would you like to hear about next??? Head over to my instagram @leishakaye and let me know what interests you! Thanks for stopping by, ~ happy quilting, Leisha

Use freezer paper to easily mark areas you want to leave unquilted or transfer motifs onto your project. Quilting expert, Ashley Hough, shows you how.

Hello all, Today i am going to continue my investigation into the Provençal Costume by talking about something which may be surprising in such a warm climate, namely, quilted clothing. Quilted clothing is extremely widespread, as far as China, being a practical way to produce warm clothing. There are three garments worn as part of this costume which are sometimes quilted, the corset or bodice, the petticoat, and the skirt. Obviously these are more commonly worn in winter, but the skirt especially is sometimes worn even in warm weather for special occasions, such as weddings. There are two types of 'corset' or bodice worn in Provençe, with a lace up front, or an overlapping front which is pinned shut. The peasant class, the Paisanne, often wears a laced bodice as the sole outer garment, made of a double layer of colored or striped cloth. The Artisanne and the Bastidanne most commonly wear the bodice or corset which is pinned shut across the front. The back has a fold with lacing to adjust the corset to the body and provide support for the torso. This type of bodice/corset is worn over the chemise and under the dress or jacket 'caraco'. The corset is usually white or off-white, made of a double layer of cloth, and often finely quilted. Here is a photo of such a corset. Another similar garment is the petticoat, which in cooler weather is quilted the same way. These garments are made with minimal wadding or none at all, and often show very elaborate geometric and/or floral designs quilted into them. Here are some examples. More surprisingly, perhaps is a skirt worn by the upper class, the 'Bastidanne', which is sewn and quilted just like a comforter, and is considered to be a very formal garment. The normal skirt averages about 4.5 m around, but the quilted skirt runs about 2.6 m. The regular skirt is called 'jupe', but the quilted skirt goes by the special name of 'Cotillon'. Here is a drawing by Lucille Armstrong showing this version of the Provençal Costume. This is more or less the upper class, Bastidanne Costume, except that the sleeves on the jacket are usually longer, and the fichu is normally of whitework. Here is another photograph of a Provençal wedding, with both the bride and groom in the Bastidanne Costume. It is very refreshing to see people maintain their own traditions instead of submitting to the cookie cutter white elephant wedding gown of standard western culture. The woman standing at the left and the man kneeling at the right are both in Paisanne Costume, while the two women standing and kneeling behind the groom are both in Artisanne Costume. If you look closely, you can see that the bride is wearing a quilted 'cotillon'. If the cotillon is made of a printed material, then usually the quilting is made up of a grid of diamonds over the body of the garment, with parallel lines of quilting on the bottom edge. Here are some examples. These skirts are made in a wide variety of colors and print designs. These skirts are made by putting the lining cloth on a stretcher, then placing the wadding on top, and the outer cloth is then quilted by hand on top. The bulk of the texture of the quilting shows on the outside, and the inside is relatively flat. There is a second type of cotillon which is made, in which the surface cloth is of a solid color, often a rich silk. A band of design is inserted between the diamond grid of the body of the cotillon and the parallel pipes of the hem. Here is a photo of the Bastidanne costume including such a cotillon. The solid color of the top cloth enables the quilted design to be seen and appreciated. Those who wish to make more ambitious quilted designs choose to do this. The inserted design varies significantly in width. Here are a couple more examples. Here are some examples of the types of designs which are inserted. Each horizontal band is a separate design. There is yet one more type of cotillon which is sometimes found. Occasionally a girl makes one specifically for her wedding. While the dress for the wedding may be of any color, this particular type is often white. The added design makes a very wide band, but instead of being arranged in bands, the design consists of various images symbolic of a wedding, fruit, flowers, arches, baskets, hearts etc. scattered around the band. Usually this includes the bride-to-be's initials, and can also include inscriptions such as short prayers or 'this skirt belongs to demoiselle X'. These are obviously a lot of work and are often handed down as heirlooms within the family. Here are a couple of examples. I found this tradition of handiwork surprising, and I hope that you find it interesting and inspiring. Let us make and wear things that are not the same as everyone elses. Let us look to the traditions of the past when everyone contributed to the development of traditions. Thank you for reading. Feel free to contact me with requests for research. I hope to eventually cover all of Europe and the Former Russian Empire/Soviet Union. I also gratefully accept tips on source materials which i may not have. I also accept commissions to research/design, sew, and/or embroider costumes or other items for groups or individuals Roman K. :[email protected]. Source Material: Mary Gostelow, 'The Complete International Book of Embroidery', New York, 1977 Rode de Basso Prouvenço, 'Le Costume Populaire Provençal', Aix-en Provençe, 1990 Andre Sainsard, 'Costumes Folkloriques Provinces Françaises', Paris, 1972 Royere, Gardilanne, Moffat et al, 'Les Costumes Regionaux de la France', New York, 1929 Charles-Brun, 'Costumes des Provinces Françaises', Paris, 1937 P. Leroux, 'Costumes Regionaux', Paris, 1940 Nicolette Tennevin & Marie Texier, 'Dances of France II. Provence and Alsace' from the series 'Handbooks of European National Dances', London, 1951

You know, I've been so bad at blogging this year that I was embarrassed when a couple of friends pointed out that I never blogged about the new book. Yup, I wrote another book, this time about the quilting process. Most of you know I love that walking foot and so I set about putting it through its paces and trying to get the most out of it and the result was WALK: Master Machine Quitling With Your Walking Foot. The walking foot is awesome for straight lines as we know, and I'll never disparage simple linear quilting, but that's only the start of the creative quilting options that are possible with the walking foot. Just check out the back cover of the book to see what I mean. WALK has been selling like hotcakes since its publication in December and has been one of the top selling quilting books on Amazon. It popped back up to number one once it got back in stock and I thought we should celebrate with a giveaway. Just comment here and let me know what you love about walking foot quilting to win a copy of the book. Leave a comment by Monday 9 a.m. CST. After I wrote the book I've continued to push myself to find more walking foot friendly quilt designs and I'll be sharing some how to's for those soon. In the mean time, if you haven't got the book, check with your local quilt shop, library or get it in your hands the Amazon way. Walk on!!

This has been the most fun project so far! Sometimes I get a little carried away with adding bling. Someone needs to restrain me. Seriously. But when I have an embroidery area that is fourteen feet long, it’s easy to let my imagination run wild! I didn’t have to hoop, and rehoop, and rehoop…. just to get an embroidery that fits a 60 inch table runner. I could do it all in one pass! No stabilizers! The back of my table runner looks as nice as the front does. Back to the bling….. I stitched this table runner on a black fabric that I cross-hatched with a 3/8 inch design in the back ground. I love the way it looks when a small cross-hatching is washed and thrown in the dryer. After a little checking, I discovered that Mylar for embroidery can go through the washer and dryer without any harm or change to it. Perfect! I enlarged my design from Embroidery Library, brought it into Grand Format Embroidery on my Innova quilt machine, and pressed GO! Pinning a layer of Mylar under each flowered area was simple. All you have to do is tear away the excess, and then move to the next area. When the runner was complete, I added my beads. Like I said, someone needs to restrain me because I am having way too much fun!

"Serenity" by Molly Hamilton-McNally just stood out for Justin at Houston Quilt Festival 2021 and made him say, "Wow!"

Customer Quilts Quilt by Noelle Powers Quilt by Noelle Powers Quilt by Heather Bostic Quilt by Jenny Redwig Quilt by Jenny Redwig Quilt by Julianna Gasiorowska Quilt by Julianna Gasiorowska Quilt by Michelle @Ilikeorangetoo Quilt by Penny Layman Quilt by Cindy Wiens Quilt by Cindy Wiens Customer Quilt Quilt by Angela Pingel Quilt by Katie Pedersen Quilt by Katie Pedersen Quilt by Krista Fleckenstein Quilt by Krista Fleckenstein Quilt by Sonja Callaghan Quilt by Sonja Callaghan Quilt by Jenny Redwig Quilt by Krista Fleckensten Quilt by Alison Robins Amanda's Value Quilt Personal Quilts

These are quilts that represent the different quilting designs that I offer. With each one of these quilt designs, I was told by the clien...

At UQSM I learned about Days for Girls https://www.daysforgirls.org which is a wonderful organization that provides education and feminine hygiene supplies for girls in impoverished communities. Above is a list of items they need donated. Perhaps you have some of these items lying around your sewing room? I'm pretty sure I do! Paper Round by Kimberly Sandberg The Modern Pineapple by Carolina Asmussen Honorable Mention (Don't you love the quilting?) Cake Plate by Salena Korpi Beckwith 3rd Place Pieced Again... Don't you LOVE the quilting?? Inspire by Marie Eldredge First Place Modern We got to see this little Cutie Pie's first dance recital this weekend! What a JOY, what a TREAT, oh how FUN it is to be a GRANDMA! 😁

Explore gfquilts' 1845 photos on Flickr!

I usually just quilt my quilts with all over designs. I'm just not very fancy. I don't enter my quilts in shows or anything, it's not ...

I have a neat new quilting design for you today! It’s appropriately titled Neat Fans: I realized the other day...

Custom Quilting is determined by how complex and dense the quilting is. I hope that these photos and descriptions can help you to determin...

Here are a few designs from my Quilting Sketch Book: It is FUN for me to draw wavy horizontal lines in the sketch book... then fill in the sections with different designs. This mindless drawing helps me determine what designs will work under the needle. I chose these two designs and paired them together.....they flow nicely. This looks too busy... but, if it were stitched with matching thread, it would look great....lots of texture! Draw out some wavy horizontal lines... then fill them in and see what you come up with. Red Goat Barn Front Yard Hydrangeas Hydrangeas are at their peak right now... Thread Shed Hydrangeas Gunnr.....supervising from the pick up seat! CLICK HERE to view my online Sketch Book CLICK HERE: to see My Quilts May Your Bobbin Always Be Full, LuAnn Kessi
