

"I have a tiled floor and the foot pedal seems to slip further and further away throughout my sewing session, until I have to fish it back again. It's this sitting with one leg extended, sitting at an angle that I'm convinced in a back-breaker for me. So I set out to solve this dilemma and sew a non-slip sewing machine foot pedal pad. It's not pretty, but it works, and that's what matters. My foot pedal stays put now a lot more than it did before. I think this would work if you had a wooden floor or carpets too, not just for tile. Here's how you can make one – it's pretty cheap!"

Sewing Machine Covers look super cute, but they also help protect your sewing machine from dust and pet hair getting into your sewing machine which will help prolong its life.

Here are 60 ideas To Recycle Vintage Sewing Machines into various types of home decor accessories. We hope that some of these ideas will inspire you.

Find out how Beth Donaldson's quilting career led to her being a super model. Plus she's giving away two copies of: F is for Friendship, A Quilt Alphabet.

When someone mentions a home sewing machine, most people immediately think of Singer. Indeed, many Americans saw their grandmothers use this machine type when they were children. Even though the first Singer sewing machine appeared ... Read more

Here's what to do when your sewing machine thread bunches up. Sewing machine thread bunching up on the top or underside of fabric is a common problem & a frustrating one! But don't despair, there are lots of things you can check to solve this issue. Refer to this checklist before call a sewing machine repair man!

10 Top Budget-Friendly Sewing Machines You Can't Ignore!"

When the timing of your sewing machine isn't right neither are your stitches. Learn how to time your sewing machine today.

For all it’s hard work and taking the blame for my mistakes, it’s time to show my sewing machine some love! It didn’t seem like a particularly exciting project, but my sewing mac…

Free downloads and designer projects for sewing, quilting, crochet, and knitting enthusiasts.

Bunching thread? Breaking needles? Skipping stitches? It happens to the best of us. We consulted Becky Hanson of Singer Sewing Company to keep your sewing experience positively seamless.

I have a foot fetish apparently. Not the weird kind, the sewing machine foot kind. This is my recent addition: the binding foot! It is amazing. You can use this foot to attach bias tape and

Many of us have old and vintage sewing machines from our grandmothers. They are beautiful pieces of history. If you are not using the sewing machine you

When I first began sewing, I saw patterns as silver fitting bullets. Unlike the ready-to-wear garments that gave me conniptions, from their gaping waistlines to buckling busts, sewing patterns were…

Get a Crocheting Friend to Help and Make One for Each of You! Soft yellow crochet is so pretty between fabric blocks in this lovely cover. Display it on a table or add another row of blocks for a lap throw. Five inch charm squares in vivid large scale prints are sown together, right sides …

Learn how to sew on a sewing machine with these printable practice sheets. Download them for free, print them on your home printer, then stitch along the lines to practice sewing straight, curves, turn corners, and more. They're perfect for kids and adults who want to learn to sew or practice their sewing skills.

If your child doesn’t have home economics, you should consider teaching your child how to sew on a sewing machine at home instead.

Sewing tutorials for all ages! Whether you're a beginner or you've been sewing all your life, there's something here for everyone.

A little while ago on the Oliver + S discussion forums, one of the members introduced a topic that I thought was very interesting and timely. She mentioned that she had been doing some research on …

Date a Girl Who Can Sew. ~ Lorenza Doyle

This post is part of the Sewing Back-to-School series, 30 days of helpful sewing articles by guest bloggers. Feel free

You need to be careful when oiling your precious sewing machine because too much application could attract dust and lint, gumming up the machine and even rendering it dysfunctional. Get familiar with sewing machine oil ingredients, minerals, and lubricants with this post and keep your machine at its best level!

Learn to tailor like a pro!

Don't stress over the tension dials on your sewing machine. Find out when and how to set and adjust thread tension.

New to the world of overlockers and sergers? Understanding your serger will help you feel comfortable and confident while using your machine.

If you are a quilter, then you know how important it is to have plenty of table room to support your fabric. Most sewing machines do not come with adequate table space. Large fold up tables can be placed on both sides of the quilting machine, or you can opt to make your own machine quilting table.

Today I’ll be showing you how to use a twin needle or double needle on your sewing machine all in a video tutorial. There’s a photo tutorial as well along with some great close up examples to help you be as successful as possible with sewing with a twin needle. There’s something about sewing two […]

Learn how to use a gathering foot with your home sewing machine to gather fabric fast and easy. Watch our step-by-step video tutorial here.

mailed this today, it is my first time sewing a zipper. I was not brave enough to use the machine so I just sewed it all by hand..

This is the easiest way to hem pants using a sewing machine. Even beginning sewists will do great with this!

Today I’ll be showing you how to use a twin needle or double needle on your sewing machine all in a video tutorial. There’s a photo tutorial as well along with some great close up examples to help you be as successful as possible with sewing with a twin needle. There’s something about sewing two […]

The easiest way to follow your favorite blogs

Learn how to use a sewing machine and participate in Melanie Ham's learn to sew series! This is for absolute sewing beginners and beyond.

Today, in part 4 of the Getting To Know Your Featherweight Series, you will learn how to thread a Singer Featherweight Sewing Machine from start to finish.Suggested Products:1) Crosswound Spool of thread: Aurifil or Presencia2) Thread Stand or Thread Post3) Schmetz Needles4) Thread Cutterz or Thread Snips5) Super Easy Machine Needle Threader6) Singer Featherweight Instruction Manual 221 or 222 To begin, you will need to turn the handwheel (which is technically called a “balance wheel”) towards you until the thread take-up lever is at its highest position. Turning the handwheel in the proper direction is something important to remember! You always, always, always want to turn the handwheel towards you and not away from you. Even if you are sewing in reverse, the handwheel will still be turned toward you – in the same direction and manner as in the video tutorial. If you ever turn the handwheel away from you it causes the thread to catch incorrectly around the bobbin assembly and can result in a thread jam…. But not to worry if that happens accidentally, because there is a video tutorial (from the Featherweight Schoolhouse page) to help with removing the jammed thread. Now you will need to determine what kind of thread spool you are using. Is it a stacked spool or a cross-wound spool? A stacked spool has thread that is wound round and round stacking the thread strands one on top of the other. A cross-wound spool has thread that wound on the spool in a crisscross pattern. If you are using a stacked spool of thread then place the spool on the spool pin. Your thread will go directly from the spool to the first upper thread guide... Like this: If using an Aurifil cross-wound spool then it helps to remove the bottom orange disk so the thread doesn’t get caught on the bottom and will unwind smoothly as it goes to the needle. With a cross-wound spool then it is highly recommended that you use a Thread Stand or Thread Post that is designed specifically for the Featherweight. There is has an excellent video tutorial on the Featherweight Schoolhouse on the importance of using a Thread Stand. Shop Thread Stand for Singer Featherweight 221 or 222 HereShop Thread Post for Vintage Singer Sewing Machines Here Cross-wound spools require the thread to be lifted off the spool, versus pulled from the side (which causes a wobble of the spool). Bring the thread strand first to the stand’s upper guide then back down through the hole at the base of the shaft, then directly over to the first upper thread guide on the machine. NEW, Updated Thread Path! Now your thread won't slip out of the Thread Stand guide whether you use it for a spool on the top of the machine or with a cone at the back! Simply thread the hole through the base of the shaft before going to the first thread guide on the machine. Like this.... When using larger cones - you simply adjust the placement of the Thread Stand to accommodate front to back, which allows the thread to flow easily off of the cone from the table as shown below. The remaining steps for threading the machine will be the same for all spool types. Place your right hand on the thread to hold it taut for the next couple of steps….. Using your left hand, grab the thread and bring it straight down and slip it between the tension disks. Make sure it’s between the disks and not in front or behind them. Bring the thread around and under the take-up spring, continuing on around. The take-up spring should raise up as the thread is brought all the way around and into the retaining fork on the tension unit. Then direct the thread behind the wire thread guide (directly above the tension unit). Next, go up and through the take-up lever from right to left. Bring the thread down and into the eyelet on the faceplate. Usually, you can catch the thread from the back of the eyelet. Continue threading to the next lower wire thread guide as well as the last needle clamp thread guide directly above the needle. Some Featherweights have this last guide situated in such a way that the thread enters from the right, but most Featherweights have the thread entering this last guide from the left. Remember from our last video how important it was to have the flat side of the needle facing left? Well, this last threading step is just as important, too, for proper stitch formation. The thread goes through the needle from the right to the left – or an easy way to remember is INSIDE OUT. From inside the machine to the outside. If the thread or needle is difficult to see then be sure to try our super easy machine needle threader in the shop. It takes away the hit & miss guesswork and easily threads the needle! The instruction manual says to draw about 2 inches of thread through the eye of the needle, but we recommend pulling several inches to have more to work with before you sew. Once you get used to threading your machine the proper way, you’ll zip through machine threading every time, no matter what kind of thread spool you use! Be sure to review video #1, 2 and 3 in this Getting To Know Your Featherweight series because our next tutorial will be all about how to pull the bobbin thread up to the surface and prepare for sewing! NEXT: Getting To Know Your Featherweight Part 5: Prepare for Sewing

Here are 60 ideas To Recycle Vintage Sewing Machines into various types of home decor accessories. We hope that some of these ideas will inspire you.

How to Make a Bodice Pattern - Draft a sloper pattern based on your own measurements to help you fit patterns to yourself.

If your sewing and stitches aren't going smoothly, your sewing machine tension may be the problem. Here's how to determine where the problem lies, and how you can prevent thread nests as you sew.
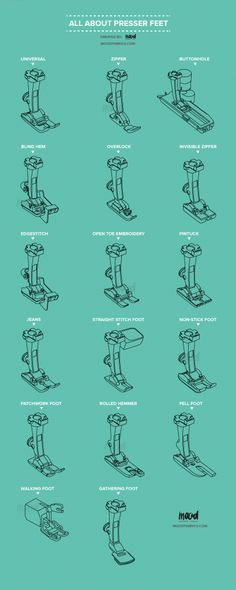
We're back with another guide, and this time we're focusing on presser foot attachments! One of the most important pieces to any sewing machine and project,
