

Are you interested in exploring natural plant dyes and the eco-print technique? Or perhaps you are already a seasoned eco-printer but would like to learn more about dyeing on paper? This ebook provides an in-depth guide to each step of the process. There are illustrated pages about different categories of leaves, with specific plant names to help you choose good leaves to eco-print with right away. You will learn about different paper types and the options of preparing them with metal and soy mordants, or adding iron and dye blankets on top. It also covers different options for bundling and cooking, some pointers for improving pale prints, and suggestions for how to use your beautiful eco-printed paper. At the end is a recipe section with step by step instructions for 4 special projects, including discharge printing. This ebook is a beautifully illustrated, 84 page PDF document that is available for download immediately after purchasing.

Eco Printing or Eco Dyeing on Fabric. How to make Eco Prints with leaves on silk chiffon and cotton fabric with an iron modifier.

data:blog.metaDescription

Hey creative mamas! Have you ever thought that it was possible to get your kids right into nature through a fun crafty activity? Eco print with natural dyes will do just that. It's totally safe,

Eco Printing or Eco Dyeing on Fabric. How to make Eco Prints with leaves on silk chiffon and cotton fabric with an iron modifier.

Introductory notes: The search for hidden colours, forms and textures is for me the lure of eco dyeing and eco printing, and a form of art. Eco dyeing and eco printing are essentially direct contac…

Onion skins are perfect for creating beautiful earthy tones and are a great starting point for natural dye beginners. Here's an easy tutorial to create your own onion skin dye bath.

Bundle dyeing is one of the easiest dyeing techniques. It produces a unique pattern every time, as it all depends on the arrangement of the dyestuff. This tutorial doesn’t cover mordanting - fixing the color. If you are working with materials you have at home, you can skip this step, though colors will be less vibrant and less durable. Don’t let it stop you from experimenting, though!

Natural Dyeing Tutorial. Learn how to use red cabbage to obtain beautiful purples, greens and blues with organic cotton yarn.

[responsivevoice_button] The live round of the Iso Dye Club has come to an end, although new students are still welcome to join and will be able to work through the ecourse at their own pace. It ha…

Dyeing with a natural Cochineal dye prior to eco printing to create the most amazing colours imaginable! Complete tutorial with pictures!

Learn a fun new technique called rust dyeing fabric that uses vinegar soaked fabric and old rusted metal to create gorgeous pieces of dyed fabric.

Eco printing has so many questions since it is such an interesting art form. I'll share my Eco Printing Tips & tricks with you from my many experimentations

Learn how to easily ice tie dye geode patterns with this in-depth, step by step tutorial on the cool geode tie dye technique.

Discover the process of dyeing with this Natural Dye Pulling (Tie Dyeing) DIY. This project is great to do with kids and is part of our Kids Lab series.

We are in the middle of a pretty intense heat wave over here in the Midwest, and boy is ever it hot hot hot. The humidity level reached the point of unbearable since this past week and that means our outdoor adventuring has sort of come to a halt until things cool off a bit. That being…

Lois Ericson shows you how to create uniquely colored and patterned fabrics with ordinary household bleach.

Bundle dyeing is one of the easiest dyeing techniques. It produces a unique pattern every time, as it all depends on the arrangement of the dyestuff. This tutorial doesn’t cover mordanting - fixing the color. If you are working with materials you have at home, you can skip this step, though colors will be less vibrant and less durable. Don’t let it stop you from experimenting, though!

Natural dyeing is an ancient tradition & techniques behind this art hardly vary globally. Read the article to know more about natural dyeing than most people.

Dyeing with a natural Cochineal dye prior to eco printing to create the most amazing colours imaginable! Complete tutorial with pictures!

Eco Printing or Eco Dyeing on Fabric. How to make Eco Prints with leaves on silk chiffon and cotton fabric with an iron modifier.

Lois Ericson shows you how to create uniquely colored and patterned fabrics with ordinary household bleach.

This is tutorial on sun printing fabric with Dye-na-Flow by Jacquard.

Have you ever wanted to try natural dyeing? It's as easy as raiding your pantry! Check out this step-by-step tutorial for how to dye yarn using black beans to get a gorgeous smokey blue color!

Mordants used in natural dyeing. Defining mordant such as Allum, Copper, Tin, Iron and Chrome. Protein and cellulose fibers

Long-term readers of this blog may remember that a couple of years ago our house was really badly flooded when the water tank in the loft overflowed while we were on holiday. :-( We came back to a …

Get stunning results with the simple technique of sun printing on fabric also knows as Cyanotype. Upgrade your fabrics with leafy patterns!

Simple instructions to figure out the mysteries of Eco Printing on silk. Full explanation with detailed pictures. Make your own Silk Scarves!

History and practical use of natural dye pastes for modern textile printing.

Natural Dyes I have spent the last few days experimenting with natural dyes made from plant products. The process has given me a new appreciation for natural colours and fabrics. It has been a fascinating journey as I have tested the validity of different information on the topic and worked with the natural dyes. The information below has been gathered from research and my own findings. What Can Be Used as Natural Dyes? The best thing about natural dyeing is that the ingredients you need are fairly easy to come by. Here are just a few materials you can use (and the colors you’ll get with each). Brown Onion skins (yellow/orange) Red Onion Skins Coffee grounds/tea (brown) Strawberries/cherries (pink) Roses (pink) Lavender (pink) Red cabbage (blue/purple) Hyacinth flowers (blue) Beets (deep red) Iris roots (gray/black) Daylily blooms (red/purple) Artichokes (green) Celery leaves (yellow) Turmeric (yellow) Mulberries/blueberries/blackberries (purples) Red Hibiscus Flower (reds-purples) How to Get Started Straining the dye Step 1: Prepare the Dye Chop your plant or berries into small pieces, measure them, and put them in a medium-to-large pot. Add twice as much water as ingredients (if you put in two cups of plant material, add four cups of water). Bring to a boil, and then simmer for one hour. Strain off the hard materials and keep the “dye.” Keep in mind that the longer you let the materials sit in the water, the stronger your dye is going to be. If you have the time, you can even let it soak overnight (without heat) to get a really concentrated solution. Red Onion Skins Red Cabbage Brown Onion Skins Beets Red Hibiscus Vinegar Fixative Step 2: Prepare the Fixative Once you’ve picked out what you want to dye and you’ve got your dye all ready to go, you have to prepare a fixative for your fabric. This will “fix” the dye into the fibers so it won’t wash out. If you’re using berries to dye your fabric, you should use a salt fixative. Put 1/2 cup salt in 8 cups of water. Put your fabric in here and boil for one hour. If you’re using plants to dye your fabric, you have to use a vinegar fixative. Combine one part vinegar and four parts water, and boil the fabric in the mixture for one hour. When your fabric is done, rinse it out under cold water. Step 3: Dye the Fabric All you do now is place your wet fabric into the dye bath and simmer until the fabric has reached the color and shade you want. The color is going to be a bit lighter once the fabric dries out. Then, wash the fabric separately under running cold water until the water runs clear. Beetroot Dye Red Cabbage dye Brown Onion Dye Red Onion Dye Tea dye Red Hibiscus Dye Turmeric tie-dye Turmeric dyes (with tie dye) Sample natural dyes Sample natural dyes Red Hibisus colour after rinsing Red Cabbage dye pre-wash Beet pre-wash Brown onion pre-wash Names of dye for each fabric sample Naturally dyed fabric As evidenced by the pictures, natural dyes really do work! The easiest colours to obtain are brown, yellow, red and purple tones. I tried several of the listed natural dyes for green (grass, spinach & red onion skins) but none of them were successful; in fact, the red onion skins produced a strong brown/red colour. All of the colours are muted compared to the pre-wash colour. This may be simply the process for natural dyes. I did not use any chemical fixatives; these may have helped to hold the colours better!
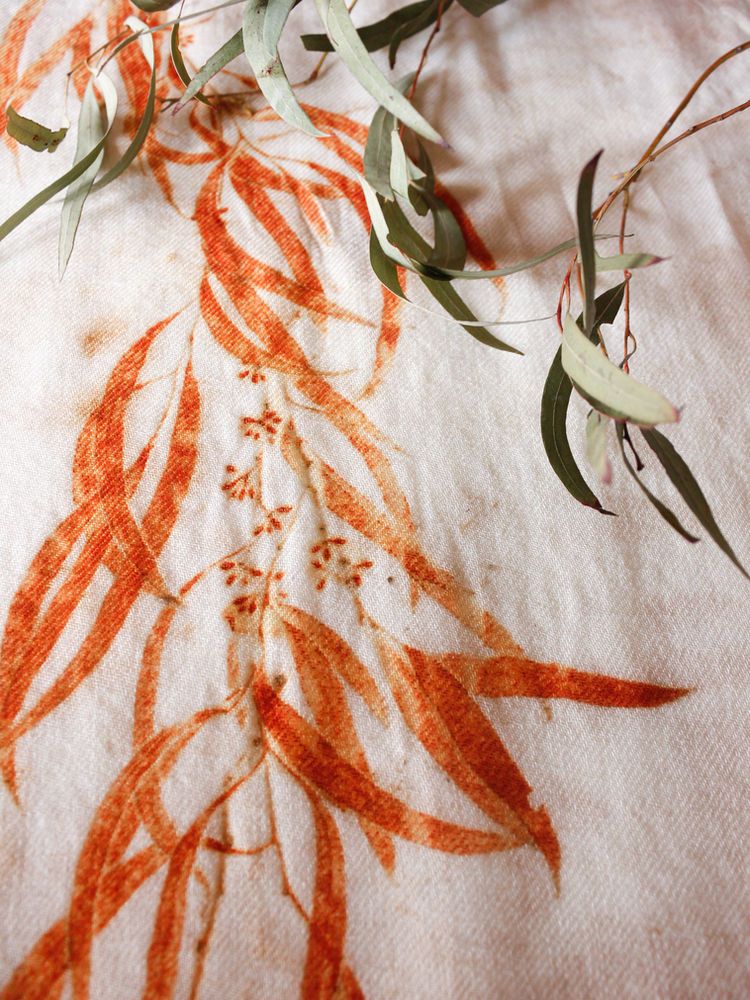
I’ve just released my new ebook all about eco-printing so I thought this might be a good time to write a quick post about the leaf that started it all for me, eucalyptus! I first learned about eco-printing in my natural dyes and weaving class in college over ten years ago. I saw an example of eucalyptus leaves printed on silk and I was shocked to see they printed a beautiful orange. It took me many years and lots of twists and turns before I finally got a chance to try the method myself and when

Eco Printing or Eco Dyeing on Fabric. How to make Eco Prints with leaves on silk chiffon and cotton fabric with an iron modifier.

Simple instructions to figure out the mysteries of Eco Printing on silk. Full explanation with detailed pictures. Make your own Silk Scarves!

You can see that I again stacked the mandalas as I really like the subtle differences and as I used less dye and some lighter values, they came out pretty good! I am sure now that the one on the left is the one on top and the one on the right is on the bottom. It was easy to sort them out last night as they were all so different. Note that these haven't been ironed yet! The post today will be a relatively detailed description of how I do these. This is one of the tshirts lying across a relatively flat surface before I start "pleating". Here I have almost finished the pleating process. I start at the lower left hand corner and just use my fingers to.gather up the garment on the diagonal. One is reversed as I did it inside out!! All gathered up and now I spiral it. Two spiraled t-shirts sitting on the drop cloth which is on grate suspended over a plastic box. I did four t-shirts altogether yesterday. Here you can see four mandalas altogether. There are two in each half of this square (really looks more like a rectangle as I didn't cut as even as I could have!). This is what the t-shirts look like after I have applied the ice and the dyes. Used here were sun yellow, grass green, leaf green and some dark green (which is very very dark I have discovered). This is one set of mandalas covered with the ice and dye. Lots of yellow here. This is mandalas after 2 1/2 hours. These are the t-shirts after 2 1/2 hours. These are the mandalas after five hours. T-shirts at five hours. The ice is almost all melted. Note that a lot of the yellow is still in powdery form. These are the mandalas right before I start washing -- this was about 7 hours later. I do these in my basement which is relatively cool. These are the t-shirts before washing. Before I do the washing, I nuke each of the t-shirts for about four minutes and do the same for the mandalas (although I group the mandalas and do 4 at a time). I do the same with the drop cloths. Just want to get them nice and warm to make sure the dye is set. I then unfold and rinse in cold water getting a lot of the dye out and hopefully most of the soda ash. I then dunk them in quite warm water, swishing them around to get out as much dye as possible. (The water will look very dark.) I change up the two waters after two t-shirts. I then thrown them all into a bucket and cart them to the washing machine for final washing. I use the hottest water I can in my washer and add Synthrapol. I also make sure I am using the maximum load size. The rinse water is warm. After this wash, I remove them and get all the strings that have tied them all up off and look at them as this is probably what they will look like. I then repeat the wash/rinse process one more time. I always tell people to make sure they wash before using as well as they may have a hotter wash cycle and potentially could get some more dye out. The dye that is left is really a stain and no longer active though so generally if there is some staining, a little Synthrapol will get it right out. These are the remaining mandalas displayed with their "partners". And here are the t-shirts. The first two are Hanes x-large and the third one is a Basic Editions (K-Mart) 2x. This is a 1x v-neck t-shirt.

A comprehensive guide to Shibori Indigo Fabric Dyeing techniques for beginners. Lots of before and after resist methods included.

It started with avocados. "Remember when people were dying fabric with the pits and skins, like, three or four years ago? I tried it and became so obsessed

Lois Ericson shows you how to create uniquely colored and patterned fabrics with ordinary household bleach.

Find out which are the best plants for eco printing. FREE printable list of 30 leaves and flowers for eco printing.

In this blog I want to show you the results of different mordants with different leaves.

How to make natural dyes from food. Turn your food scraps into all natural dye to color Fabrics, Paper, Frosting. Easy natural dye recipe

Use ice or snow to create vibrant, water-colored textiles, by Saki Jane.

[responsivevoice_button] The live round of the Iso Dye Club has come to an end, although new students are still welcome to join and will be able to work through the ecourse at their own pace. It ha…

Use leaves and foliage to print on fabric using iron mordant and basic eco printing cotton method, full detailed instructions with pictures
