

Here are 50 tin can recycling projects that'll keep you busy...

These recycling projects are exactly what I needed to get some ideas for updating my home on the cheap. I can't believe how good they look!

DIY Tin Can Planters - Share it! If you have enjoyed this post, then why not share the love or pin it for later! Don't forget to check out my Pinterest too, for more creative inspiration. Have a creative project in mind, but don't know how to plan it? I have you covered with a

Super fun and easy DIY recycled craft ideas! Here are some cheap and creative upcycling tin can projects. These simple crafts are great for home and office organization, holiday decorations, vases and much more. This unique repurposing idea is fun to make with your kids!

Elevate your plants with this simple DIY project! Make your own hanging planters using coffee tin cans, spray paint, and rope!

Learn how to make these pretty tin can wind chimes using recycled cans from coffee, vegetables, and some beautiful napkins.

Here are 50 tin can recycling projects that'll keep you busy...

Hold on to those tin cans! We've got nearly 50 upcycled tin can crafts to try.

Do you ever wonder how aluminum cans are made? No, it’s just me. Well, congratulations on having more interesting curiosities than the origins of your

Turn ordinary tin cans into beautiful craft room storage or vases with this easy tutorial. These decoupage cans make a wonderful centerpiece for a party too!

Here are 20 brilliant ways to recycle soda cans and turn them into amazing DIY new household items that you can decorate your home.

I have seen so many different variations of these repurposed tin caddies, that I thought I’d give it a whirl myself! I used six 28oz cans, these free vintage seed packet labels, reclaimed wood & …

These recycling projects are exactly what I needed to get some ideas for updating my home on the cheap. I can't believe how good they look!

Super fun and easy DIY recycled craft ideas! Here are some cheap and creative upcycling tin can projects. These simple crafts are great for home and office organization, holiday decorations, vases and much more. This unique repurposing idea is fun to make with your kids!

Looking for some fun, functional and frugal ways to upcycle old tin cans? Check out these creative DIY tin can crafts for the home, for kids, and more.

Flowers made from recycled drink cans.

DIY projects can be so expensive, but not these recycled item DIYs. Show them off to your friends so they see just how resourceful and creative you are!

Here are 50 tin can recycling projects that'll keep you busy...

Hacer figuras con latas de aluminio es sencillo, este material es bastante maleable y fácil de pegar, se pueden hacer esculturas con asombrosos detalles.

Raid your recycle bin and junk drawer to make some funny face planters! I made these guys for The Week Junior magazine. Mr. Potato Head, that classic toy, was my inspiration for making the facial features move-able (they’re attached to magnets!).

Explore giving a new life to your empty tin cans. Our guide is packed with ideas and tips for upcycling cans into beautiful crafts.

We have already seen some amazing things you can make with a Coke-Cola can. but now it is the turn for Pepsi cans to get upcycled.

If you've got soda cans lying around, you're going to want to try one of these.

Add to Flipboard Magazine.

We have already seen some amazing things you can make with a Coke-Cola can. but now it is the turn for Pepsi cans to get upcycled.

There’s a saying that one man’s junk is another man’s treasure. This is certainly true when it comes to upcycling. Along that though, did you know that you can upcycle just about anything? It’s true

Make this DIY Bee Craft using upcycled tin cans, spray paint, and a few simple supplies for a cut hanging tin can bumblebee in your garden!

Here are 50 tin can recycling projects that'll keep you busy...
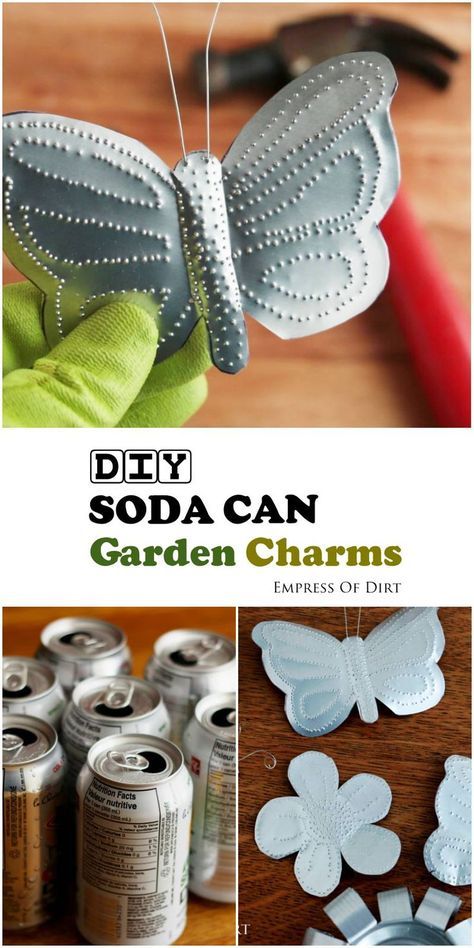
Turn soda pop cans into decorative charms! This simple craft usues the metal from pop cans to create punched tin butterflies, flowers, birds, and more.

Learn how to make these cute and simple mini kettles from upcycled aluminum cans in this tutorial with step by step instructions and video

Tuna Can Swing Out Storage Tower: Whenever I look at the recycle pile, I see untapped potential. One day when I was making tuna for lunch, I had an epiphany about the can even before it hit the recycle bin. Why not use it to create a stacked swing out catchall that could be used fo…

Make us of old tin cans by turning them into functional objects for storage.

"These upcycled tin can planters will brighten up your garden or patio even on the dullest of days. I used paper napkins of my favorite designer Marimekko. These Finnish prints are so bright and colorful and look great together. You can easily buy mixed packs of napkins on eBay. You only need one paper napkin per tin. The tins are then sealed with an acrylic varnish so they can be used outdoors. All you need to do is plant them with your favorite summer flowers."

Crating recycle art projects is a fun and easy way to have fun, make inexpensive crafts, and also help to keep some of our common household extras out of the landfill. These projects include easy

I’m always looking for interesting decorations to put on our allotment. I spotted some upcycled wind spinners made with drinks cans online and decided to have a go at making some. I’m really pleased with the results and wanted to share the making process in this tutorial. They are really simple to make and once you’ve made a couple, you’ll get the hang of it. I hope you enjoy making them too, I think they look great spinning away in the wind… You will need… 2 clean aluminium drinks cans 10” of stiff wire (I’ve used PVC-coated garden) Kitchen scissors Bradawl (a nail & hammer work just as well) Long nose pliers Combination pliers (to cut the wire) Tin opener 4-6 beads (plastic or wooden) Masking tape Marker pen For my wind spinners I have used tall aluminium cans, the type you get beer or cider in. The taller cans make a larger spinner. You can use smaller soft drinks cans if you prefer. Step 1: Using a tin opener, cut the tops off the cans (ring pull end). Once the top has been taken off, rinse out thoroughly and leave to dry. Once dry, trim down the excess aluminium at the top of the cans. Step 2: Now you need to cut the cans to create 12 fairly equal ‘spokes’. One method is to wrap a piece of masking tape around the can and mark off equal sections with marker pen to guide you. Try to get the spokes as equal as possible, but don’t get too hung up on it. Once the spokes are joined together, the overall effect looks good even if you haven't got every single spoke exactly the same width... Step 3: Once you are happy with the marking off of your 12 spokes, use the kitchen scissors to cut slits from the top edge to within 1/4" from the bottom. Step 4: Next, open out each of the spokes outward and down. Tip: press your thumb against the bottom of each spoke before bending them out - it will help stop the metal from crimping. Step 5: Once you have fanned out the spokes, you should have something that looks like this. Repeat with the other can… Step 6: Using the bradawl (or hammer and nail) punch a hole in the bottom of both cans. Step 7: Use the long nose pliers to fold over the end of each spoke (about 1/4" is enough). Repeat process on both cans. Step 8: Now you are ready to construct your windspinner by joining the spokes together. Overlap the end of a spoke from one can with the end of a spoke from the second can. Slide the corners together and hold firmly with the fingers of one hand, use the long nose pliers to bend the corner over. Use the pliers to crimp the corner tightly together to secure the spokes. Step 9: Move onto the next spoke and repeat the above process. Keep linking the spokes together until they are all joined up. Your wind spinner should now look like this… Step 10: Using the long nose pliers bend the end of the wire to make a small loop. Thread 2-3 beads onto the wire and then thread the wire through the holes, top and bottom, in the cans. The wire should now run through the centre of your wind spinner. Thread the remaining 2-3 beads onto the wire. Your wind spinner is now ready to hang either in your garden or on an allotment plot. It is possible to stack 2-3 spinners on top of each other. Just join the wires together or thread a longer piece of wire through the centre. Just remember to thread beads between each spinner or they wont rotate in the wind. They really come alive when they are spinning in the wind. So I'm going to try and get a video of one of my spinners 'in action' on our allotment plot... There you go, a great way to upcycle empty drinks cans…enjoy! Feel free to pin the image below to your Pinterest, but please link back to this post, thank you! I'm linking up with... Trash2Treasure over on www.coombemill.com HomeEtc over on www.thetwinklediaries.co.uk and mummyofboygirltwins.com Making Home over on www.mrscraftyb.co.uk

Here are 50 tin can recycling projects that'll keep you busy...

There’s a saying that one man’s junk is another man’s treasure. This is certainly true when it comes to upcycling. Along that though, did you know that you can upcycle just about anything? It’s true

Looking for fun and eco-friendly crafts? Check out these 35 amazing project ideas using old egg cartons. Let's get crafting!
