

SKEINS: 3 (3, 3, 4, 4) skeins of Purl Soho's Field Linen SIZES: 31 (35, 39, 43, 47) (51, 55, 59, 63) TO FIT: 26-29 (30-33, 34-37, 38-41, 42-45) (46-49, 50-53, 54-57, 58-61) -inch chest with 2 to 5 inches of positive ease COLOR: Silver Thistle

Needlebooks come in quite handy for keeping track of your pins and needles (and make a charming addition to any sewing basket). DIY Tutorial
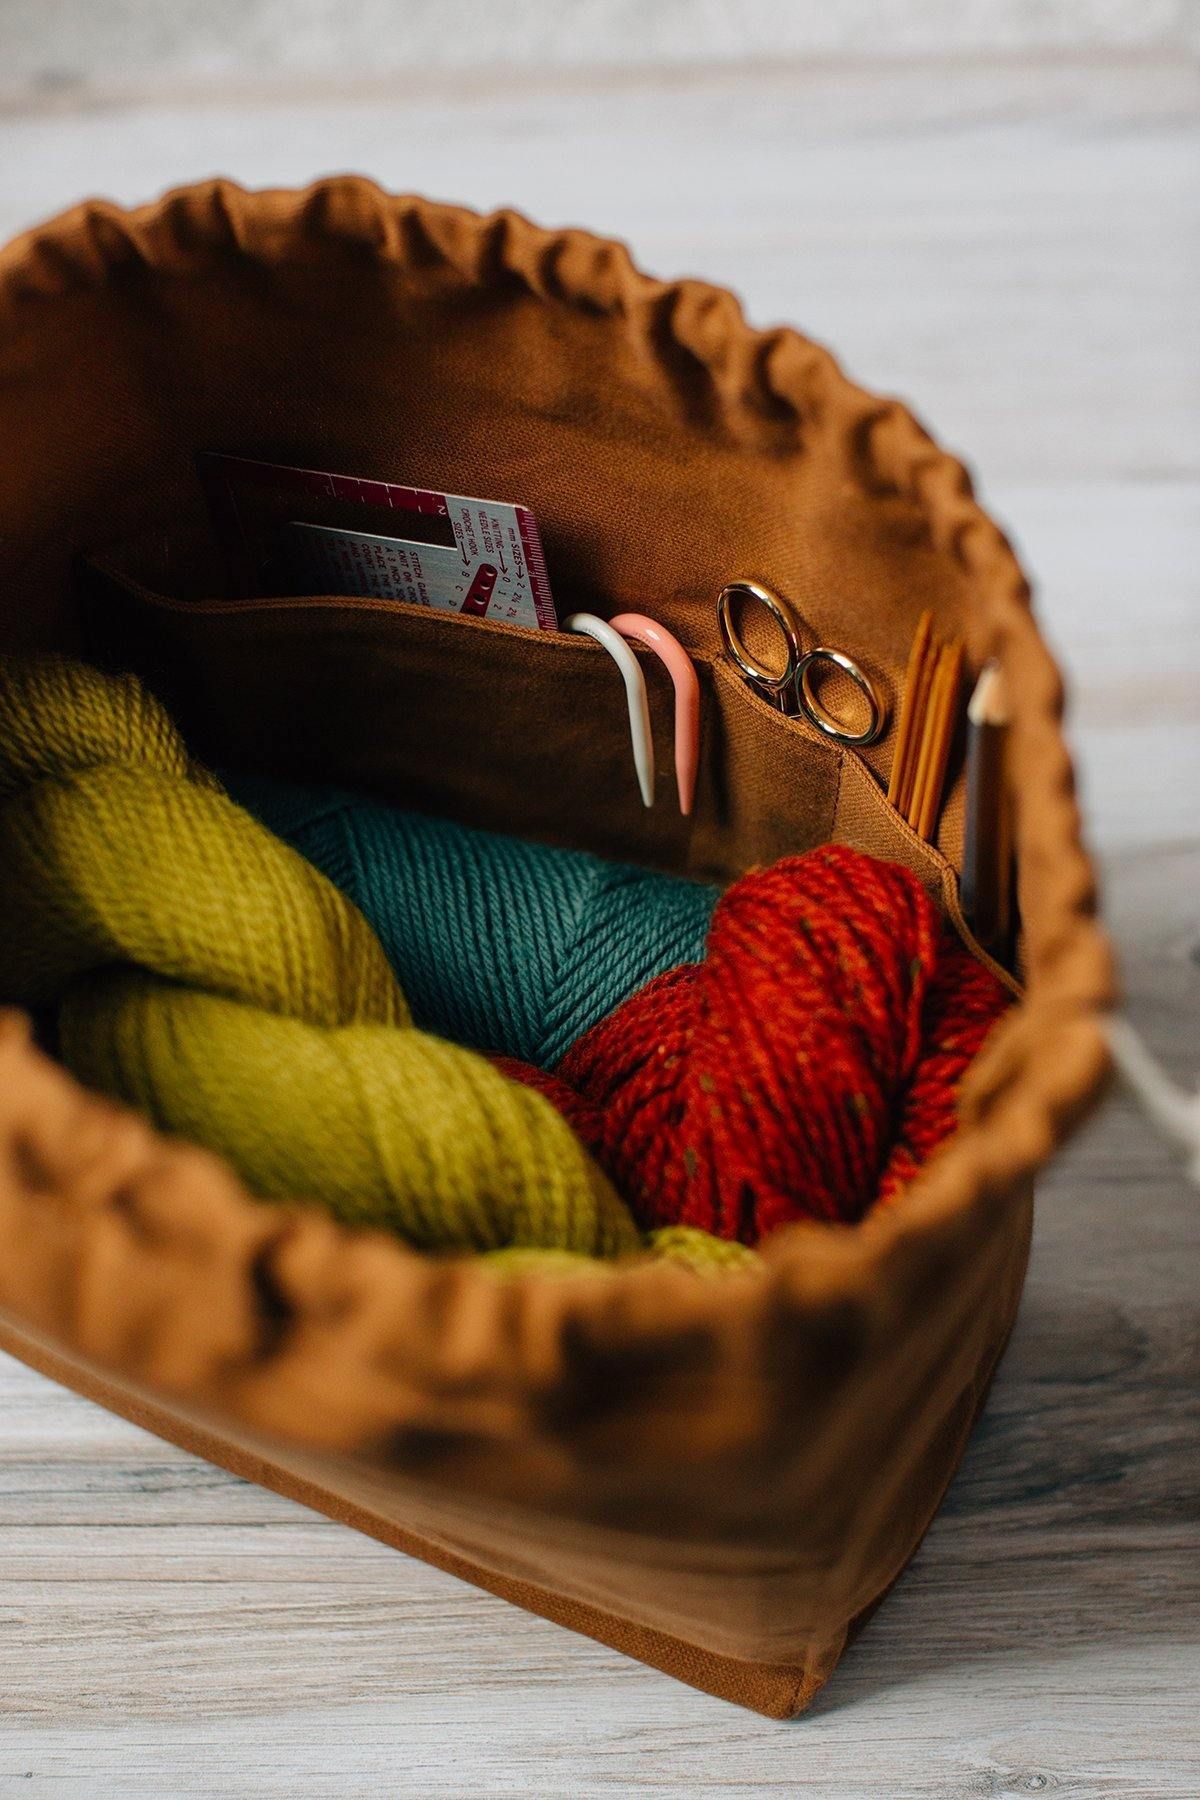
The Field Bag was originally designed and sold by Fringe Supply Co. and is now available to home sewers as a sewing pattern! The Field Bag is ideal for organizing knitting, sewing, embroidery, or other works-in-progress. It features a roomy main compartment with interior pockets designed for corralling tools, patterns,

The 3-Needle Bind Off is a great finishing technique for joining two pieces of knitting…

I am so honored to be invited again by the wonderful Agatha from Green Issues by Agy to jump on board her new blogging train: Making Good...

It seems impossible that we’re just over halfway through January already, which means I have completed 18 blocks of my stitch journal. top right, January 2022 I worried that it might be a cho…

Choosing the right jeans Most of the mending projects I share are pretty extreme examples of patching using sashiko inspired mending techniques combined with my own stitching style. The examples that I share are either my own jeans or those that I've found while shopping at thrift/secondhand shops and garage sales. Whe

"Check out my fishy floors. It was either this or thousands of dollars to replace the whole floor because they don't make tile like that anymore. I don't know about you, but like this solution better!"

by Judit Gummlich An in-depth guide to contemporary stitching with and on wool, explaining every step of the process. “My aim is to provide a trail of knowledge and inspiration you can follow.” Transform your knits with a handful of simple embroidery stitches: a cosy cardigan embellished with bright flowers, a dragonfly on the front of a sweater and mittens with plants climbing up the back of the hand. This timeless embroidery book features 18 nature-inspired templates, generously complimented by insightful tips and ideas on how to use them. Embroidery on Knits is an in-depth guide to contemporary stitching with and on wool, explaining every step of the process — from planning to finished project. It is a source of inspiration and knowledge for crafty beginners and savvy stitchers alike. Judit Gummlich is a multi-talented crafter who has worked in theatre costume departments for more than 20 years. She is a passionate knitter, gardener, beekeeper and nature lover. Judit lives with her husband, bees and two cats in Hamburg, Germany. Embroidery on Knits is her first book.

This week on the blog we take a look at the new to me old craft of hand sewing as I create a needle case using beautiful vintage fabrics

Tiny vessels hand stitched and cut to form abstracted memories. Sizes from 3-8 cms. Loop Head stitch pots Worn and Wethered Summer Fields Autumn

Greetings, Feeling Stitchy readers! I'm excited to bring you embroidery-related tutorials on Thimblenest Thursdays! I'm sure spouses, children, and pets could testify that those of us who dabble in embroidery are prone to misplace needles from time to time. Having been guilty of that myself, I started getting a little worried recently when I also began misplacing my embroidery scissors. After finding myself sitting on them one too many times, I devised a way to keep them in a safer, more visible place on my person at all times--a wrist cuff! Calculating Your Fabric/Notion Measurements As you read through the following tutorial, please keep in mind that this cuff is based on my scissor and wrist/arm measurements. Obviously everyone has different sized arms and scissors, so you may need to adjust your fabric dimensions accordingly. For reference, my scissors are 1 5/8" x 3 5/8" (4 cm x 9 cm)--if your scissors are around that size, the pocket should probably work. Most important is the wrist/forearm measurement; at the wrist, my arm circumference measured 6" (15 cm) . 4 inches (10 cm) up my forearm (the height of the cuff), the circumference was 7" (17.8 cm). Based on the 7" measurement, I added 2" (5 cm) of overlap to be sure the cuff fit. To be sure your cuff will fit, follow this formula: Forearm circumference (at largest part of arm where cuff will sit) + 2 inches (5 cm) = length to cut main fabric and interfacing. From this point forward I'll be referring to the measurements I used to create my cuff. If your scissors are roughly the same size as mine, the only thing that will be different is the length/width of your cuff. Let's do this! Materials For main cuff 2 pieces midweight cotton: 9" (23 cm) x 4" (10 cm) 1 piece lightweight iron-on interfacing: 9" (23 cm) x 4" (10 cm) double-fold bias tape 2 pieces 4" (10 cm) long 2 pieces 10" (25.5 cm) long (the length of the cuff + 1 inch (2.5 cm)) For pocket 2 pieces midweight cotton: 2 3/4" (7 cm) x 3 1/4" (8.25 cm) 1 piece felt or thin batting: 2 3/4" (7 cm) x 3 1/4" (8.25 cm) double-fold bias tape 1 piece 4" (10 cm) long 1 3" (7.5 cm) piece of Velcro Water soluble fabric marker Sewing pins or clips Assembling the Main Cuff Iron the interfacing to the wrong side of one main cuff piece. Place both cuff pieces with wrong sides together and sew around all four sides using a 1/8" (3.175 mm) seam allowance. Sew the 4" (10 cm) bias tape to each short end of the main cuff. Then attach the 10" (25.5 cm) bias tape to the long edges; extend the extra length evenly over each end at the corners. Fold the raw edges in on themselves before sewing the bias tape down. Your main cuff is complete! Assembling the Pocket & Attaching to Cuff Place the two cotton fabric pieces with right sides facing; lay the felt or batting piece on top of them. Sew all three layers together using a scant 1/4" (6.35 mm) seam allowance, leaving one short side unstitched. Trim seam allowance close to stitching. Turn pocket right side out--cotton fabric should now be visible on both sides and felt/batting will be turned to inside. Push out corners and press entire pocket with a hot iron. Apply remaining 4" (10 cm) piece of bias tape to top (open) edge of pocket, turning in raw ends. Center pocket on top of main cuff along bottom edge and stitch through all layers using a 1/8" (3.175 mm) seam allowance--leave top edge of pocket open! Applying Velcro & Finishing Cuff Try the cuff on--hold in place with pins or clips. Using the short end of the overflap as a guide to draw a line with the water soluble marker on the underflap. Your line will be at an angle because the cuff forms a cone as it wraps around your arm. Place the loop side of the Velcro tape just inside the line you drew (following its angle) and sew in place. Flip the cuff over and sew the hook side of the Velcro tape at the opposite end of the cuff. Remove the water soluble line. Your cuff is finished! Strap on the cuff and gather your scissors and needles (the padded pocket makes a nice little mini pincusion!). Your scissors can be worn either underneath or on top of your wrist and you can embroider in peace--no worries about sitting down on a sharp surprise! How do you keep your embroidery scissors under control?

Have a go at this toad-ally adorable craft project.

For a long time I had my many needles jammed in a bin with a lot of other little embroidery odds and ends, and I really wanted a more convenient (and cute!) way to store them. So I set out to create a needle book, and a tutorial to go along with it!

I have been wanting to make a Travel Sewing Kit for sometime now. We are in the car quite often and it seems like the perfect place to take along my hand sewing projects.

Check out this fun and easy DIY drink holder carrier tutorial. This coffee cup carrier is a great gift to sew for the holidays.

If you've been around since the beginning of Lo & Behold Stitchery, you might remember that key fobs were my JAM. Back in the early days, I cranked out SO many key fobs in all sorts of variations and stocked my Etsy shop with them. They are super fun to make and very quick and rewarding! I eventually phased out of making them for sale, but I do still really enjoy making one from time to time! They make great teacher gifts, stocking stuffers, party favors....whatever you'd like! All you need is some scrap fabric, scrap batting and a key ring (which you probably already have!) Gather all of your supplies and lets get to it! PS - Looking for a printable PDF? I have this tutorial condensed into six lovely, printable pages for your convenience. Download it here. . . Okay, here's what you'll need: Basic sewing supplies (Sewing machine, rotary cutter, cutting mat, scissors, iron, ironing board, etc.) You can find a list of all of my favorite supplies here. Fabric - One 3

DIY Fabric Block Zipper Pouch Free Sewing Pattern and Tutorial

Imagine a group of extra-terrestrials gathered in a living room. They’re poking and prodding a…

sitting with my parents and uncle steve in the kitchen an hour before we leave for the party and i’ve been going through pinterest while we chat. it’s led to this little compilation of …

A Textile Designers guide to the art of Fabric Manipulation to use in simple craft projects

Many fiber artists have captured dry, lacy leaves in quilts. They lend themselves so well to lustrous threads and machine embroidery. But, as anyone who has tried to create thread-only designs can tell you, patience and a good water-soluble stabilizer are absolute musts.

АВТОР: Ершова77 Реглан снизу, вяжется отдельными деталями и сшивается, силуэт прямой, рукава без утягивающих резинок, с отворотом. Кто не любит реглан снизу, можно и сверху связать. Очень удобно примерять и регулировать нужную длину пула. Есть еще вот такие фото, поближе. По моему связано жемчужной…

Just getting started with sewing? You'll love this roundup of easy sewing projects for beginners including pillows, blankets, a dress, and more.

Hello Sewing Enthusiasts! Are you ready to take your lingerie sewing to the next level? I'm excited to share with you a fantastic bra hack using my free PDF bralette pattern. In this tutorial, I'll show you how to transform your bralette pattern into two different types of bras that are perfect for all sizes and body types. Plus, it's a beginner-friendly project with detailed step-by-step instructions, so you can easily follow along and create beautiful bras! The best part? You can use any fabric you have on hand, even repurposing an old 100% linen skirt, like I did in this tutorial. It's a fantastic way to upcycle and create unique and stylish bras that fit you perfectly. In the video, I'll show you how to resize and modify the bralette pattern to create a classic bra and a bralette with a different style. You'll learn all the tips and tricks to make the process easy and enjoyable. The tutorial is detailed and easy to follow, making it perfect for beginners who want to try their hand at sewing bras for the first time. But don't stop there! Once you've mastered these two styles, you can use the same techniques to create a variety of other bra styles, such as balconette, plunge, or sports bras. The possibilities are endless with this versatile bralette pattern hack! I encourage you to watch the entire video, try out the tutorial, and share your thoughts on the bras you create. Don't forget to give the video a like, subscribe to my channel for more sewing inspiration, and leave any questions or comments you may have. I can't wait to see what amazing bras you'll create using this hack! Happy Sewing! How to sew bra step by step plus free printable pattern How to sew soft bra DIY Bra Hacks: Transforming Your Bralette Pattern into Two Stunning Bras! step by step sewing tutorial sewing bra sewing bra for beginners free printable sewing bra pattern

создаёт cross stitch patterns, embroidery patterns, craft tutori

Imagine a group of extra-terrestrials gathered in a living room. They’re poking and prodding a…

Exploring scale on crochet making: how about those tiny pin cushion? cute, no?

Let me give you a hand with the holiday shopping. Skip the stores and just make a pair of Oven Mitts! These are so easy, and fun, and I have a FREE PATTERN for you. YAY! If you’re curious how many oven mitts I made in this process…..well, a lot! Pattern-making is such an evolution, […]

This listing is directly related to my product [PHYSALIS Crochet Pattern]. If you prefer to buy a copy of this pattern, please find the link below or visit my store PATTERN section. Physalis has interesting color changes over its lifetime, especially when fruit is ripe. Its stunning intricacy was demonstrated in this video in two very different ways. The making of a very fine leaf is also included which is absolutely valuable to learn! Video tutorials for my crochet patterns are produced to provide alternative support to crocheters who prefer video interaction rather than reading stitches and diagrams. ATTENTION! If you are a pattern reader and are used to crochet this way, please don't buy this video! Please buy the pattern from my store. My videos are generally faster than videos for beginners as my objective is to improve crochet to an artistic level! My video tutorials usually include 5 sections of complete bouquet production unless otherwise stated. Section 1, Material preparation Section 2, Main flower(s) making procedure Section 3, Supporting part(s) making procedure Section 4, Treatments (if applicable) Section 5, Assembly Once payment is made you will be provided with a PDF document where the video link is attached. Please refer to the last picture in this listing to find the exact location of the link. You can watch the video indefinitely. If you have any trouble accessing the video, please contact me. I will send you a link in an email. In addition, this PDF document also includes the following information: 🧡 MATERIAL KIT - all materials and tools you need for the project 💙 PROJECTS SUITABLE AT THIS LEVEL I hope it will get you going smoothly. If you have any trouble with the video, PLEASE CONTACT ME. I will provide necessary support to help you obtain full understanding of the procedures. This includes extra reading materials, links or video demonstrations. Alternatively visit my website www.floralcrochet.com where you can access to all contents I publish or sell. All the best! I hope you will make these amazing mini crochet flowers soon! PHYSALIS pattern link: https://www.etsy.com/au/MiniBouquet/listing/1188343378/crochet-pattern-physalis-or-gooseberry?utm_source=Copy&utm_medium=ListingManager&utm_campaign=Share&utm_term=so.lmsm&share_time=1648087561344 🌼🌼🌼🌼🌼🌼🌼🌼🌼🌼🌼🌼🌼🌼🌼🌼🌼🌼🌼🌼🌼🌼🌼🌼🌼🌼🌼🌼🌼🌼🌼🌼🌼🌼🌼🌼 Thank you for visiting my store! I can't wait to show you how to make this bunch of charming PHYSALIS, to pin on your clothes, wear on your hair, wrap up as a handmade gift, or even make to sell! ANNOUNCEMENT: My crochet patterns always have minimum interruption from other media and focus solely on crochet – no glue, no modeling clay, no dye, no paint, no wrapping tapes, minimal wires… Not only I work to promote pure art of thread but also washability and longevity. I have been working in the creative industry. This background helped me to critically rethink of my approach to teaching crochet as a genre of arts. I have created a system to transform crochet as a hobby to an art object for resale. I hope that you get inspired from reading my heart-felt passion and hand-drawn patterns. And, visit me at www.floralcrochet.com where I share everything in my mind, be it a crochet idea, a new technique, a travel note, a hand sketch, an emotional spell of finding a new crush (a flower:) … Let’s meet up and have some fun! DISCLAIMER: All intellectual property (including copyright) developed, adapted, modified or created by me will at all times vest, or remain vested, in me. You must not, without my prior written consent: • copy or use, in whole or in part, any of my intellectual property; • reproduce, retransmit, distribute, disseminate, sell, publish, broadcast or circulate any of my intellectual property to any third party; or • breach any intellectual property rights connected with the products, including (without limitation) altering or modifying any of my intellectual property; causing any of my intellectual property to be framed or embedded in another website; or creating derivative works from any of my intellectual property. PERSONAL INFORMATION We only use your personal information you provided to us for the purpose of this transaction only. We do not store or use this information in any other way. If you want to know how your personal information is handled by the platform, you can visit Etsy’s Cookies & Similar Technologies Policy and their Privacy Policy.

Sewing Purse Bag Organizer. DIY Pattern & Tutorial.

Learn how to sew a zipper with these 6 helpful tips. Sewing in a zipper will be easy on your next sewing project.

Interesting Bookmark Free Knitting Patterns

"Every child who sews with a will should have a wee birdie to help with his bill."I have long been fascinated with some of the clever inventions of the past, the sewing bird being one of them. The sewing bird, also known as a sewing clamp, hemming clamp, or third hand, was used in the 18th and early 19th centuries to attach one end of a piece of cloth firmly to a table to enable the seamstress to hold her sewing taut with one hand while stitching with the other.(Image Source) Commonly used in the Victorian home, this third hand clamps to a table while the beak holds the fabric to be sewn. Depressing the tail releases the beak enabling the fabric to be repositioned or removed. Before the invention of the sewing machine, clothing, sheets, and other household items were sewn by hand, this handy little clamp was often used for hemming. (Reproduction Sewing Bird for sale at Victorian Trading Company) Early clamps can be traced to the late 17th century. The "sewing bird" came into fashion early in the 18th century. Invented in the Georgian period in England, it was the first device that allowed the material to be moved without having to loosen the clamp. Many were made for the travel trade and were used for advertisements. Most were made of polished and turned wood or iron. Victorian clamps were made of brass, iron, steel and painted wood. (Image Source) In America the first sewing birds were called "grippers." Not used widely until mid-19th century, they became popular as a luxury item, which a young man would present to his intended bride months before the wedding. These were made in many varieties; birds with or without a pin cushion, on a spindle or not, deer, dogs, fish, frogs, snakes, dolphins, cherubs and people. Small thread winders, spool holders, netting hooks and rug braiders were also common. (Antique Sewing Bird) After the invention of the sewing machine the need for grippers was diminished but they were still manufactured as novelties. The Singer Sewing Machine Company produced a few as late as 1980. These original inexpensive novelties of yesteryear are expensive antique collectibles today. (Reproduction Sewing Birds sold at My Secret Shelf) I have seen these marvels in antique stores but don't actually own one, however, I had a need for making my own version of a "sewing bird". I found myself frustrated at always have to run to my sewing basket while crafting when I needed a handy pin, needle, or thread. I began my solution with a faded pale blue feed sack, an old cork/metal bottle stopper, and a vintage iron receipt holder found at a flea market... I sketched a little bird body, tail, and wings onto the feed sack with a Mark-B-Gone marker adding detail lines to the body, tail, and wings, which I then stitched over in brown embroidery floss... After the pieces were stitched together and stuffed, I removed the marker lines with a damp cloth and then used Fabri-tac to attach the tail and wings... I used a strong glue (E-6000) to glue the bottle stopper to the bottom of a small purchased twig and moss nest... And then I glued the bird into the nest, tacking the wings to the sides of the nest... I slipped spools of thread onto the receipt holder and pushed the cork bottle stopper down onto the sharp tip of the holder, then filling my sewing birds nest with needful supplies, like a mini scissor tucked under one wing (These were a gift from my sweet friend Pam and they are so sturdy and cut so well)... A large needle and thimble under the other wing... Pins and needles perch on the back of the bird... A little surprise pocket in the tail conceals a needle threader (I hate to admit that my eyes are just not what they used to the and I actually need one of these now!)... Here is my new sewing bird sitting on the worktable and all ready for service with no more running to the sewing basket! (For more great sewing ideas visit http://topreveal.com/diy-sewing-craft-ideas) They say that necessity is the mother of invention. I truly believe that and I am very happy with how my little version of a handy and helpful "sewing bird" turned out. "Sew", if you could create a needful invention to solve one of your problems, what would it be? ""Blessings, Miss Sandy

DIY Origami Scissor Case Free Sewing Pattern & Tutorial

These Embroideries Of Boobs, Butts, Nipple Hairs And Stretch Marks Are Just Perfect (NSFW)

Sew a beautifully fitting Shorts with this shorts pattern- with an elastic waist in the back and with a fitting waistband in the front with zippered opening

Do you need a more organized working space? Or maybe you want to make the bathroom more organized? If the answer is yes, then, these Bubble Pod Containers are perfect for you! The finished size is approximately 5″. Their shape is round which helps them be the perfect pods for storing things like cotton reels […]

If you've been around since the beginning of Lo & Behold Stitchery, you might remember that key fobs were my JAM. Back in the early days, I cranked out SO many key fobs in all sorts of variations and stocked my Etsy shop with them. They are super fun to make and very quick and rewarding! I eventually phased out of making them for sale, but I do still really enjoy making one from time to time! They make great teacher gifts, stocking stuffers, party favors....whatever you'd like! All you need is some scrap fabric, scrap batting and a key ring (which you probably already have!) Gather all of your supplies and lets get to it! PS - Looking for a printable PDF? I have this tutorial condensed into six lovely, printable pages for your convenience. Download it here. . . Okay, here's what you'll need: Basic sewing supplies (Sewing machine, rotary cutter, cutting mat, scissors, iron, ironing board, etc.) You can find a list of all of my favorite supplies here. Fabric - One 3
