


Learn how to build an outdoor fireplace with this Easy DIY Outdoor Fireplace Kit! Stacked stone fireplaces in 3 styles & 3 colors.

Our backyard underwent a major transformation this summer. We added a sprawling deck to our backyard and furnishings and finally, built an outdoor fireplace as the finishing touch. We went between …

Our backyard underwent a major transformation this summer. We added a sprawling deck to our backyard and furnishings and finally, built an outdoor fireplace as the finishing touch. As a reminder, just a few months ago, the space looked like this: We went between the idea of fire pit vs fireplace, but in the end […]

If you are looking for a great looking outdoor corner fireplace that will be the hit of the neighborhood, then look no further than the Saguaro design. This DIY fireplace has a wide squared firebox with two squared wood storage voids on a 45-degree angle. The pictures show an alternate arched firebox and voids. The 8" deep TV recess above the firebox will accommodate a 55"-60" TV so get ready to have some sports on while you enjoy your backyard. The hearth extends the width of the structure so you will have plenty of seating for all your family and friends. The total height of the fireplace is 11' as designed. The shelves above the storage voids are approximately 4' tall. The firebox is 48" wide, 24" deep, and 32" tall. The storage voids are 32" wide, 20" deep, and 24" tall. This construction plan consists of 44 pages and it will guide you through the construction of a cinder block and mortar structure. You will simply add whatever veneer you want to the outside of the fireplace. The estimated rough build materials t build this fireplace was calculated by Backyard Flare at approximately $1,096. This cost does NOT include the foundation or the finish materials such as the veneer, or the TV.


If you love this fireplace and would love a DIY outdoor fireplace construction plan to build it, look no further. This is our Pima II design with a 48" wide firebox for your raging fires, guaranteed to produce lots of heat. The structure height to the top of the chimney is approximately 7' and this can be altered as well. This construction plan will guide you step by step as you build your fireplace using cinder blocks and mortar, and it will offer some ideas for finishing the structure. There are so many neat and gorgeous options and we know you'll pick the perfect veneer. The overall footprint of this structure is 96" wide (8') and 48" deep (front to back). We can't dictate the concrete slab depth as there is no "one way" to construct that portion of the build. The plans do not include instructions for a concrete slab or the finish work. The materials cost for the rough build of this fireplace is approximately $610. That's a LOT cheaper than having it built for you and it's lots of fun to do yourself. Believe and you can do it. We know you can. Please look through the pictures to see what other amazing DIY customers have done with this same construction plan. The plans consist of 37 pages and they will not leave much to figure out. This item is a digital download and there are no returns. Thank you so much for considering us for your DIY needs. Please let us know if you have any questions.


When we first moved into our house we knew a few interior projects we wanted to dive into immediately, as well as some items on our “5 to 10 year Plan,” one of them being our outdoor fireplace. The more Matt and I talked about...

16 beautiful DIY fireplace ideas using electric inserts, faux mantels, or updating existing fireplaces for all budgets and all skill levels.

An outside fire can be larger than the usual indoor version, though that consumes more wood. But it should have visual appeal and a certain “wow!” factor. I opted to make the opening 700 mm x 700 mm, so I can put on a reasonably chunky piece of ti tree without constant refuelling but also leave a few trees standing on the property. I made the hearth about 600 mm above ground level, as most people will be standing in front of it.


A DIY fire pit is just what your backyard needs this summer. Whether you want stone, cinder block, or one welded from metal, these ideas have you covered.

Our Arizona Backyard Fireplace Hello all you DIYers and enthusiasts of backyard fireplace and transformation. I wanted to write a bit about one of our latest ventures, a corner Arizona outdoor fireplace with storage voids that I built at my in-law’s house in Arizona. The backyard isn’t huge, only about 30 feet deep from the

How To Build Outdoor Fireplace / DIY Outdoor Fireplace Ideas / DIY Outdoor Stone Fireplace / How To Make Your Own Outdoor Fireplace / HallstromHome

Our Arizona Backyard Fireplace Hello all you DIYers and enthusiasts of backyard fireplace and transformation. I wanted to write a bit about one of our latest ventures, a corner Arizona outdoor fireplace with storage voids that I built at my in-law’s house in Arizona. The backyard isn’t huge, only about 30 feet deep from the
Trish built this beautiful outdoor fireplace and the patio out of stone. "I Built this outdoor fireplace and when I was finished I asked my brother to take a picture of me with it and I came out in an evening gown! Ha ha!"


How To Build Outdoor Fireplace / DIY Outdoor Fireplace Ideas / DIY Outdoor Stone Fireplace / How To Make Your Own Outdoor Fireplace / HallstromHome


Find your perfect patio & backyard fireplace with Round Grove Products. Choose from multiple pre-fab options & start enjoying your outdoor space!

Are you tired of your boring backyard? Elevate the look of your outdoor living space with one of these five cool DIY pergola ideas.

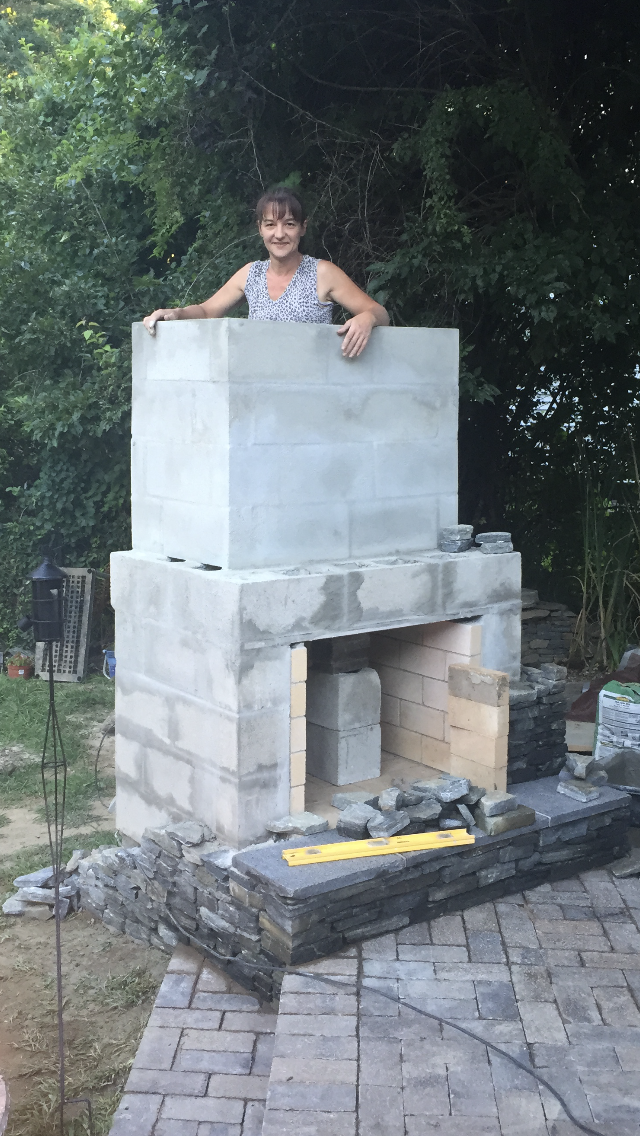
Hello barbies! I'm sorry it's been so long since my last post - we've been working on a big project in the back yard, that as weeks wore on, felt like it was getting bigger and more expensive by the day. What started in March as a 2-3 week project to transform our backyard from empty and boring into a useful, relaxing outdoor living space turned into a two month project with cost overruns accumulating at an unbelievably fast rate. We ended up going way over budget and even more over in terms of the time it took to complete, but we are so incredibly happy with the finished product. We now have a big paver patio, hot tub, grilling area, dining area, lounge chairs and fireplace for outdoor entertaining and relaxing. The best part? Hubby mastermined every bit of it and did it by himself with some help from my very helpful, amazing family. We feel like it will add some value to our house and are looking forward to many beautiful memories in our transformed backyard! THE PROCESS For starters, we had to find the pavers on craigslist (since paying retail price for the amount of pavers we needed would have cost in the thousands), once we did, we paid for them, then Ross had to manually load and unload all 800 of them. They're fifteen pounds each and very coarse - so moving each one twice was no joke! Then we had to power wash each one to get the old paver sand off of them so they'd fit tightly. This was incredibly tedious but thankfully my mom helped. Then Ross had to excavate and relocate the sod for where the patio was going to go. Excavating took several days in itself because our yard was not level and there was a lot of measuring, digging and leveling involved. Once excavated, Ross used wood and then ultimately decorative paver blocks to make a border to hold in the patio. Once level, we brought in three truck loads of gravel and paver sand to lay as the foundation. Each truck load had to be shoveled out of the truck bed scoop by scoop then extensively spread and tamped to make sure it was level. Then we began laying pavers. I helped a lot with this part, unlike several other parts which were almost entirely Ross. This involved picking up, arranging and tighly weaving the paver pattern so that they would stay firmly in place. After this step, which took two full nights after work, Ross brushed in the paver sand using a broom to seal everything in place. We were so excited to finally see a nice, level patio of pavers, but Ross still had a lot of work ahead of him. He had to finish the borders, which involved more decorative blocks, which he had to mortar together to make a wall. Then, he capped the walls with wooden planks, painted in a high end paint stain from Home Depot by my sister and I. He then used his table saw to cut the planks down to size and did touch up paint on the edges. He mortared these planks on top of the decorative edge blocks. Last but definitely not least, Ross built our outdoor fireplace from the ground up. For starters, he dug the fireplace's footprint out of the ground and replaced the dirt with a concrete foundation. He poured concrete and used metal rods for extra support. This was extra difficult because our yard is not level (I don't think any yard is), requiring a lot of precision to create a flat concrete foundation. Once the footings set, he began stacking and individually mortaring the same large, decorative blocks we used for the patio's border. Like the pavers, we also scoured craigslist for these, which enabled us to get a great deal on them. It also meant we had to manually load and unload them, which was a horrible process considering there were 180 of them and they weigh 45 pounds each! It took my mom, Ross and I a full Saturday just to fetch, load and unload them all and boy did we look and smell rough afterwards. Woof. Anyway, Ross stacked the blocks level by level, often waiting over night after doing a few rows to let the mortar set before he began stacking more blocks on top to make sure the structure was stable enough to support the additional weigh (with 10 45 pound blocks on each level we're talking about a lot of weight!). You can't see it, but inside the blocks there's a metal vent and funnel to escort the fumes out the top properly. When he got done, we had to purchase MORE pavers to serve as capstones. We got some that matched our CL blocks nicely from Home Depot and Ross cut them down to the right size to serve as our caps. My dad dedicated an entire Saturday to mortaring the capstones in place so that Ross could proceed with the higher blocks. It was super helpful and my dad was perfect for it because he has a really great attention to detail. During the process it felt like we were running out of mortar almost every day. Ross must have went back to Home Depot for more mortar at least 10 times - no exaggeration! Thankfully, the fireplace is finally done and I couldn't be prouder of my hubby for building it! We also planted two new privacy evergreen trees so that we can enjoy the patio without feeling like everyone who drives by can see me walking around in my mismatched bikinis eating cheetos. We also bought several plants for our decorative planters to liven up the very stoney space, and in our typical fashion have already managed to kill two of them (we really suck with plants). Ross also mulched the area between the patio and the porch, which looks great! Here's the before of our empty backyard and the after of our DIY backyard paradise! As always, thanks for reading barbies! <3 you guys to pieces!
