

Let me take a minute to address my post regarding Staples new rewards program for teachers. I thank everyone who commented. It seems I am not alone in my dismay with this revised program. Please, reach out to Staples and let them know how you feel, whether you agree with me or agree with them. It is important for our voices to be heard either way. I would love to see them revert back to the old program or at least offer up some reason as to why the change was necessary. * * * * * * * * * * * * I wrote a post a while back about foldables and lapbooks. If you haven't seen the post, go visit. I was able to link to some great pdfs of foldable books by Dinah Zike, the queen of all things foldable! :-) I used some of her foldable ideas on lapbooks my friends were working on recently. I have done lapbooks on occasion before, but they are not a staple in my teaching for one main reason; they take a long time to get done! While I do believe they are worth every minutes spent on them, the current curriculum I have to follow does not allow me to linger. I know that they can be done in less time if you do them on a smaller scale, but mine always seem to take on a life of their own! I like doing them because you can really do so much with them. Most importantly, my friends love the project feel of it all. Every time I have done them, my friends are always eager to work. Also, when they see their final project completed, they are a little in awe of themselves. Love it! In our guided reading groups, my friends were working in three different books, one on volcanoes, one on King Tut, and the last on the history of Jazz music. Speaking of which, on a total aside, do you know the Cheesecake song as sung by Louis Armstrong? If you don't know it, watch this! I show this to my friends every year, and we end up singing it all year long. I promise you will have this song stuck in your head! And, just wait for Bing Crosby to come hopping through! Too funny! Isn't that just great!!!! We will often substitute the word cheesecake with pizza or tacos or any featured lunch menu item. Any two syllable word will work. Most of my friends are also in their second year of instrumental lessons, so they love seeing some of the instruments they play featured. Anyway, back to lapbooks! I thought I would show you some of what we did. I forgot to get pictures of the Jazz books, but here is some of what my friends did with Volcanoes and King Tut. Be warned, many pictures to follow! One of the big lessons for this activity was getting my friends to effectively summarize and show synthesis. I'm happy to say they did a very nice job. What was also another perk was the interest my friends had for the books they didn't read. Once they saw the various lapbooks, they wanted to read all the books. I have to say, I do love doing lapbooks with my friends. But, for me, it can be very time consuming. It also requires a lot of pre-planning. You have to have the foldable papers cut to size and ready to go. You also have to carefully plan what you will be doing with each section. You also need to be prepared for that friend whose fine motor skills make a mess of the folding! Always have some extras ready to go! Having said that, I will definitely be doing lapbooks again next year. :-)

After I review nonfiction text features with my third graders they will each get a file folder (I have already premade 25 file folders and divided them into 8 sections) a sheet of directions and a nonfiction book. I love the Scholastic Vocabulary Readers! I have them for all the topics and they are perfect for my lower readers. After modeling the project the students will be left alone to complete it. Here's a sample of a completed folder. Here are the directions along with a rubric Nonfiction File Folder Project. Do you think you'll use this project with your students? I'd love to hear your feedback!

We are sharing tips on how parents can best help their kids with school projects. See how we helped ours with the Kids Cloud Science Project.
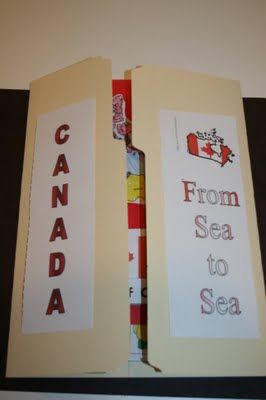
For anyone who knows us or has been reading my blog for a while, you probably aren't surprised that Canada was chosen for our geography fair project and you probably know who's idea it was. Colin wants to live in Canada, where he imagines he'd be surrounded by hockey and find outdoor ice rinks on every corner. Since it was our first geography fair, I thought it would be best if they just did one country together. Colin immediately said Canada, but the girls weren't too thrilled with that idea. They named other countries, but never seemed set on one so I talked them into doing Canada. I figured Colin would do more of the work since he's older and should do something he's interested in. We used the Download N Go (DNG) study, Expedition Canada. From this we got to watch lots of videos showing different parts of Canada. We learned about a different animal each day, some places there, inventions, history, popular sports, Canadian cities, geography, and holidays. Some of the books we read Caleigh made this beaver, a national symbol of Canada, and this totem pole, which were made by the First Nations peoples. Lego Creations: Colin made the CN Tower and Caleigh made an inukshuk, both of which we learned about in the DNG study. In addition to DNG, we also used Homeschool Share's Canada lapbook and a Canada mini lapbook from Fortunately for You for our lapbook. I think this is the first time we've ever done an actual lapbook. We usually just add the mini books to our notebooks, but I wanted something they could display at the fair this time. We made maple cookies with real maple syrup. You can find the recipe we used here. Kids at the geography fair. Along the bottom of the table, we taped coloring pages for each of the provinces and territories.The kids spent a lot of time coloring them. Display board: It was Colin's idea to use black and red. Caleigh came up with using maple leaves under the letters in Canada. On the bottom right is a Mountie paper craft that Molly put together. Also on the board: map of Canada, map of North America, flag, popular sports, major industries, major crops, information about what the word Canada means, languages, holidays, animals, and Levi from Children Just Like Me. On the right, we brought along some of the inventions from Canada. On the left toward the front of the table is a French Canadian counting book. In this picture, you can see Colin's hockey helmet, a puck, the Lego CN Tower, and a French/English color words matching game. I'm so glad we did the geography fair. It was lots of fun showing our display and seeing everyone else's. The girls and I weren't too excited about doing Canada since it doesn't seem as exciting as some other countries, but we did learn a lot of new things and it ended up being a good study for us. In my previous post, I have some pictures of other projects at the fair and Molly getting a henna tatoo.

Let me take a minute to address my post regarding Staples new rewards program for teachers. I thank everyone who commented. It seems I am not alone in my dismay with this revised program. Please, reach out to Staples and let them know how you feel, whether you agree with me or agree with them. It is important for our voices to be heard either way. I would love to see them revert back to the old program or at least offer up some reason as to why the change was necessary. * * * * * * * * * * * * I wrote a post a while back about foldables and lapbooks. If you haven't seen the post, go visit. I was able to link to some great pdfs of foldable books by Dinah Zike, the queen of all things foldable! :-) I used some of her foldable ideas on lapbooks my friends were working on recently. I have done lapbooks on occasion before, but they are not a staple in my teaching for one main reason; they take a long time to get done! While I do believe they are worth every minutes spent on them, the current curriculum I have to follow does not allow me to linger. I know that they can be done in less time if you do them on a smaller scale, but mine always seem to take on a life of their own! I like doing them because you can really do so much with them. Most importantly, my friends love the project feel of it all. Every time I have done them, my friends are always eager to work. Also, when they see their final project completed, they are a little in awe of themselves. Love it! In our guided reading groups, my friends were working in three different books, one on volcanoes, one on King Tut, and the last on the history of Jazz music. Speaking of which, on a total aside, do you know the Cheesecake song as sung by Louis Armstrong? If you don't know it, watch this! I show this to my friends every year, and we end up singing it all year long. I promise you will have this song stuck in your head! And, just wait for Bing Crosby to come hopping through! Too funny! Isn't that just great!!!! We will often substitute the word cheesecake with pizza or tacos or any featured lunch menu item. Any two syllable word will work. Most of my friends are also in their second year of instrumental lessons, so they love seeing some of the instruments they play featured. Anyway, back to lapbooks! I thought I would show you some of what we did. I forgot to get pictures of the Jazz books, but here is some of what my friends did with Volcanoes and King Tut. Be warned, many pictures to follow! One of the big lessons for this activity was getting my friends to effectively summarize and show synthesis. I'm happy to say they did a very nice job. What was also another perk was the interest my friends had for the books they didn't read. Once they saw the various lapbooks, they wanted to read all the books. I have to say, I do love doing lapbooks with my friends. But, for me, it can be very time consuming. It also requires a lot of pre-planning. You have to have the foldable papers cut to size and ready to go. You also have to carefully plan what you will be doing with each section. You also need to be prepared for that friend whose fine motor skills make a mess of the folding! Always have some extras ready to go! Having said that, I will definitely be doing lapbooks again next year. :-)

Learning about the Human Body is great fun! Exploring and understanding the amazing structure and design within the composition of human life, inevitably points to a Creator. Oh what a blessing to be made in

[A VERY OLD SHOWCASE. PLEASE PREPARE YOURSELF BEFORE YOU SEE IT] Penuh editan lama nan buruk rupa. Jangan diliat

Hi everyone! So, on today's post, I'm super excited to say that I have joined a challenge based on the Seven Deadly Sins! I usually stay away from challenges because I never know if I'll have the time to do all the challenge manis and sometimes the actual challenge topics just don't call for any creativity in me. This particular challenge was created by Alice from One Nail to Rule Them All and Helena from Nail Wish and it's called the Deadly Sins Challenge. Illustration by Dahlig (her DeviantArt is http://dahlig.deviantart.com/) The first week challenge is Lust and we can do both of the challenges or just one. I chose the Day 1 challenge and decided to do something that I've been thinking about for a long, long time. I had seen a Tadashi Shoji dress on Pinterest that immediately had me wondering what it would look like as a mani. After having it in the back of my mind for a while, I decided that I needed a black jelly to make it work, so frankened one. Then I sat on it some more. Finally, this challenge was what prompted me to get my act together and see if I could capture the lace under black guaze look. I think it looks ok in pictures but it falls a little flat in real life. I did enjoy finally getting my butt in gear and trying to get my idea onto my nails. The polishes I used are Sinful Colors Snow me White and WnW Black Creme. The black jelly is created from the Black Creme. Here's the dress that inspired me: From: http://www.stylebistro.com/runway/New+York+Fashion+Week+Fall+2012/Tadashi+Shoji/1dHUggmWw-D

This is a great project adaptable for distance learning! The assignment was designed as a project for my year 1 high school class, but would be great for middle school too. It's a way for them to tell a little about themselves through drawing of personal ideas. Like a self-portrait about them. It en...

Grab these K-2 sight word lists and checklists to help you assess the sight words your K-2 learners need. {3rd-5th grade sight word lists are coming later this week!} Psst! We also have an Elementary Sight Word Lists for Grades 3-5! *This post contains affiliate links. This is a subscriber freebie! Please subscribe to grab ... Read More about K-2 Sight Word Lists & Checklists

Since its inception, Hollywood has shown us an image of unattainable youth and glamour, though quite frankly, French collage artist Matthieu Bourel doesn't seem too impressed. Whether in his hand-cut collages or entrancing animated GIFs, Bourel deconstructs images of models and actors of a bygone era. He splices divas' head shots with anatomical diagrams, peeling away what looks like layers of skin to reveal veins and eyeballs. In other works, faces come off like masks only to reveal more removable faces underneath. Bourel's bizarre and slightly morbid work points to the illusions of the entertainment industry. He makes his viewers cognizant of the absurdity of our celebrity-obsessed culture through his strange sense of humor.

Sundays are special because we get to go to church and learn from the scriptures. And we can also learn at HOME! You can use File-Folder Games as a fun way to teach your children about the scriptures and faith-building principles. Supplies: File Folders Pictures of scriptures stories (You can use printables, pictures cut out of church magazines, or anything else you think might work! The printed ones I have below were ones I printed & colored appx. 13 years ago as part of a goal I had in my Young Women's program to make fun Family Home Evening games for my future family! My hard work paid off!) Scissors Glue or tape Marker Here's what you do: Create a file-folder game using whatever pictures you were able to find. Your kids can play with these independently, or you can have a little lesson to go along with it. Here are some examples: Bible Picture Match-up: People in the Bible Match-up: Sailing to the Promised Land Puzzle: Noah's Ark Matching: Book of Mormon Matching: (what's the Book of Mormon? Click here.) Pass-Along Card Matching:

I came across this photo that inspired this project. It would have been such a great project that I know I would have enjoyed as a kid. I think (know) my students are enjoying it because I heard on…

can anyone tell me who is the folder of this?

SUPPLIES Hanging File Folder Tote 4 Different Colors of Hanging Folders Manila File Folders File Folder Labels Black Writ...

Teaching music with fun, tried & tested lessons, DIY classroom projects & ideas your students will love with Tracy King, the Bulletin Board Lady.

No one likes those plain pocket folders from the drug store! Learn how to make a pocket folder and you'll never have to buy an ugly one again! These are completely customizable!

No one likes those plain pocket folders from the drug store! Learn how to make a pocket folder and you'll never have to buy an ugly one again! These are completely customizable!

You can create stunning pages without sacrificing simplicity. With Kiwi Lane’s innovative products, and patented scrapbooking method you can preserve your memories in a way that is both beautiful and blissfully simple. . Discover more…

The moment I discovered the theme for July was Office Space, I knew I wanted to create a mini book using manila file folders. There were so many choices and designs out there. I didn't follow any one tutorial exactly, but rather used each design I found

So I have this collection of decorative file folders, which I don’t…actually…use. It started when I spotted a package of bird-themed folders by Cavallini while shopping at Barnes…

When you carry a daily planner, it is nice to be able to tuck important papers into a folder in your planner. With the steps below, I will show you how to create your own planner pocket folder. This pocket folder is movable from week to week. Plus, the folder is compact, without adding any bulk to your planner. These pocket folders are created using ordinary file folders. You can find pretty file folders at your local office supply store. Or, you can purchase file folders and decorate them yourself. Supplies for this project include: A file folder Pencil Ruler, or a tape measure Scissors or Exacto knife Hole punch Glue stick, or double sided tape Tape measure Scotch Tape, or if so desired, Washi tape Post it tabs Find the desired length you need for the size of your planner. I cut just under the tab of the file folder. Which made the pocket folder, approximately 7 and 1/2 inches long. Then, lay your folder open on the table, decorative side facing out. Your file folder will have a crease down the middle. Bring the folder sides to the middle and press. This is the beginning creation of the folder pockets. After folding, the planner will be approximately 4 and 1/2 inches wide. With your ruler or tape measure, mark where you want your pockets to begin. I measured up about 3 inches. Use a pencil to mark this spot. With your ruler, I just grabbed a discarded piece of folder, use this as a guide to mark from the corner of the folder to the pencil mark in the center of you folder. You should have a triangle shape. Lightly draw a line with your pencil, connecting these two edges. Cut along this line with you scissors or Exacto knife. Your folder will look like this, when you have cut off both sides of the folder. Using your glue stick, or double sided sticky tape, glue down the bottom edge and inside edge of your flaps forming your pocket. (Do not glue down the angle cut edge) Just to reinforce the glue, tape the bottom of the folder and then tape down the middle of your planner. Use Scotch tape, or if you want some added decoration, use your Washi tape. Now, because my planner is spiral bound, I need to add repositional Post it tabs to my pocket folder. I have a blog post on how the create the Post it tab coil clips here. When you have your Post it tabs in place, insert your pocket folder in to your planner. This is how your folder will look in your planner from the left side view. Here is how your pocket folder will look from the right side view and opened up ready to place our important papers in for safe keeping. With a few easy steps, you can create your own pocket folders. If you do try this diy project leave a link to your folder picture, blog post, or video in the comment section below. For those of you who have ring binder planners, please follow Alexis aka Miss Trenchcoat's You tube video on how to create the pocket folder dividers for 6 ring binder planners. Now to you- Do you have another folder idea for your planner? Leave your answer in the comment section below. We are always looking for new ideas for our planners. Subscribe by email * indicates required Email Address * First Name

Visit the post for more.

I was at the Back To School sales this week with my son and I saw pocket folders for 20 cents. I started thinking that for that cheap, I could figure out some way to use them to organize my magazines and ephemera for junk journals and altered books.
![File Folder Art Journal [VIDEO] How to Tutorial](https://i.pinimg.com/originals/ec/d4/27/ecd427affb7d30b769b9ee1c31e8611a.jpg)
During a recent art therapy supervision session, I was re-introduced (thanks Mary!) to the technique of taking a basic file folder and re-purposing it into a mini book that could be used as an art …

2018 Retreat guests were given a "welcome folio" upon arrival that contained information for the weekend. Several attendees asked to learn how to make one, so here we go! Begin with a budget manila file folder from your favorite office supply store.

Have you ever needed a file folder and either can't find one? Or are you just tired of staring at the boring colors of your old file folders? Whether you want to make your own or just simply add to the folders you already use, here are a...
After I review nonfiction text features with my third graders they will each get a file folder (I have already premade 25 file folders and divided them into 8 sections) a sheet of directions and a nonfiction book. I love the Scholastic Vocabulary Readers! I have them for all the topics and they are perfect for my lower readers. After modeling the project the students will be left alone to complete it. Here's a sample of a completed folder. Here are the directions along with a rubric Nonfiction File Folder Project. Do you think you'll use this project with your students? I'd love to hear your feedback!

This folder was actually very simple to make, you only need a few supplies and can change the style of pockets to suit your planning needs. To view the video tutorial of this please click HERE. You…

Back to school? Need to organise your work? Jazz up your folder with these quick and easy to make folder dividers! What you’ll need for this project: A4 coloured cardHole punchShoelacesPencil…
