

This post brought to you by the Beadalon crew!Welcome to day 3 of the party where we visit with Miss Kaaaatie Hacker!If you’ve been in the DIY jewelry world for any length of time, I’m positive you know Katie. She’s a good egg and one of my favorite people. She also hosts the popular television […]
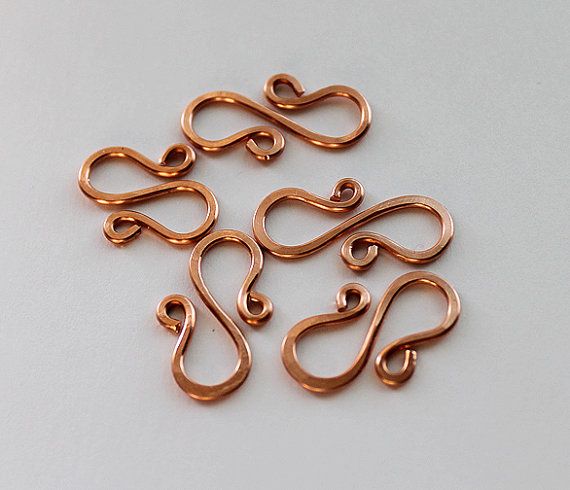
"S" clasp is a nice comfortable clasp. Handmade clasps and hooks will add a personal touch to your jewelry. Make sure you use a wire gauge that is heavy enough to produce a strong clasp for your necklace or bracelet. I generally use 14 gauge wire, but, for a delicate piece I may use 16 gauge.You can also use a jump ring with the clasp. To make this clasp you will need round nose pliers, chasing hammer, steel bench block. Watch my video tutorial how to make this "S"-hook clasp. PS. Excuse my web-camera for going out of focus in some episodes.

Basic Net Wire Wrap: This is a good rustic wrap for irregular stones, crystals, and sea glass. To dress it up a little you can use longer wires and add beads or charms as you close the bail at the end.

Make your own I have seen a few beautiful, dainty, wire rings lately and I have fallen in love. Case in point. Kelly Fro...

Good morning! I’m so excited that Love My Art Jewelry just posted the invitation to their 3rd Boot Camp. I’ve participated in their first two and had a fantastic time of learning and fu…

Pendant and earrings made using "Wirely" wire weaving technique when multiple wires are woven together and keep the form with tension. Earrings and pendant are made of artistic wire with sterling silver earwire.

Eddig titokban tartottam, de most megmutathatom: zenésznek rendelték ajándékba ezt a fülbevalópárt. Az alapötlet nem saját, de az egyik-ilyen-másik-olyan megoldás igen (talán:-) Senki nem vádolhat azzal, hogy nem figyelek a részletekre: a fotón a violin-kulcs pont a helyén van. Zenészek a családomból, ugye, büszkék vagytok rám? :-D

learn how to wire wrap a stone using the spiral cage technique. This DIY tutorial will show you how to turn a gemstone or piece of sea glass into a necklace

Ear-resistable!!

Abby Hook Artist Artwork Gallery

For more information about my craft, please visit my profile page. GLACIER ICE is a 20 carat handcrafted raw genuine aquamarine gemstone pendant that I created swirling and shaping sterling silver plate wire by hand to enhance the natural beauty and shape of the stone. The combination of the elegant, swirly silver wire setting, together with the crystal-like and dramatic gemstone creates a very versatile piece of wearable art that can be worn with a party dress or your favorite casual attire. Stylish Care More pendants are sure to add a touch of natural drama to your fashion wardrobe. Aquamarine is the birthstone for the month of March. It measures 3/4" across and 1 3/4" top to tip including the bail. The bail is designed to be large enough to accommodate your favorite chain, choker or cord. Your gift of a 17" silver plate chain is included. All purchases are nicely packaged in a gift box. The following metaphysical healing properties have been collected from various sources. For more specific information please contact an experienced Crystal Therapist. Aquamarine's healing effects: Aquamarine is a stone of courage. It provides a shielding property for the aura and the subtle bodies. It helps to attune to more spiritual levels of awareness; for those who are involved in spiritual development, it provides emotional and intellectual stability and enhances the connection with the higher self. It enables one to travel deep within the self. Carry Aquamarine to provide a protective layer around your energy field and create stability within your field. Use your crystal to open up to spiritual energies and increase your awareness. Aquamarine helps with cleansing, meditation, serenity, safe travel on water and water spirits. It is a stone of courage and tolerance. It's a good stone for aligning and balancing the chakra's. Helps to stimulate and cleanse the throat chakra to allow better communication. Chakras: Frontal, Soul Star, Third Eye, Throat Astrological sign: Aries, Gemini, Aquarius, Pisces

Jessica is sharing her wire wrapped button ring tutorial at Curry Designs Handmade. If you have access to a bunch of antique or unusual buttons, this might be a great way to display and share them…

Angel Earrings

Argh! I can't believe I am already behind so early in the game! I am afraid first vacation and then sickness distracted me from posting here...

Worauf Sie beim Kauf von Schmuck achten sollten #achten #schmuck #sollten #worauf Mothers Day Jewelr

Фотарэпартаж з выставы Вікінгі і балты: паўночная сага , якая адкрылася 10.02.2015 ў Мінску ў Доме-музее першага зезду РСДРП. Выстава арганізавана мінскім клубам эксперыментальнай археалогіі True Varing і віцебскім клубам ваенна-гістарычнай рэканструкцыі і мадэлявання Naglfar . На…

Introducing my wire crochet workshop participants with other wire work techniques, that are different than my Invisible Spool Knitting wire crochet, made me want to write about it here on my blog , so my readers that can't attend my workshops in person can learn about them too. The list is long so probably not all the

Are you working with wire today? I find myself playing with some kind of wire every day, my wire selection is at hands reach! Whether it’s Vintaj Natural Brass, Arte Metal or Artisan Copper colored wi

Это очень полезная информация! Сохраните себе.

As a form of fiber art, crochet offers infinite opportunity for creativity Materials include thread, yarn, ribbon, fabric strips, wire, rope, twine, cords, twisted paper, video/cassette tape ribbon…

Working away on a new Copper Wire Collection . There is something about just using your hands and a pair of pliers to shape and form and ...

*** ATTENTION *** I am going to be out of the studio EVERY WEEKEND from Friday to Monday. All orders placed Friday to Sunday are going to be processed and shipped following Tuesday and Wednesday, so please, plan accordingly. New addition to "Blooming" collection. Rose, Queen of flowers! Contemporary, yet classy, minimalist yet decorative! Pin is almost 2 3/4" or 7 cm long Shawl pin has thicker needle so it is best to use with knitted, crochet or fabrics with loose weaving. *** Metal has bare finish, so some darkening will occur with time, so the best way to keep it away from moisture. and high humidity. However shine can be restored by polishing with jewelry polishing cloth. ***Pin will arrive in zip lock bag with anti tarnishing black tab, so if you keep it like this it will help to protect it from further oxidation. I also sealed it with high quality micro-crystalline wax to delay oxidation.

A couple of people have been requesting a tutorial for this elegant pendant for a year and I’m pleased to say that I’ve finally finished it. This pendant has been a good seller for me at shows and I’m happy to share my technique for turning your favorite lampwork focal bead into a gorgeous pendant caged in coiled sterling silver wire. The tutorial is 19 pages, and contains 45 steps and 50 photographs. In this day and age we all need to work smarter and faster so I’ve incorporated some timesaving techniques and helpful hints including two pages of instruction on how to coil with a drill and even make your own mandrels. Every pendant will be uniquely your own based on your choice of components. Materials: 1 lampwork bead, 15 to 20mm 2 bead caps with 6 petals, 10 to 15mm wide 3” 16 gauge dead soft wire 3” 22 or 24 gauge dead soft wire depending on size of hole in bead. 6-7’ 26 gauge dead soft wire 1 cubic zirconia or quartz top- drilled pendant bead, 18 to 35mm The tutorial is in PDF format and will be emailed to you within 24 hours, usually much sooner. Adobe Acrobat Reader is needed to view the file. The tutorial will be sent to the email address associated with your Paypal account unless you instruct otherwise.

Remember these? As promised, here is the super easy tutorial. Afraid of Color Blocking? Start off slow with these colorful bracelets...

"Woodland Realm" Silk String Bundle from Marsha Neal Studio Ribbon and leather cording is all the rage, and many of you are probably contemplating adding it to your jewelry repertoire. Finishing off the ends can be a bit of a head-scratcher when you first start out though, especially if you haven't had time to explore all the products and techniques available for attaching your cording sections to the rest of your piece. The first piece I ever sold on Etsy had 2mm Greek leather on it, and I faked up some coil ends on it--I had bought some simple, cheapie ones at the craft store and was trying to copy them. The only think I could think to do was wrap the wire around the ends of the leather and make a loop at the end, but it was really frustrating because the leather was kind of floppy. Ca. March 2005 It was so frustrating in fact, that I didn't use leather in my designs again for a couple years. Later I discovered commercial crimp ends for sale, and used those on a few pieces. From Cool Tools PMC supply They look really nice, and come in different finishes, but in my experience they have a tendency to break. The center section on some styles actually breaks away from the end sections when it's crimped, and this can give way under too much wear, like with a bracelet that gets tugged and twisted a lot when you're trying to put it on or take it off. (I actually had to repair a bracelet where the crimp end broke--I redid it with a different technique.) Could be I squeezed it too much; it's hard to tell how tightly to crimp it. I don't think there are the same issues using these findings with a necklace though, because they don't get the same wear and tear, and I've used them with necklaces without any reported problems so far. With silver plated pewter crimp ends from Fusion Beads I still really wanted to use leather in my bracelets, without having to fold it over a ring or something (because that can be kind of bulky, especially with Greek leather), but I needed something sturdy. It eventually occurred to me (probably in the shower) that I should make the coil and loop BEFORE attaching it to the cording, and THEN slide it onto the leather and tighten it, instead of trying to wrap the wire around the cording. (I have no doubt thousands of jewelry makers have been doing this forever, and I could have learned this from one of them, but perversely self-sufficient freak that I am, I had to take two years to figure it out myself.) So I gave it a shot and it worked fine. This is how I eventually ended up making them--these are in a few different sizes: They look like this when they're attached and tightened up: I like to use 16 gauge wire, as I prefer a chunky, substantial look (and I'm a little paranoid about things coming apart--I also add some adhesive, like GS Hypo Cement or PlioBond--Hypo Cement is clear so probably a little easier to use, PlioBond is more amber colored), and this gauge seems to work for most of what I do. The 16 gauge is not so heavy that it's hard to work with, and I can get the coils down to about 4mm inner diameter, which is the lower limit for most of what I do. If you wanted to do something with just, say, one strand of 2mm Greek leather, you could go down to 18 gauge and get a smaller coil that would still be sturdy enough. (You can always anneal too, if your hands are worn out and need a little extra help--some days the elbow grease just isn't there!) For a 5mm (inner diameter) coil, I use the base of my round nose pliers. Leaving the wire on the spool (you won't cut it until you're totally done), make a coil with three or four courses around. When you actually tighten it up around your cording the whole thing is going to get skinnier and longer and you'll end up with a couple extra courses around. (The longer the finished coil is, the greater the surface area you will have grabbing onto your cording and the more secure it will be.) When you've got your coil completed, you'll need to bend the free end of the wire up to create the loop. I pull up on the free end a bit to create some space for me to slip my bent nose pliers in there: Then I slide the tip of my bent nose pliers under there, and bend it straight up. You can use the pliers as necessary to sharpen the bend a bit. (Again, anneal if you need to--the process of tightening it later will work harden it plenty so it won't open up on you.) Squeeze it together a bit again. After you have your 90 degree angle, it's time to make your loop. I just pop my round nose pliers under there again, near the base, and just bend the wire right over the top. Nip it off with your flush cutters just about even with the top rim. Tuck the end just inside the edge of the coil, and hammer it a bit to strengthen it and give it a finished look. (Hammering is optional, I just like to hammer things.) You might have to trim your loop a bit after hammering it, because that tends to make it a little longer. Once you have a feel for that you can trim it a little shorter right off the bat, so that hammering it will make it just the right length. Make sure the loop goes straight over the top, transecting the coil right across the middle. Adjust as necessary with your pliers. Of course, you can make these any size you like. I just eyeball the cording I'm using and guesstimate what inner diameter I need. It's totally fudge-able because you're going to squeeze it down tight anyway. That said, it's nice to get it as close to the right diameter as possible, because squeezing an oversized coil down is a pain in the butt. You can do it, but it's a lot more work, and of course the more you squeeze it, the tougher the wire gets and once your cording is in there you can't re-anneal. Next time, we'll talk about actually putting it on your cording.

When first learning kumihimo wirework, you'll notice right away that braiding with wire is different than other media you've used before. Wire is firmer and less forgiving than traditional kumihimo materials like silk or leather cording. With that comes a bit of a learning curve.

When first learning kumihimo wirework, you'll notice right away that braiding with wire is different than other media you've used before. Wire is firmer and less forgiving than traditional kumihimo materials like silk or leather cording. With that comes a bit of a learning curve.

"Music washes away from the soul the dust of everyday life"

How to wire wrap beads on the outside of a wire frame to make a terrific heart pendant - free tutorial.
