

Wax is a favorite topcoat for chalky finish paint projects, and now there's a spray wax product on the market! Learn about the pros and cons right here!
A quick video tutorial on how to wax furniture or finish your craft projects like a pro. Paste wax adds the finishing touch to painted furniture.

If you've ever wondered how to paint your old wooden furniture, well then today's post is for you! Welcome to my beginner's guide to painting furniture. I'm a huge fan of doing big things on a small budget. I think you can create something awesome and not have to spend a fortune to do so. It just requires creativity and the willingness to get your hands dirty. Painting old thrift store furniture is one of the ways I do that. Here's my favorite find ever, my bedroom dresser. I scored it secondhand for only $50, and completely transformed it with some homemade chalk paint. See chalk paint recipe here....scroll down to tip #6. I absolutely love the way it turned out. This dresser was a total score, and I knew immediately that I could turn it into a piece I would love for a long time. Here is how it originally looked the day I brought it home. This thing was a total ugly duckling at first. And this 'before' pic does it way more justice than it deserves. It was a dirty, smoky, beaten up, rickety old dresser. It took a lot of work to transform this dresser into such a babe, but it was well worth it! Here's how I did it: #1. I took out the drawers and removed the handles. #2. Sanded the whole thing down with my trusty sander. #3. Coated the whole thing with Zinsser Primer. (See why you should prime first here.) #4. Painted the drawers & frame with 2 coats of Behr Premium 'Creamy White' that I converted into chalk paint. If you use chalk paint, you can actually skip the sanding and priming part, but I wanted this dresser to be really durable so I did it anyways. #5. Once the paint was thoroughly dry, I put the drawers back in and screwed in the hardware. Then I finished the whole thing with Minwax Finishing Wax (Amazon Affiliate link). All you do is rub some of it on the furniture with a rag and then buff it out. It buffs out to a beautiful finish, and makes painted furniture look fabulous. I usually change out the hardware when I redo furniture, but the hardware on this piece was pretty, so I just left it alone. My favorite tip is to paint the insides of your drawers. It looks beautiful and it gets rid of any smells or stains. I'm totally hooked on painting the insides of drawers now. Best upgrade to an old dresser ever! You can see more about how to do that here. I love the way the dresser turned out, and love the way it looks in the master bedroom. If you want to read more about our bedroom, you can check out this post about the 10 different looks this room has had since the start of this blog and all of the crazy mistakes I've made along the way! I can almost guarantee you'll enjoy it. :) And thanks so much for stopping by today! I'm so glad you're here! For related posts, please check out the following: How To Paint Laminate Furniture 10 Thrift Store Furniture Makeovers Bedroom Decorating Mistakes & Lessons Follow my blog with Follow my blog on or or Subscribe to LiveLoveDIY with email! Enter your email address: -->

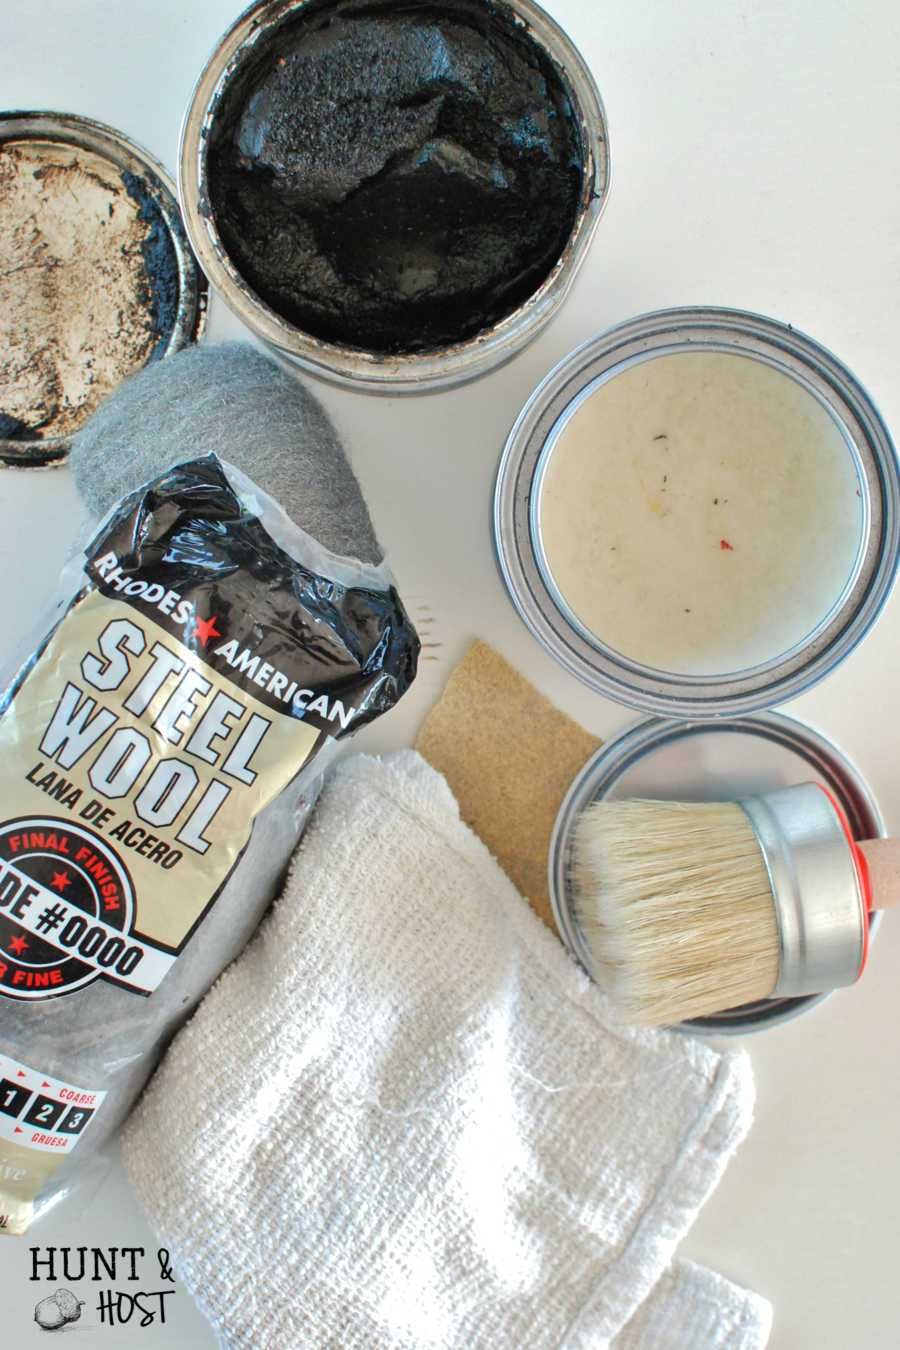
Make your own dark finishing wax using all natural ingredients! I wanted a cost-effective way to try out a black finishing wax, I had just purchased an amazing dark wax from Minwax but it’s b…

How To Use Gilding Wax On Painted Furniture | Tips and Techniques for Different Effects!

I absolutely love to work on an antique piece of furniture that has an alligator texture. That texture, the bubbles and bumps, are cause from the varnish breaki…

Cove - Cornish Mineral paint NEW MINERAL PAINT IMPROVEMENT/BENEFITS •New Ultra-durability, water, stain & scrub resistant top-coat, added into our premium mineral paint formula. No waxing or varnish required, unless for decorative finishes or for high traffic areas. •Super easy to use mineral paint, offering a smooth and ultra matt finish, with an added paint extender within the formula, giving our users more time to paint and touch up if required. Drying time in-between coats is one hour. •Environmentally-Friendly Mineral Paint, made with no added chemicals or toxins. We have stayed true to our eco-living ethos and kept Cornish Milk Earth friendly. Cornish Milk Mineral Paint is 100% water based. •Ultra-low VOC content, with only 9.0g per Litre. Cornish Milk is one of the lowest VOC decorative furniture paints on the UK market. •Vegan & Cruelty free. No cows or animals have been used or harmed in the making of our mineral paint. • All our Cornish colours are made with 100% real powdered earth pigments (No Synthetic dyes or stains have been used). Our pigments guarantee an even and flawless finish, which a richness of colour. • Our new formula resists heat of up to 80ºC, which makes Cornish Milk perfect for kitchen and fire surround transformations. •New maximum coverage technology for all your favourite Cornish Milk colours. No more extra coats or inconsistency coverage. Achieve maximum coverage with all our colours within a few coats of paint. Saving you time for more painting! •Exterior & Interior use Mineral Paint, with a new built in weather shield with enhanced UV Protection. •Extended shelf life of up to five years. Cornish Milk's new tins insures your mineral paint will be fresh to use every time you want to paint. •Our new Formula has been approved by our Official Cornish Milk Stockists.

Here's an easy way to create an aged rust finish on new home decor items. Painting a vintage and weathered look is a huge decorating trend right now.

Finishing touches to our DIY wedding tables included a coat of Minwax paste finishing wax, a product that added a matte sheen and wonderful feel to our pine tables.

How to Use Gilding Wax in Your Home. This DIY product should be in your paint toolbox to add sparkle and shine to your home decor.

Learn how to refinish furniture faster and easier by avoiding stripping. A seasoned pro tells you how to clean, repair and restore old worn finishes without messy chemical strippers. Furniture refinishing will be easier from here on out!

Knots bleed through paint. It's frustrating and it's unattractive. This is the surefire way to stop knots from bleeding through your painted DIY projects.

Make copper look like real aged copper with this paint technique. This is a great way to give your kitchen a vintage look.

How to make your own white liming wax for timber and painted furniture. DIY by Lilyfield Life

Learning how to distress a painted sign isn't hard - and it can be a lot of fun. Distress as much or as little as you'd like with this easy technique.

Minwax Soft Touch, 8 oz., finishing wax. Protects bare and stained wood with a hand-rubbed matte finish that's soft to the touch. Use on bare, stripped, painted or stained wood that hasn't been topcoated. Use on furniture, cabinets, small projects and more. SpecificationsCapacity: 8 ozCountry of Origin: United StatesWeight: 0.72 lbs- SKU: TRVAL127478

A quick video tutorial on how to wax furniture or finish your craft projects like a pro. Paste wax adds the finishing touch to painted furniture.

To stain wood any color, mix 1 part paint with a 4 parts clear mixing glaze. Or, add water to acrylic paint in a 1:1 ratio. Transparent dyes also give wood a colorful, stained appearance.

How to create a faux zinc paint finish on a wood dining table or any surface. It is easy and inexpensive to do with craft paint from Walmart. Follow step-by step faux finishing steps to create your own faux zinc finish.

Distress without stress, thanks to Rust-Oleum Chalky Finish Furniture Paint. Revive chairs, restore wardrobes and revamp desks with a smooth, chalky matt finish in just one coat. No priming or sanding necessary beforehand.* There are 110 gorgeous shades to choose from. Go bold with two contrasting colours or create a subtle effect with toning hues. Simply brush onto the bare surface or over the old paint or varnish, then sand or scour when dry. And for the finishing touch, add a layer of Rust-Oleum Furniture Finishing Wax or Rust-Oleum Furniture Lacquer. Easy on the eye. Easy as pie.

I'm all about the finishing touch when it comes to painted furniture. Aging and accenting with dark wax can be intimidating but using a natural wax makes it muc…

If there is a darling of the DIY world, chalk paint is it, thanks to its ability to transform outdated furniture into Insta-worthy superstars with virtually zero prep. It turns your biggest furniture makeovers into simple one-day projects. We've got all the deets you need to chalk paint like a pro.

Warmth and durability all in one place. Light & Dark Waxes are formulated to protect your finishes and give them the cozy, golden warmth we love in a well-worn antique. Dark Wax is the professional finishing touch found on beautiful antique restorations. In combination with Light Wax, Dark Wax adds years of authentic aging found in the Paris Flea Market or your favorite vintage shops. This special formulation can be used on metal to preserve or enhance patina, as well as on raw or painted wood as protectant or sealer. Use on metal, to preserve and enhance patina, or to act as a protectant and sealer for raw wood. Pairs perfectly with your stained and painted pieces and gives milk paint an authentic, vintage sheen.

DIY How to Paint Furniture. Distressing . Annie Sloan Chalk Paint . Distressed Blues. by The Decorated House. Donna Courtney

After sharing my paint secrets last month, I was so excited to find out how much ya'll loved them! Your enthusiasm reminded me that many of you are still learning just like I am....and I love that. I thought I would share a few more tips today, and hopefully answer a few questions that I frequently receive from readers. Some of these you might know, some you might not. Maybe you'll even have a few lightbulb moments like I did when I figured this stuff out. So, here are my 10 paint secrets...round two! #1: Make a paint chip key ring I recently made my own paint chip key ring, and it's so useful! I wish I would have done this long ago! It's just a simple key ring with all of my paint colors and paint names attached. It really comes in handy when I'm out shopping for fabric, furniture, or decorative accents like pillows, etc. To make this, I used the paint chips from all my wall colors, a key ring, and some key tags. You can find the key tags in the key department of most home improvement stores or here (Amazon affiliate link). I cut out a small square off the paint chip, glued it to one side of the tag, and wrote the name of the paint color and room it goes in on the back of the tag. I have it in my purse and take it with me whenever I go out. You could also do this with popsicle sticks, or even just laminate little pieces of the paint chips and hole punch them. *To see the paint colors we used in our house, go here. #2. How to choose a paint finish When you've never painted anything before, that first time to the hardware store is a doozy. Paint comes in a bunch of finishes and it can be really confusing when it comes to which one you're supposed to get for which project. So, after years of using different paint all over my house and my furniture, here's what type of paint I usually get for different projects: Flat paint: use for walls in living rooms, bedrooms, ceilings, or furniture Eggshell: use for walls in hallways, dining rooms, kitchens Satin: use for walls in bathrooms, or furniture Semi-gloss: use for windows, trim, doors, and cabinetry #3. Use Tack Cloth I love tack cloth. A lot. Have you ever sanded down your furniture or wooden trim before painting it and then ended up with a million bits of fuzz and dust in your paint job? It can be so frustrating to paint a piece so perfectly and find out after it's dried that there is a giant tumbleweed stuck right on top. Tack cloth is the solution for that. It's basically like a kinda sticky rag that doesn't get it's stickiness anywhere. You just wipe down the surface of whatever you're painting and it picks up everything. I use it on every single piece of furniture that I paint. #4. Furniture touch up pens These things are definitely on my list of awesome inventions. I am well known around these parts for being heavy handed with a vacuum cleaner and scratching up the legs of all our furniture. Plus, Tootie and Cheese take care of the rest of the furniture with their claws. Once a month or so, I go around the house with one of these Minwax pens and color in the scratches. I have an espresso one for our couch legs, and a black one for our desk and table. You can find these here (Amazon affiliate link). #5. Save time with artist brushes While I usually take the time to remove outlet covers, etc., sometimes (if you're like me), you've painted for endless months by yourself and you just run out of steam. This can save you some time, and the brushes are so small that you can really paint a small very precise area. I've done it in a couple rooms, and it truly looks like I took the outlet cover off. Not only does this tip work for outlets, but it works for doorknobs and hinges, and for touching up small knicks and marks on your walls, too. #6. Prime before painting wood I painted a lot of furniture before I learned about primer. It was the MOST annoying learning lesson I've endured yet, as most of those pieces ended up having to be redone. I'm sure it's common knowledge to any of you seasoned furniture painters, but for those of you just starting out (like I was a few years ago!), hopefully this tip will save you from the trauma of peeling furniture. Hopefully by now, we all know that you're supposed to sand furniture before painting it. However, unless you sand it down like you have the arms of a powerlifter, your paint won't last forever. This is where primer comes in. If you prime wood before painting, it makes your paint adhere like crazy. Even if you don't sand, primer will still make your paint stick. Ideally, when painting furniture, you would sand and prime. However, if you're short on time, if your piece is already painted, or if it's laminate, you can skip the sanding and just prime, and your paint job will look great and last for a long time. So, the moral of this story is PRIME IT. See how I paint furniture from start to finish here. #7. Wax it. When it comes to finishing furniture, wax is my favorite method. After painting tons of pieces, I've discovered that my favorite method is to sand, prime, use flat paint, and finish with wax. If the piece needs to be really durable (like a table or desk), I'll use polycrylic, but if it's just a normal piece that won't be put through a lot, I love the way a flat paint with wax finish looks. Wax isn't as durable, but it looks amazing. All you do is apply it with a rag, rub it on over the paint, let it dry and then buff it with the same rag. I used wax here, and it looks fantastic. My favorite finishing wax is the Minwax paste finishing wax in clear. It can be found here (Amazon affiliate link). #8. Cheap Sources for Paint Cans Did you know you can get empty paint cans of all different sizes at Home Depot for just a few bucks? The gallon cans are about $4 and the quart cans are about $2. This may be common knowledge, but I for one was super excited to discover a bunch of empty paint cans for that cheap. I mix and blend a lot of my own paint colors, as well as make my own chalk paint, so this comes in handy often. And there's all sorts of other things you could use them for, too! Just think of all the crafts and organizing ideas you could come up with using these. #9. Gloss spray paint I'm obviously a huge fan of all types of spray paint. However, my personal fave is high gloss spray paint when it comes to coating small accessories or ceramics. The only problem is that not every spray paint color is sold in a high gloss finish. But did you know that you can buy whatever color spray paint you want in a flat finish and then get a can of clear gloss? It instantly gives anything a glossy, factory-like finish. It's amazing. #10. My favorite gold spray paint There are a million gold spray paints out there, but they are not made equal. Don't get me wrong, they all work just fine. However, if you're looking for that certain gold color that is super trendy right now, yet always classic, my go-to gold spray paint is Rustoleum Metallic Gold. I'm using it on several projects as we speak. You can find this spray paint here (Amazon affiliate link). And that's all ya'll! Thank you so much for stopping by today! For related posts, please check out the following: Part 1 Part 3 10 Thrift Store Furniture Makeovers 10 Thrift Store Shopping Secrets Follow my blog with Follow my blog on or or Subscribe to LiveLoveDIY with email! Enter your email address: -->

This post contains affiliate, but not sponsored links. Have you ever sanded down a piece to discover the most beautiful natural wood color - only to have it turn yellow or orange once you seal it? Lucky for you, I tried a TON of brands in an experiment to see which one would maintain the perfect co

Available in two sizes in Clear or Dark, BB Frösch Premium Finishing Wax contains a unique, environmentally friendly blend of waxes that naturally enhances and protects chalk-painted surfaces as well as bare or stained wood. Product Features: Easy to apply Dries and cures in MINUTES (not days or weeks like many brands) Contains a unique blend of waxes that naturally enhances AND protects Adds a durable, buttery smooth, professional-looking finish to bare wood, stained wood, and painted surfaces A little goes a long way How to Apply: "Butter" the end of a wax brush with thin layer of wax Moving with the grain (recommended for raw wood), or in a circular motion (recommended for embellished areas), apply wax to surface When there is no more wax on your brush, remove excess wax from surface with a lint-free wax cloth You will know excess wax has been removed when cloth glides smoothly, surface is not tacky to the touch, and surface begins to shine Repeat above steps (wax on, wax off) until entire piece is waxed Note: wax can be softened by placing a small amount in a microwave-safe dish and melting for 5 seconds at a time

How was ya'lls weekend? Mine was the usual- had a girls night Friday night when hubs and little man were out, hung with the fam on saturday....

Whitewashing wood with wax is a great way to update wooden furniture. Sometimes all that's needed is an easy makeover with Fusions Liming wax

The Stencil Brush 1.25" by JRV is not only great for stenciling, but also perfect for waxing and painting. With its synthetic bristles, this brush is made to last and provide consistent results every time. 1.25" size. Synthetic bristles. Made in USA. Ideal for stenciling, waxing, and painting. It is not only functional, but also stylish. The handle features a dark walnut stain with a matte lacquer finish and a chrome logo, adding a touch of sophistication to your art tools. Care: To ensure that your brush lasts for years to come, it's important to take proper care of it. Clean the bristles immediately after painting with a mild soap, and never leave the brush to sit in water for any period of time. Please note that no refunds or replacements will be issued if the brush has been left in water.

Yep. Spray paint and salt can give you an instant weathered iron effect. You can create a faux rust effect using these ingredients. As I am still sick, to ...

Back before the seemingly infinite rows of paint chips you find yourself looking through at the home improvement store…. back before the large-scale manufacturing of gallons and gallons of paint… back before having to carefully choose between eggshell, satin, matte, glossy, and so many other finishes… Thousands of years before the world of spray paint, acrylic paint, oil-based paint, latex paint, chalkboard paint, and even washable paints… there was milk paint. Some of the earliest cave paintings known to man were created with a very basic combination of milk, lime, and earth pigments. As these formulations were refined over time, milk paint coatings became more and more beautiful and durable. Many ancient artifacts still retained their vibrant painted designs upon discovery, giving us a unique peek into the color preferences of these historic cultures. Traveling painters in Old World Europe and colonial America would carry pigments with them, mixing their powders with milk and lime from the farm once they happened upon a home where their craft was needed. Although we no longer need access to goats from the farm to make milk paint, it still must be formulated with casein, a protein found in milk, to achieve its unique velvety finish. So the name “milk paint” remains a perfect fit even though it can now be commercially manufactured. Milk paint is essentially a versatile and authentic way to create an Old World finish on any piece of furniture, cabinetry, decorative accent, or even artwork – no matter the age of the actual surface you are refinishing. In its original powder form, true milk paint has an unlimited shelf life. Each of the rich, luxurious pigments in Amy Howard At Home Toscana Milk Paint were sourced from Italy and the South of France. Their authentic provenance from the heart of the Old World ensures a superior finish, color, and vibrancy. With no VOCs or other unsafe commercial ingredients, this milk paint is safe to use anywhere in the home. After mixing with water and removing any clumps or foam, Toscana Milk Paint can be used as-is, thinned to create a glazed patina, or layered multiple times for luxurious, antique depth. Working with Toscana Milk Paint requires close attention, although beautiful results are easy to achieve. It is much thinner than commercial paint you might be more used to, as it it is completely all natural. Working on a horizontal surface is necessary, and several coats are usually needed to create the look you are envisioning. As you agitate your paint and work through a wet edge, imagine yourself in southern Italy painting alongside the old masters in this same way, using the same methodology and brush strokes! In the past, you had to search for years or spend thousands to find a piece with this kind of elegance and drama. Now you can recreate this iconic historic patina in your own garage. Once you are comfortable with the basics, try some of Amy’s more advanced aging techniques using waxes, Dust of Ages, and even Antiquing Glaze with your favorite Toscana Milk Paint colors! Getting Started with Toscana Milk Paint: 1). Choose your favorite Toscana Milk Paint color. Remember, your mixed paint will dry to that exact shade! 2). Use this 2.5″ Flat Paint Chip Brush with your milk paint and the specialty 2.0” Round Hog Hair Paint Brush for any waxes you may apply. 3). Be sure to protect and seal your painted finish with Matte Sealer or Amy Howard At Home Waxes. 4). For advanced milk paint techniques check out Amy’s latest book Rescue Restore Redecorate.

Get a well-used look with all the metal damage

When I was visiting my family in Sacramento a couple weeks ago, my sister-in-law took us to a local thrift shop that was having a closing sale. I spotted this vintage, Thomasville sideboard that was 50% off. I was glad we had the truck with us, so we could haul this beauty back to Santa Cruz for a little makeover. It had some damage on the front and side veneer, but that is nothing a little spackling paste and sand paper can't remedy. I love the size and shape of this sideboard and there is nothing like the impeccable quality of vintage Thomasville furniture. I painted the whole piece in Graphite Chalk Paint by Annie Sloan and then distressed all the edges so the brown finish underneath shows through and brings out the details and adds dimension. I wanted this sideboard to be black rather than dark grey, so after I clear waxed it, I mixed the dark wax with unscented mineral spirits to make a dark wax glaze. This really deepened the color and turned it into a gorgeous, soft black. The paint and distressing really highlight all the beveled edges of this sophisticated piece of furniture. I left the hardware brass as a contrast against the black finish. One half of the sideboard has drawers behind the cabinet doors and the other side is shelving. This is a versatile piece and would work in a bedroom as a dresser, living room as a sideboard, or dining room as a buffet. This post is linked to the parties on my sidebar.

How to distress wood and furniture: 8 SUPER easy techniques & video tutorials to create aged & weathered wood quickly. Detailed steps & expert secret tips!

The Stencil Brush 1" by JRV is not only great for stenciling, but also perfect for waxing and painting. With its synthetic bristles, this brush is made to last and provide consistent results every time. 1" size. Synthetic bristles. Made in USA. Ideal for stenciling, waxing, and painting. It is not only functional, but also stylish. The handle features a dark walnut stain with a matte lacquer finish and a chrome logo, adding a touch of sophistication to your art tools. Care: To ensure that your brush lasts for years to come, it's important to take proper care of it. Clean the bristles immediately after painting with a mild soap, and never leave the brush to sit in water for any period of time. Please note that no refunds or replacements will be issued if the brush has been left in water.

Whitewashing wood with wax is a great way to update wooden furniture. Sometimes all that's needed is an easy makeover with Fusions Liming wax

If there is a darling of the DIY world, chalk paint is it, thanks to its ability to transform outdated furniture into Insta-worthy superstars with virtually zero prep. It turns your biggest furniture makeovers into simple one-day projects. We've got all the deets you need to chalk paint like a pro.

If there is a darling of the DIY world, chalk paint is it, thanks to its ability to transform outdated furniture into Insta-worthy superstars with virtually zero prep. It turns your biggest furniture makeovers into simple one-day projects. We've got all the deets you need to chalk paint like a pro.

If there is a darling of the DIY world, chalk paint is it, thanks to its ability to transform outdated furniture into Insta-worthy superstars with virtually zero prep. It turns your biggest furniture makeovers into simple one-day projects. We've got all the deets you need to chalk paint like a pro.

What would you say if I told you that white wax created a whitewashed look on my raw wood furniture in one easy step? Dreamy!

This post will help you understand the options available to seal and protect your chalk painted furniture! I'm explaining when to u...
