

Japan-based artist Ayumi Shibata (previously) constructs intricate paper cities and natural landscapes that both fit in the palm of her hand and are expansive enough to pass through on foot. Using dozens of layers of paper for a single project, Shibata carves miniature houses, clouds, and tree-filled forests that eventually are illuminated in glass vessels, stored safely in a book, or erected in large-scale installations. The artist tells Colossal that she doesn’t use pencil outlines, in part because the white paper isn’t durable enough to be erased if there’s an error. More

It is easy to make recycled paper at home with the grands. Paper making is an intriguing and hands on process and a great way to use recycled paper.
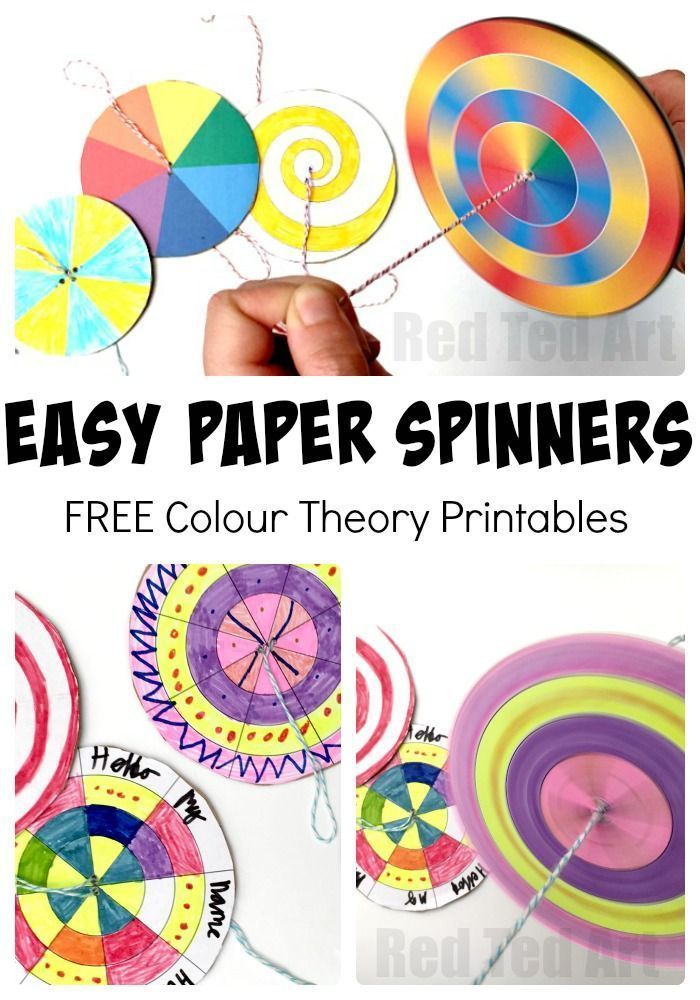
Free DIY Paper Spinner are super fun and easy to make.These paper spinning toys are also a great way to explore colour theory & fun with patterns.STEAM for kids

Discover Peter Gentenaar's amazing organic paper creations suspended in their flight on Sansible

8 More Earth Day Crafts for Kids

Paper ornaments, inspired by design*sponge. These are hanging in our guest bedroom.

Make pressed flower luminaria for any occasion or create as gifts. Charming lanterns that show off the beauty of flowers with soft light.

Do you sometimes feel the need to get your hands in to some kind of project? We are sure that most of us feel the need to do this once in a while and it also

For nearly 10 years, Sophie Mouton-Perrat and Frédéric Guibrunet have combined soft lighting with delicate paper craft to create ethereal sculptures.

De kunst van het papier maken van plantaardig materiaal is duizenden jaren oud. Met behulp van plantenvezels krijg je dan prachtig,...

Eco-printing on paper is a fun and easy way to introduce children to the wonders of natural dyeing or to get started with it yourself. Here’s a tutorial for one particular method, using autumn leav…

brewing up a batch of bio-paper. This is a new recipe, using a different process; I get very clear and transparent paper as a result. I'm quite satisfied with it!

Katie Loves …how Danish textile artists Helle Gråbæk and Maria Kirk Mikkelsen have played with paper weaving to make these beautiful squares of color and...

Australian artist Meredith Woolnough creates elaborate embroideries that mimic delicate forms of nature like leaves and coral. “I have been collecting skeletonized leaves for as long as I can remember,” says the artist, whose “traceries” capture the beauty and fragility of nature. Woolnough uses a special embroidery technique that involves a domestic sewing machine and a base cloth that dissolves in water after the piece is complete leaving just the skeleton. In a way, her process also mimics the natural process of leaves dying and drying up which, in turn, become the subject of her work. More

Découvrez une sélection unique de 100 créations en papier qui vous émerveilleront. Préparez-vous à être surpris et inspiré par la poésie du papier !

Learn how to make paper with this step-by-step tutorial featuring easily available materials. We'll also explore three ways to make your paper even fancier!

watch video: how to make: printable template: see more:

paper mobiles I made for bco craft swap. the recipient was a really cute 4-year old who loves rainbows! i love how these turned out, this was lots of fun!!

*Adds dead flowers to list of things I didn't know I could upcycle.*

This is the BEST paper tube Koi Fish, and one of several other Lunar New Year Animal inspired art lessons that we offer. This fun DIY craft is an original idea from ART CAMP Studio. It's a great year round project for all ages.

full photo tutorial - how to make a pretty paper orb

Hyperbolic Crochet - some fiber for thoughts about art, math, crochet, and all the various threads in our lives.

This easy recipe for paper mache glue simply requires flour, water, and salt. It is ideal for most paper mache projects.

Ok, so the giant food sculptures we started making a few weeks ago are (almost) finished! Here are some of the ones who finished yesterday. Aren't they scrumdidlyumptious?! This donut needs sprinkles I feel.. Sushi Roll Tomato-less Hamburger Sweets for all! Have a look at my last post on the giant food sculptures, to see

Decorating, Thrifting, Traveling...with a French Accent

Explore 26 captivating mushroom craft ideas that will spruce up your decor. Unleash your inner artist with these fungi-themed DIY projects.

I have been making paper for over 15 years and I love every step, from wandering around outdoors scoping out the plants to removing the finished sheets from the drying rack. It is so satisfying to use something free and renewable to create something beautiful. Collecting plants for papermaking opens your eyes to more of our world. The desire to learn more, naturally follows as you seek to identify species suitable to the craft. Collecting iris leaves about 15 years ago. I first made paper in a weekend workshop taught by an instructor through an Emily Carr College outreach program . We used cotton linters, abaca, and Japanese Kozo fibres. Before the weekend was through I was already thinking about local plants that I might try on my own. Swamp grass: collected dry in late fall on left, dried fresh in summer on right In this step by step tutorial, I'll take you through my process of making plant fibre paper, from start to finish. See the bottom of this post for a list of supplies and materials. Step One: Removing the unwanted components that contaminate the pulp. After you have collected your plant materials and done the initial preparation such as peeling the bast fibres or scraping fresh iris leaves to break down the pulpy material, you now cut the plant material up into 1/2 to 1" lengths using sharp scissors or garden shears. For information on collecting the plants for paper, read my earlier posts on collecting willow (woody bast fibre) and on collecting other types of plant fibres (herbacious bast, leaf, and grass). Then you will cook the material in a non-corrosive pot with an alkaline (soda ash) solution. This purifies the fibres by dissolving the lignin, sugars, starches, waxes, and gums. The remaining cellulose allows absorption of water and promotes bonding. Fill your pot about half full with cool water. Weigh the plant fibres. Weigh out soda ash (20% of the dry weight of the fibres). Stir the soda ash into the water (always add an alkali to the water, not water to the alkali). Add the cut plant materials to the pot and enough water to cover the plants and allow them to be stirred freely. Bring to a boil, then reduce to a simmer (work in well ventilated area; it's stinky). Generally two hours is adequate and sometimes less is enough. When the fibres can be easily separated along the grain they are ready to be rinsed to remove all residue. The liquid will be almost black from all the impurities that have been cooked out of the fibres. And the fibres usually darken as well. Strain the fibres in your cheesecloth bag and rinse until the water runs clear - several minutes. Keep squeezing the bag and rinsing. A garden hose works well for this step. Swamp grass and willow pulp Step Two: Separating the fibres To separate the fibre into individual filaments, I use a blender. Fill the blender 3/4 full with water and add a palm full of the cooked fibre. Blend with intermittent pulses until the fibres aren't clumped together. Care must be taken to avoid fibres tangling in the blender blades and burning out the motor. Don't over process. Pour into a bucket or bowl and continue with the rest of the fibres until finished. If you will be adding recycled paper to your handmade paper, soak it first in warm water until it falls apart easily. Mix it in the blender in the same way as the plant fibre and set it aside in a separate bowl or bucket. Step Three: Mix the formation aid (thickener) Follow the directions for the product you are using to mix it in a blender. I use about 2 tbsp of the powdered thickener in a blender full of cold water, keeping the water moving as I add the powder to prevent clumping. Pour it through a fine sieve to catch any clumps. This will keep refrigerated in a jar for a couple of weeks and you may not even need it depending on your plant fibre (read further). Swamp grass and field grass after processing. Ready for making paper. Step Four: Hogging the vat, throwing the wave, and kissing off I like to do the rest of the process outside, weather permitting. Fill your vat 1/3 to 1/2 full of water. Add the plant pulp to the water and stir with your hand to distribute the fibres evenly (hogging the vat). Using a mold and deckle with the plain deckle frame positioned on top of the screened mold (the screen side up) and held tightly together, use a side to side and back and forth motion (throwing the wave) to dip the assembly into the water as you scoop up water and fibre and lift it out still holding the mold and deckle together. Let the water drain away. Some plant fibres are too coarse so the water drains away too quickly and the fibres clump together. This is where the thickener comes in. If you find that the water is draining from the screen too quickly and not allowing enough time to form an even sheet of paper, add a small palm full of the formation aid to the vat and stir it into the fibres. Add more if needed. This will keep the water from draining too quickly. Some plant fibres have enough small fibres in the mix to help keep the water from draining through the screen too fast so formation aid isn't needed. Trial and error. Adding recycled paper pulp to the plant fibres also keeps the water from draining too quickly (which is also why you don't necessarily need formation aid) and makes your plant fibres stretch further. I usually make some paper from the pure plant fibres and then make some with recycled paper pulp added to give me some texture and colour variation in the batch. How much fibre you pick up with each dip is also a matter of trial and error. Remember that as the sheets dry, they will be thinner. If you want to make cards, you will want a thicker paper than if you are using it for collage. If you scoop up too much fibre or it's clumped or otherwise not acceptable, just turn it over and shake it back into the water (kissing it off). Step Five: Pressing the paper There are many different methods for pressing your paper as it dries. I have enough molds to dry some sheets of paper on the molds. Some fibres shrink more than others and by leaving them on the screen, it holds them taut as they dry so there is less chance that they will curl and crinkle. Even if your papers crinkle, they can sometimes be flattened by misting them with water and then putting them under weights to dry again. Also, if you are gluing them onto something, that will relax them as well but keep them pressed until the glue dries. If you're not happy with the way a paper turns out, you can re-soak it and redo it or try mixing it with some recycled paper pulp. For most of my paper, I use the following method. Lean your smooth drying board against something to hold it in an upright position (a chair, a tree, etc.) near your vat. If you are working indoors, set the assembly in a large plastic storage container or child's wading pool. After you remove your fresh sheet of paper from the vat and it has drained, lift the deckle off the mold and set it aside. Ready for pressing. I never got around to putting duct tape on this mold. This photo is from another session as DH wasn't handy to take the photo this time. With the paper still on the screen, hold it face down on the drying board (try not to move it or it will distort). From the back, use your sponge to carefully press against it, sponging up the excess moisture and pressing it to the board. Now gently remove the mold. You should have a perfectly beautiful piece of wet paper stuck to the board where it will be left to dry. If you have torn or distorted it, just scoop it up and throw it back into the vat. This session: field grass paper with recycled paper, willow and recycled paper, pure swamp grass paper Fill up your board and leave your paper to dry. Don't dry in the direct sunlight as drying the sheets too fast often causing premature lifting and distortion. I do dry the paper that is left on the molds in the sunshine though. Also, green papers will fade with light. The colour in the chlorophyll is very fugitive. When your paper is dry. it should just peel of the board. One side will be smooth and the other will have a slight texture. The paper that is dried on the screen will have one slightly rough side from the texture of the screen and one coarse side. I prefer this for some projects. The handmade papers look so beautiful, I almost hate to use them. This unsized paper is fine for ballpoint ink, pencil, crayons, and block printing and for notecards or other craft projects. For very liquid art media, the paper should have size added which can be done in the vat or brushed on after. I never use size. If I want to paint with acrylics on the handmade paper, I use clear gesso first, although the plain acrylics would probably work fine. Here's what you will need to make your paper, using my methods: Plant materials Recycled paper - preferably decent quality paper such as bond but I also use recycled manilla or kraft envelopes for their earthier colour. Newsprint is not recommended. Safety goggles/glasses - I recommend wearing them when cutting your plant material in case of flying bits and when handling the soda ash. Better to be safe. Scissors or shears Rubber or latex gloves. The soda ash and water will dry out your hands. A stainless steel or enamel pot (at least one gallon) Soda ash (sodium carbonate), also available as a pH increaser for hot tubs Stainless steel, wood, or plastic stirring implement Cheesecloth bag (used by hunters for game) or a jelly bag (in the canning goods department) or a paint straining bag A couple of small buckets or bowls for soaking recycled paper and for holding plant fibre A blender (I buy these at garage sales for a couple of dollars rather than use my good one) A vat - a dishpan will do for small sheets of paper but bigger sheets will require a larger vat such as a plastic underbed storage container (not too deep) A mold and deckle - you can use two picture frames the same size or make two very basic wooden frames the same size using pieces of wood about 1" thick and 1 1/2 to 2" wide. Inside dimensions vary. I like 5x7 to make small notecards 3 1/2 x 5" and 6x8" for larger cards. I also have some larger sizes for other projects. On one frame, staple a piece of screening material the outside dimension of the frame. You can use window screening to start but you may want to use the fibremesh screening material available from papermaking suppliers for larger molds or if you'll be doing a lot of papermaking. As these stretch they can be re-tightened with steam. Window screening would have to be re-stapled. Cover the staples and mesh along the frame with duct tape to keep fibres from catching. Note: It's a good idea to put a coat of varnish or other sealer on your wood to prevent water soaking in and warping the frames. However, I never have and mine are still okay 15 years later. I just let them dry after use. Formation aid (from papermaking supplier) or methyl cellulose or carageenan (thickener if needed) A sponge A smooth surface to dry your sheets of paper on - I use old drafting table tops from garage sales as well as left over counter top material. If anything seems unclear or if you have further questions, please feel free to let me know in the comments. And if all of this is just too much work, feel free to visit my Etsy shop where you'll find handmade paper greeting cards already made! Pansies on handmade paper. In future tutorials I'll show you some of the ways I use my handmade papers in art and crafts as well as dyeing your paper pulp with natural dyes. Resources Here are a few of the resources I have found the most useful: Papermaking with Plants, Helen Hiebert The Craft of Handmade Paper, John Plowman Papermaking for Basketry and Other Crafts, edited by Lynn Stearns Art and Craft of Papermaking, Sophie Dawson Papermaker’s Companion, Helen Hiebert Paper Pleasures, Faith Shannon Suppliers The Paperwright - I have dealt with this supplier for years and they have always been very good to deal with. They are located in Ontario, Canada and welcome international orders. The Papertrail - Vivian from Lady in the Tower on Etsy just told me about this supplier, her favourite. I checked out their website and I'm impressed with all they have to offer as well. They are also based in Ontario, Canada and sell internationally. I haven't ordered from the U.S. but a quick search brought up a number of suppliers under "papermaking supplies."

Online art Classes: Learn from the comfort of your home What’s not to love about papier mâché? : You are recycling newspaper or paper to make beautiful objects that can last a very long time, you most likely already have everything you will need in your kitchen and once you get familiar with the technique, there is almost no limit to what you can do: sculptures, furniture… It is also an activity that is fun to do with kids. (prices in US$) In this class, I am going to show you how to make beautiful papier mâché flower bowls with patterns. They are very easy to make and each one will be unique. You can use them to hold jewelry, keys and little objects. Even though they are varnished, I would not use them for any wet content or food. The class is text and picture based and you can see all the steps in detail (prices in US$)

Use household items to make beautiful marbleized paper.

Kids can make these Colored Paper Collage Sculptures as a sculpture and colored paper collage project all rolled into one.

What is ebru? Also known as paper marbling, it is the Turkish tradition of painting on water and it is such a bizarre painting technique!

It's been so long since my last post but I have the best excuse of all time. Life as I knew it has changed completely since the arrival of my little baby. My days are now filled with love and laughter, dedicated entirely to taking care of this little magic creature! Nonetheless, I have found the time to take some pictures of one of the things that I made for the nursery room. It is a colorful mobile with flying objects made out of paper-mache. Actually, I had posted some work-in-progress photos of this mobile a while ago. With the hope that my baby boy is going to enjoy it in the years to come... ...and in more detail... For my angel who came and brightened up my life...

Whoever dreamed up these ingenious uses for empty toilet paper tubes was brilliant: my favorite ways to reuse, repurpose, and recycle these ubiquitous cardboard cylinders.
