

Quilt Dictionary. Every craft has jargon, and quilting is no different. This dictionary will help you make sense of quilting terminology. Vocabulary
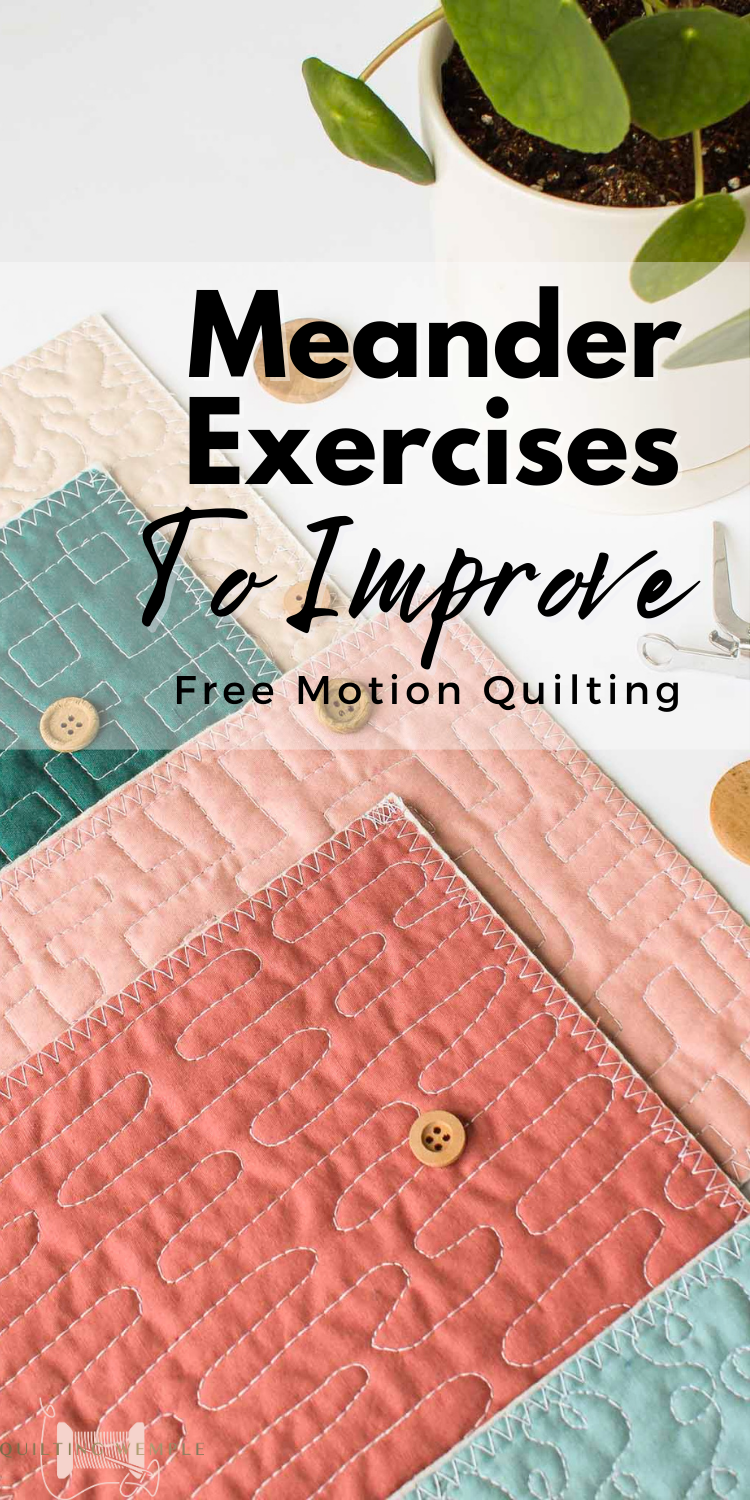
Continue reading for 5 meander practice exercises that will help you learn to put FMQ skills on autopilot so you can focus more on quilting.

Hand quilting is the technique of sewing together the three layers of a quilt (batting between two layers of fabric) in a decorative freehand stitch.

Whether you're a beginner or seasoned quilter, you may find yourself asking "what is the best quilting thread?" And our team has the answers!

Quilting made easy for beginners. Follow our step-by-step guide to learn how to quilt, choose materials, and create your own unique quilts.

Continue reading for our 6 step process on how to make a quilting plan and feel confident in your design before ever making a stitch

9 must know Quilt piecing tips. Quilt techniques to know especially if want to learn how to quilt or want to improve your piecing accuracy.

Become educated on quilt design software, which allow quilters to design their own quilts with different blocks, fabrics, borders, and more.

Know how much thread is needed to quilt a quilt so you can buy all of your quilting supplies at the same time before beginning a project.

Continue reading for 5 meander practice exercises that will help you learn to put FMQ skills on autopilot so you can focus more on quilting.

Have you ever tried using decorative stitches for quilting? Learn how to take a stitch and turn it into a computerized quilting design.

Looking for Game ideas? Click here. Publicity Ideas are here. These are program ideas for your guild meeting. If you have any other suggestions, please use the form at the end of...

Our Certified Instructor, Jackie Kunkel, who is also the owner of one of our Certified Shops, Canton Village Quilt Works, created this tutorial on the basics of paper piecing. The tutorial is ba…

Quilts are often made to celebrate milestones—birthdays, births, weddings, and graduations. Angela Clark of APQS Raleigh made this quilt to commemorate her sister’s awesome achievement—receiving her Master of Education degree.

Learn the basics of quilting with this helpful guide. An introduction to selecting fabric and thread, piecing the top, quilting, and binding. How to start making a quilt.

Are you new to machine quilting? You may have made tied quilts for a while and now want to explore machine quilting. I’ve seen a lot of advice given for how to machine quilt but I think mos…

How to quickly stitch up a randomised panel of patchwork squares.

Our pioneer ancestors would tell us that even with the world at our fingertips, we’re missing out on what’s right next door! Nothing beats the warm feeling, satisfaction and contentment that comes from sharing something you love with others who love the same thing.

Learn how to sew your first quilt with simple instructions and video tutorial from quilting instructor Melanie Ham. This is for beginners to learn to quilt.

Quilting for Beginners teaches newbies how to quilt from the basics, start to finish. This 5 part series walks you through each step of quilt making.

Happy New Year! Despite the long pause in postings, I did actually complete a few more sewing projects in 2014. January 2014 - Drawstring book bags for Allie and Cate's birthdays February 2014 - Robert Hughes baby quilt (I really need to consider taking a "how to photograph your quilts" workshop:) quilted with stars and spirals May 2014 - Amy Becker's HS graduation lap quilt Amy picked out fabrics at Fabric Depot during her Portland visit, Christmas 2013. I supplemented with a few fabrics I found at The Stitching Post and at Kapaia Stitchery during a trip to Kauai (always looking for an excuse to fabric shop). The blue batik with butterflies was the first fabric Amy chose. Other colors were built around that. quilted with vining flowers and leaves Now Amy has this nice warm lap quilt - perfect for her college years at the University of Arizona in Tucson. She assures me that it does get cold there, especially when the air conditioner is running. November 2014 - New curtains and duvet set for the Sisters house After 20 years, Stefanie and I decided it was time for a change in the upstairs bedroom in our Sisters house. We found some curtain fabric at IKEA (seen below in the medium-sized pillows). After a futile search for a coordinating duvet cover I decided we just needed to make our own. Not as cheap, but so much more fun! On the bed in Anna's old room at our house (tempted to keep it here, but...) Had to add a border piece as it was just a bit too small. Found a fun coordinating fabric at The Stitching' Post. Shams and throw pillows. The quilting in the shams mimics the print in the curtain fabric. All set up in its new home. On to 2015... January 2015 - Jeanne's lap quilt This quilt was made for my good friend and fellow swimmer, Jeanne. She will be out of the water for a bit, recuperating from surgery, so of course this called for a quilt! My daughter, Anna, suggested the colors - perfect for a swimmer. Another swimmer friend, Jenn, joined me for a shopping trip to Fabric Depot and also helped with part of the sewing. Sandi and Jeanne The design incorporates over 60 small blocks with names of some of Jeanne's friends. Next Up???? cityscape art quilt based on a photo of Roussillon, France art quilt based on our Croatia travels last September flower/plant themed art quilt for the Hardy Plant Society Hortlandia Plant Sale in April hopefully taking Hilde Morin's Bowl Art class

Learn how to resize a quilt block using a handy Quilt Block Resizing Worksheet and how you can use this helpful skill to create one-of-a-kind creations.

Hi, all! As you probably already know, I was fortunate enough to attend QuiltCon last week. I signed up for a class called Dynamic Quilts with Solids, taught by Nydia Kehnle. Considering how many solid scraps I have, you can guess that I was really excited! We were instructed to bring about 125 7.5" squares, in at least 25 different colors. Well, I went nuts, pulled everything I could cut a 7.5" square out of, without rhyme or reason, and showed up to class. This is the class instructor, Nydia Kehnle, and one of her fabulous quilts! We spent the morning making a bajillion half square triangles, then worked on laying them out with her guidance. Alas, I had too many colors with no connection between them to work well. I learned that I should have spent more time researching the type of quilts she made to get a better idea of what colors I needed to bring! But that meant that I had a lot of HSTs to use up and no plan for them. I tried laying them out as HSTs at home, but found the they really didn't "flow" like I wanted them to. So I tried them as hourglass blocks, and that was ok, but no "pop". What to do? After staring at this for a while, I decided to do something drastic - I cut it up! After all, somebody had to take the plunge to make the first disappearing nine-patch, right? So here goes... I cut on either side of the diagonal centers, breaking the block into nine patches. Then I rotated the center a quarter turn clockwise. Next, I took the top left corner and the bottom right corners and switched their positions, and did the same with the other two corners. Once it was sewn back together and trimmed, this is the result! I posted a picture on Instagram, and got some really good feedback, so I'm going to provide a more specific tutorial below. For the tutorial, I used 10" squares - a layer cake that was gifted to me a while ago, so I'm happy to be giving it a chance at quilt-y life! The first step is to make your HSTs. I would suggest pairing up your pieces to give good contrast for this block. Once completed, press the seams to the dark side. Pair them up to make the hourglass blocks, being sure to use four different colors in each one. Lay the two HSTs right sides together, with the two seams nesting into each other. Place your ruler from one corner to the other, crossing the seam line. Line up one of the inch markers with the seam line as shown above to ensure that your ruler is perpendicular to the seam. Make a line from one corner to the other. Pin across the seam in the center to hold the seam in place, then stitch 1/4" from the line on both sides. Cut on the line, then press the seams, spinning the centers, on both hourglass blocks. Each pair of HSTs will yield two very similar hourglass blocks. Once you have made and pressed all your hourglass blocks, turn them over so you can see the back sides. Each pair of near-identical blocks will "spin" in a different directions. Make two piles, one spinning clockwise and one spinning counter-clockwise. Now it's time to square up those blocks! Starting with 10" squares, I found that these hourglass blocks squared up to 9". Depending on what size you begin with, yours may square up smaller or larger. Being sure to use blocks that all spin the same direction, choose four to put together into a four-patch hourglass block. Assemble the block. Press it carefully, spinning the seams around the center. Now it's time to cut it up. Be careful! For this size block, I chose to measure 2" from the center diagonals. How far you cut is up to you! Rotate the center 1/4 turn clockwise, swap the upper right and lower left corners, and swap the upper left and lower right corners. NOTE: If you aren't happy with the way the colors align, feel free to move things around until you are pleased with the layout. I had to do that on one of my smaller blocks, and it worked out just fine! Sew the rows together on the diagonal, carefully matching the seams. The corners will be longer than the sides - don't worry, it will be trimmed later! Sew the three rows together, once again carefully matching the seams. Square the block up, cutting off the corners that extend beyond the top, bottom and side seams. This particular block, which began from 10" squares, squared up at 16". And there's your finished block - a disappearing hourglass block! I really wanted to know what it would look like when placed with others like it - what secondary patterns would appear. Here you can see the one larger block, next to four of the smaller ones made from my class HSTs. In the on-point layout, the crosses are more visible, and in the horizontal layout below, the squares seem to show up better. It's going to be fun to play with this block! I'm also interested to see what it looks like in prints - but that's for another day, as I have some quilting I must get to now. Let me know if you give this a try (particularly if you don't understand something or find a better way to do something!) I'd love to see what you come up with! Hugs! Sarah

The best way to get perfect quilting is to transfer quilting designs onto the quilt top before stitching. Continue reading to see how!

Tips for planning and quilting with your home sewing machine by Christa Watson including using a walking foot and free motion design.

Once I read Wendy Butler Berns' article about how to make picture quilts in Quilting Arts Magazine, I knew I had to give her technique a try.

A list of commonly used quilting terminology every beginner quilter should know; from applique to zig-zag stitch.

When it comes to the best thread for quilting, how do you choose? There are a lot of decisions to make and factors to consider. There's also the issue of whether you are looking for thread for machine quilting or hand quilting. Many of these thread tips are helpful for any sort of sewing, so keep this handy for your non-quilting sewing projects, too! The best threading for quilting is generally a cotton or polyester-cotton blend. Avoid cheaper polyester threads as they are more likely to break or snap over time. The weight of your thread depends on your fabric and pattern. Thicker fabrics or quilts with more layers of fabric need a thicker weight (or stronger) thread. First, we will discuss thread in general, looking at the terms associated with thread and how it's measured. Then we will go into the common thread materials each thread type from which each is made. We will then focus on types of thread you will see when looking at thread spools along with the types of thread that are readily available. Some are great for quilting and some are not as fitting. Finally, we will focus on the best machine quilting threads as well as the best threads for hand quilting. So, start reading and get ready to learn all about thread in relation to quilting and choosing the best threads for your upcoming quilt projects. Table of Contents Thread Basics Thread Material Types of Thread Best Threads for Machine Quilting Best Threads for Hand Quilting Conclusion

5 Foundation Paper Piecing tips perfect for beginning quilters or anyone who wants to learn how to foundation paper piece.

If you've ever made a quilt, chances are you've used the straight line quilting technique. It's a popular choice mostly for smaller projects like table runners, potholders, placemats, baby quilts, etc. but can be used for big size quilts too.

Free Motion Quilting Tips

Whether you're a beginner or seasoned quilter, you may find yourself asking "what is the best quilting thread?" And our team has the answers!

The lsquo;Underground Railroadrsquo; was a network of anti-slavery supporters in the USA and Canada, who operated safe houses for African-American slaves. It was in operation from the beginning of the nineteenth century and was at its peak of activity between 1859 and 1860. While there is no documentary evidence, in the popular American imagination quilts were used to identify safe houses on the Underground Railroad.

Learn how to fold a quilt to prevent damaging it. By folding a quilt in a certain direction you can minimize the breaking down of fabric fibers.

This idea has been stuck in my head for awhile, ever since I heard about how quilts were used to communicate to runaway slaves on the Underground Railroad. Their patterns and blocks were a code, provi

Check out the Scallops filler that can be used on both dense and loose quilting jobs. Follow with APQS dealer Lauren Jackson shows us this unique border design on her APQS Lucey.

In this video you’ll learn about the three main quilting styles. See how they are different and how they can be applied to certain areas of your next quilt.

Aka to make one of these…. I first came across QAYG blocks and the technique over at Rita’s Red Pepper Quilts blog very shortly after I’d started sewing in 2010. Being new to sewing, and recognising that while I’d LOVE to do a big quilt, I really couldn’t see me ever having the courage to […]

You may have to go out with a bunch of different guys before you decide who you really like. I promised to introduce you to a new guy every month, and see whether you hit it off with any of them. A couple of introductory remarks. First, I am at heart a piecer, not a fuser, not a screen-printer, not a fabric painter, not a hand-stitcher. This prejudice will be reflected in many of the guys I introduce you to. But if something I suggest as a piecing technique makes you think of a neat design that you would prefer to execute in some other technique, go for it! The objective is to get you to find a guy you like, not for you to like the guy I trot out. Second, I suggest you start small, with a lunch date, not a week in Paris. Try out the new technique in a modest size – 13 x 18 is nice, because you can always turn it into a placemat. This month’s quilt date is a technique for piecing sweeping, swooping curves with a minimum of tedious fuss. We’ve probably all been seduced by the prospect of whipping out our rotary cutters and slicing away a gorgeous curve – but after we sew the seam it’s lumpy and doesn’t press exactly flat. That’s because of seam allowances. If you use the popular method of stacking two layers of fabric on top of each other and slicing your beautiful curve through both of them, the shapes are indeed identical, and the two parts will meet precisely – but on the cutting line, not the seam line. And to make a flat seam, the right part and the left part have to meet precisely on the seam line. Sometimes, if the curve is gentle, or if it curves in only one direction, you can make it work. But if the curve has a small diameter, or if it curves in both directions in an S, you generally can’t. So is the answer to make templates? God, I hope not!! Instead – and here’s your date for March – make semi-templates. Get a piece of pattern material – freezer paper, newspaper, interfacing or tissue paper. Lay it out on your cutting board. Take your rotary cutter and slice a gorgeous curve through the pattern. Don’t separate the two halves yet – first take a pencil and mark across both pieces every six inches or so, and/or at critical points on the curve. And mark across both pieces at the exact top and bottom of the curve. Pick up one piece of the pattern and lay it on your fabric, making sure you keep track of whether this is going to be the right-hand piece or the left-hand piece. Now visualize how wide you want your seam allowance to be, and free-hand cut that distance away from the template. It doesn’t have to be a perfect quarter-inch – no need to fuss with rulers, just eyeball it. There’s enough give in the fabric that you will not have problems. Finally, pin the two pieces together at the marked points, and sew. The seam will press perfectly flat. Now put the next two templates down on the fabric you have just seamed and pressed, and repeat the process for the next curve. Replace template #2 and cut along the left edge. In this photo template #3 is waiting, but I will actually cut it from a third piece of fabric. Note that I do not suggest you cut out all the pieces at once. It's way too easy to lose your place and try to sew the wrong pieces together (ask me how I know). Instead cut two pieces (one curve), sew and press, then move on. With this method you can make curve after curve, as in this quilt of mine. V-8 44 x 29" I suggest a small sample with three or four curves, either the same curve repeated or a different one (heck, the fun part is the cutting, so why not do it as frequently as possible?). Don’t get too extreme: your curve should be more like the profile of a watermelon than the profile of a grapefruit. Start with a C-curve or an S-curve, not a winding road with six changes of direction. If you like this technique, here are some ideas for the second date: • Do the same thing on a larger scale than your sample. • Make several modules on the same scale as your sample, and join them into a larger piece. • Try more extreme curves. • Or anything else that strikes your fancy. Let me know how it works out. If you want to send me a picture of what you made, I’ll post it. Have fun!

Join in for the final part of the Essential Ruler Quilting Challenge! This week, you'll be ruler quilting with the Squiggle ruler.

Wanted to start Quilting as a hobby but don’t know where to start? We have collected a few beginner’s guide for you to follow to start making your quilt.

Free-motion quilting design ideas with tutorial for each design. Try out different free-motion quilting designs to make your quilt unique!

Learn how to use quilting rulers properly, including knowing what all of the hash marks and lines are used for in creating your quilting projects.

How to Cut Fabric Accurately and Manage YardageContinuing on with the Beginner Quilting Series. In this post, we will go over how to accurately cut fabric. We will also go over how to manage yardage, especially on a smaller cutting mat and space. Managing Yardage If you buy one yard of fabric off of the bolt you will have a 36” length

Sara Trail a life long sewist and executive director for Social Justice Sewing Academy, an education program that bridges artistic expression with activism.
