

Mini Cute Angels Intarsia Pattern Scroll Saw Pattern Pattern Only download Pdf Wood Intarsia Pdf Pattern Digital Pattern Pattern Only One file to download, including three A4 pages, pdf The file includes patterns for three figures, each is about 10 cm in height, you can scale them of course if you like. We will supply any of the drawings for the work you see on our page. If you want to try any of them, just contact us and specify the product. Upon your request, we will add the relevant drawing on Etsy so you can purchase. PS: You can also purchase the completed version of every artwork pattern you see on our page from our store. After downloading; If you need futher assistance about the document, please don't hesitate to write, maybe small changes in the drawing, other formats of the drawing etc We are always ready to help you with your special orders and questions, there will also be some additional discounts for your multiple purchases, namely three or more, so please review our products by just clicking: https://www.etsy.com/shop/ChipilWood Thank you so much for your visit !..

Preserve the beauty of your work by understanding the effects of time by Mike Mathieu For me, the best part of an intarsia project is picking out the wood to use. I spend hours matching up different colors and figures of wood. Often, woodworkers don’t realize the vibrant wood they use in …

CARDİNAL BİRD Tree interior wood colour are used at all my works and all are hand cut off. Finished with protective polish. This works make a difference in your home. Some of the wood I used ( paduk,ebenum, cherry,poplar ) 7,8 inches tall and 5.5 inches wide. size 20x.14 cm What is intarsia? Intarsia is a woodworking technique that uses varied shapes, sizes, and species of wood fitted together to create a mosaic-like picture with an illusion of depth. Intarsia is created through the selection of different types of wood, using their natural grain pattern and color (but can involve the use of stains and dyes) to create variations in the pattern. After selecting the specific woods to be used within the pattern, each piece is then individually cut, shaped, and finished. Sometimes areas of the pattern are raised to create more depth. Once the individual pieces are complete, they are fitted together like a jig-saw puzzle and glued to wood backing which is sometimes cut to the outline shape of the image, often with the intention of creating a three-dimensional effect as see Thanks for taking look

Explore Nilton Freitas (Marchetaria)'s 215 photos on Flickr!


From the team that reinvented intarsia in North America.

If you do not read any further, the most important tip for scroll sawing accurately for Intarsia is CHANGE YOUR BLADES OFTEN.
If the thought crosses your mind "is the blade getting dull, should I change it?" you should change it. Perhaps subconsciously you realize you are pushing too hard. The cost of the blade is not worth the frustration not to mention if you have to scrap some expensive wood.
 Tension: Use this link to hear that high "C" note. Ready to pluck your scroll saw blade? Listen to the sounds of scroll saw blade from too loose, just right, way too tight. It's very helpful to learn the sound of a properly tensioned scroll saw blade. Music for scrollers!
Sawing: Make sure your blade is cutting square. Check the table/blade to make sure it is square. Next make a test cut, cut a curve then check it with a square. The curve makes it easier to see any light between the square and the cut part.
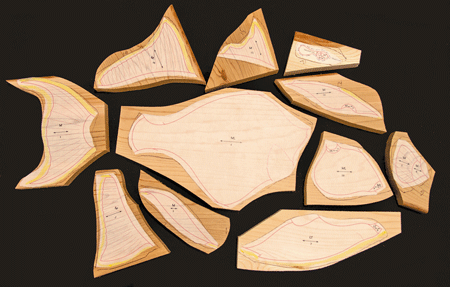
Cut the pieces about the size of your hand, this will make it much easier to handle than one large board. After cutting the hand size pieces be sure to turn them over to remove any tear out with sandpaper. The object is to keep the parts as flat as possible to ensure a square cut.
After all the parts have been laid out it is time to start sawing. If you used the same board (color) to layout many parts, start by rough cutting them into smaller more manageable sections.
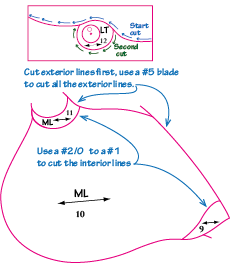
Start cutting the easiest parts first, like the outside edges. This lets you get into the swing of things. Cut some of the outside edges; parts that do not have another part next to it. I like to mark all exterior parts with a highlighter. While sawing, stop often after making a cut and remove any tear-out on the bottom side. While you're at it check your cuts with a square.

Plan your cuts: Try to make your cuts so the last cut will “drop” the part off the larger block.
Note the extra part added to the left of the eye. The last cut is a short smooth line. Drill any holes before you start sawing, like the hole for the eye.

Where to Put the Blade?
When cutting a part it is best to put the center of the blade in the center of the layout line, thus removing all of the line. With more experience the goal is to leave half of the pattern line around the parts. If you are using a larger blade you will need to move the blade a little more to the outside of the line.
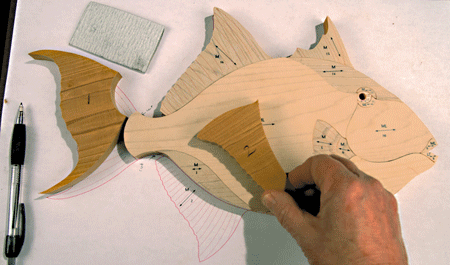
 Hand Placement: While scrolling, your hands are in control of the part. The blade is in control of the sawing. You will find that by positioning and repositioning your hands as the need arises you will be in control of your wood. Always remember to have at least one hand holding the wood down firmly on the table at all times.
Your hands will be in motion, always setting up for the next curve or turn on your pattern. Think ahead and plan your cuts.
Posture: Sit square in front of the saw making sure you are sitting at an appropriate height, so you can look down at the entire part you are cutting.
If you sit too low and are looking across the part it makes it harder to see what's coming up.
Sometimes you may find you're turning your body to allow movement of the wood, stop and reposition yourself so you are sitting straight in front of the blade.
Breath: Remember to keep breathing (I know that sounds silly). Sometimes when you cut an intricate part you tense up and hold your breath. This can make it even harder to cut smoothly. Make sure you are comfortable and take breaks as needed.
Speed: The speed (strokes per minute) we use varies from time to time depending on the material that is being cut. The main thing to remember is “control”. Intarsia requires accurate cutting, so you might want to experiment with your speed so you can get the best control. We found running the saw about 80% of the speed range on a variable speed saw works great.
Feed Rate: If you push the wood into the blade you will get a rougher cut than if you slow down and let the blade cut the wood. If you push too hard it can make your cause parts to be "out of square".
 Cutting Corners: There are different ways to cut a sharp corner (or point) it will take two cuts. You cannot quickly turn the wood, even with a small blade, to cut a sharp corner. Cut to the corner, then back up the wood, start cutting again leaving a portion of the wood. Once you cut the waste wood away, turn the part around and make the second cut to remove the small portions of waste wood.
 A magnifier really helps to see the lines. A foot switch is a good safety device. If a blade breaks or you need to stop you can easily lift your foot and stop the saw immediately.
Check for Fit: When all the parts have been cut, de-burr the back side of the part and print the number on the bottom (the same number you have on top).
Do not remove the paper from the top-side at this point. After you have numbered the back side of your project, assemble the parts and check to see how it fits. It’s a good idea to leave the paper on to see if a fitting problem could be from cutting outside of the pattern line.
If you can see the pattern lines then you will need to carefully trim the lines with a new #5 scroll saw blade. This takes some practice. If it is a free-form project practice on some of the outside edges.
The kind and size of scroll saw blades can vary from one user to the next. What
works for me here in the studio may not work as well for you on your saw. I have a certain “feel” that I like when sawing and that can be different than what you like. A universal size 5 works for most intarsia projects. If I cut back into the same part to split it up into smaller sections that will go back together I will put in a very small blade size (2/0 or 0). One thing for sure (as far as I am concerned) there is not one blade that is good for everything. The blade that I use for our Intarsia on Western Red Cedar is not the blade that I use on plywood, nor is it what I would use for harder woods. I use different blades for different things. Then there is the “How Thick is the Wood”, is another factor to consider. All in all, there is only one way to figure this out. Get an assortment of blades and a stack of material and start sawing. Experience is the best way to figure this out. Below is a chart with different blades and sizes that are just a starting point. This is the actual blade combinations that we use when sawing, but the ones that you like best might differ from ours. Just remember to experiment to determine the blade that cuts best for you Another question is how long a blade will last? When the blade gets dull it will not cut well and you may find yourself pushing the wood too hard into the blade causing the cuts to be out of square. If the thought crosses your mind “I wonder if the blade is dull” it probably is. After you change the blade you will notice right away how much easier it is to cut your pieces. We can help you get started with blades but in the end you will have to decide for yourself. Below is a list of the blades we use. You can order the “OnLine” and Pegas blades on the Scroll Saw Blades Page, just click on the links.
 Tough Little Blades are a "all around blades for hard & soft woods. Quick cutting blade for all types of wood. Skip tooth; offset teeth for a more problem-free cutting of curves. Very long durability due to special hardening;
  Gold Blades are a quick cutting saw blade - works best with softer woods. Best quality; Skip tooth; very long durability due to special hardening; Reverse teeth will prevent wood splintering on the underside.
  Platinum Blades are a quick cutting blade for all types of wood. Extremely sharp teeth and a strong back for best performance and long life. The Skip tooth design for a rapid discharge of sawdust so that no blue burn marks are left on the wood in tight radius cuts. Reverse teeth prevents wood splintering on the underside.
 TMR Titanium Reverse Skip Tooth quick cutting saw blade, has a positive cutting angle which makes it more aggressive, no drifting of the cut, extremely long life due to special hardening in oil.
  Platinum Plus These blades work well for medium to hard woods. This high-speed skip tooth blade, every 3rd tooth is reversed to prevent wood splintering on the underside. The tooth configuration allows for more control going thru curves.
 Q: My blade is square to the table but when cutting curves my parts get "out of square" usually the parts are larger on the bottom.

 | We are using the “900” Creative Station with repositionable adhesive roll. Start by spraying a very light coat of Repositionable Spray Adhesive to stick the pattern pieces upside down to a piece of paper. The paper is a temporary way to hold the pattern sections together to put glue evenly on the back of the pieces. |
 | Run the pattern parts through the Creative Station machine. This will apply glue to the back of the pattern pieces. (This machine can be found for a pretty good price online. If you purchase this, be sure to get the Repositionable Adhesive Refill to replace the permanent adhesive cartridge) |
 | Peel the paper off carefully, sometimes the pattern pieces stick to the paper. Now you are ready to place them on your wood and begin sawing. |


Mahogany Lab handmade solid wood 3D Intarsia wall art. Approx size 16 x 12 x 2 inches thick. Available in mahogany as shown or black, red chestnut, light stain or dark stain at no additional cost. Contact seller before ordering optional colors. All breeds available. Sizes and coloration will vary with desired breed. Photos of your dog will be required. Contact seller for custom pricing. Gloss finish and ready to hang. Wonderful gift for dog lovers and special occasions. Ships in 1-2 weeks.

Beginners guide to Intarsia. Learn from the best. Whale Beginner Level 12½" x 4½" 7 pieces. Just click on the whale to download the pattern & instructions.


Intarsia artist Joanie VanDusart teaches you a helpful intrasia tip that will allow you to properly transfer a pattern to your woodworking pieces.

Mahogany Lab handmade solid wood 3D Intarsia wall art. Approx size 16 x 12 x 2 inches thick. Available in mahogany as shown or black, red chestnut, light stain or dark stain at no additional cost. Contact seller before ordering optional colors. All breeds available. Sizes and coloration will vary with desired breed. Photos of your dog will be required. Contact seller for custom pricing. Gloss finish and ready to hang. Wonderful gift for dog lovers and special occasions. Ships in 1-2 weeks.


You have seen some amazing woodwork online and in magazines and thought, "I could never do that." But what if I told you anyone could create beautiful


Beginners guide to Intarsia. Learn from the best. Whale Beginner Level 12½" x 4½" 7 pieces. Just click on the whale to download the pattern & instructions.


Artwork featured in January in the River City Art Association Artist of the Month Gallery at the Vigo County Public Library marries the creative textiles and woodworking skills of Valerie and Rod F…


Howling Wolf Wood Intarsia Pattern for Wall Decor, Wooden Intarsia Pattern, Scroll Saw Pattern, Pattern Only download Pdf, Wild Life Pattern Only One file to download, pdf. Immerse yourself in the captivating world of woodworking with our unique Howling Wolf Wood Intarsia Pattern, designed exclusively for stunning wall decor. This intricately crafted pattern combines the beauty of wood intarsia with the mystique of a howling wolf, creating a truly one-of-a-kind piece. Ideal for scrollsaw enthusiasts, this pattern offers an exciting challenge to enhance your intarsia skills. The meticulously detailed design provides endless possibilities for application, from creating eye-catching wall art to gifting personalized masterpieces. Elevate your woodworking skills as you navigate the intricacies of this pattern, unlocking new dimensions of creativity. Crafted with precision, our patterns guarantee a unique and different experience compared to others in the market. Discover the advantages of honing your intarsia skills while producing a stunning piece of art for your space. Unleash the artist in you with our captivating Howling Wolf Wood Intarsia Pattern. Note: We can supply any of the drawings for the work you see on our page. If you want to try any of them, just contact us and specify the product. Upon your request, we will add the relevant drawing on Etsy so you can purchase. PS: You can also purchase the completed version of every artwork pattern you see on our page from our store. After downloading; If you need futher assistance about the document, please don't hesitate to write, maybe small changes in the drawing, other formats of the drawing etc We are always ready to help you with your special orders and questions, there will also be some additional discounts for your multiple purchases, namely three or more, so please review our products by just clicking: https://www.etsy.com/shop/ChipilWood Thank you so much for your visit !

Wooden wall art, Mushroom Art, is made of natural wood. Intarsia woodcraft, wooden art, that is one of a kind. Intarsia decor, consisting of unique wood pieces, individually cut, sanded, and pieced together for wood craftsmanship at its finest. No paints or stains are used, the wood selected is chosen for its color, grain and natural features. These happy, wooden mushrooms, appear to be growing from an old branch, with dropped leaves around them. The branch is real and cut in the Intarsia style to fit with the mushroom pieces. Each intarsia work requires all the pieces to be cut out individually, then hand sanded, shaped and contoured to complete the look desired. The craftsmanship from my shop is top notch, always looking for that wooden art you will be proud to display on your wall. My greatest joy is hearing how my customers love their intarsia wall decor! A variety of wood species are used in each intarsia creation. These may include Padauk, Zebrawood, Pine, Sycamore, Walnut, IPE, Purpleheart, Merbau, Cherry, Maple, Oak, Poplar, Greenheart, Davina, Wallaba, Angelique, Pine, Teak, Wamara, Mahogany, Basswood, Okoume, Tamarind and Jatoba. Each creation is sealed and finished with several coats of long-lasting preservation. The intarsia is attached to a backer board for stability and longevity, and a picture hanger makes your wall decor ready to hang. Intarsia woodcraft is art that you will appreciate and enjoy for years to come. I make all my intarsia creations in my shop, some taking hundreds of hours to achieve the final look you see. When you purchase one of my wooden wall pieces, I will ship it to you within a day or two, so you can enjoy your new wood art right away! Photos are the actual one-of-a-kind intarsia item you will receive. Don't let your favorite get away!

