

Get more from nimu1326 on Patreon


Get more from nimu1326 on Patreon


Get more from nimu1326 on Patreon

Amazingly fun to examine, these miniatures simply have me wondering how they were made! Take a look inside to see all the details of these tiny objects.

I've been messing around with this idea for awhile, using paper to upholster a chair. I know fabric is sometimes hard to come by. I keep trying to direct you all to quilt shops. They will have the 100% percent cotton that will always glue for you. The Goodwill and other thrift stores are a good place to look, too. Silk blouses are really cheap there and that's a good fabric to use, too. Silk ties are a good source of fabric if you like the design. You would need a couple of them for a chair, though. I went to Michaels and bought a tablet of scrap book paper to use. My Michaels was woefully low on separate sheets so I settled on a $5.00 special tablet. This won't be for everyone but I thought I would give it a try for something different. Here are your patterns for a chair. Use the directions in the "Things to do, Things to see" list at the left of the blog "HOW TO RE-SIZE THE PATTERNS" to get them to 1 inch scale. Print them out onto card stock to trace your patterns. I have included an alternate back and back cushion if some of you want a single back instead of a two part back. Always dry fit your parts. This is important to do before you are committed with glue. Of course my paper was double sided. I tried a few methods to get the two layers apart. The best method was to wad the paper up a few times to loosen the layers; I then carefully pulled the layers apart. If you try this with single layer paper you don't have to do this step. The ball on the left is when I began with both layers together. The ball on the right is after I carefully wadded and un-wadded the paper. You will have to spend time on the wadding and un-wadding to get the paper soft and pliable. After I got the paper soft and pliable I ironed it with steam on a cotton setting. The paper is still pliable enough to use. This ironing took a lot of the wrinkles out. I would think that paper has it's differences and this method may not work on all scrap booking paper. To build the chair begin with cutting four layers foam core and two layers mat board for the seat base. Glue them together with tacky glue. I place a weight, like a book on top of the stack until the glue dries. I usually wait at least a couple of hours. Trace and cut out the back and the front from mat board. The back is not as wide as the front. Center the back over the front. Turn the set over and trace the front onto the back. We use these lines when building the chair. If you don't have a saw that can cut angles you can skip doing this. To keep the chair from looking too boxy I tip out the upper back. Use a ruler and the back edge of your craft knife to score a line all across the back on the line you just drew. Don't cut through. Carefully tip the upper back to bend it slightly. Center the back onto the back of the seat base and glue them together. There should be about a 1/16" left on each side. Center the front onto the front of the seat base and glue them together. There should be about a 1/16" left on each side. This is what you should have. I use 1/2" diameter dowels for the arms. These are cut with a 7 degree angle on one end (the back). I set my saw to 2 1/4" and cut the dowels. I then set the angle of the blade to 7 degrees and re-cut the dowels. If you have an adjustable miter saw you can do this. I measured my dowel and along the short side is 2 3/8". The long side is 2 1/4". If you can't cut the angles cut the dowels to 2 1/4" long. Yes, I do use the little plastic clamps. I have the other kind you get at the big box stores. Most of the time they aren't long enough for what I want. Glue the dowels between the front and the back. Hold onto the chair until the glue tacks or use clamps. Leave this to dry, really dry. Side view. Cut a strip of foam core 1/4" wide. This will be for the braces. Cut two strips to fit between the front and back. Glue them in. Cut two more strips to fit further up the arm. Glue them in. These will support the card stock arm covers. Cut two end/sides from mat board. Bend it slightly at the top. Apply glue to the chair. Glue the end/side into the side of the chair. This fits between the front and the back. I wanted to show you the difference of the sides. Paper has a grain, like wood. I cut these two pieces laying opposite ways. You can see that the bottom piece was easier to bend and also looks nicer. Experiment to find the grain of your mat board. This also holds true for card stock. Are you dry fitting? Be sure to dry fit and trim if needed. Use the arm cover pattern to trace onto card stock two arm covers. To make gluing easier I run the top of the cover over the edge of my table and then I roll it using a pencil. Apply glue to the foam core braces and the dowel. Apply the glue all around the dowel. This piece fits between the front and the back mat board pieces. The cut out area fits at the back. Glue the arm roll cover to the arms. Glue the card stock over and onto the dowels. Your chair is built. Place the chair onto card stock and trace around the bottom edge. This is your bottom cover. I use glue stick to glue the paper/fabric to the card stock. If you want use fabric for covering the chair that's just fine. Cut the bottom cover out and apply glue stick to it and glue it to the wrong side of the paper. Trim the paper leaving around a 1/4" extra. Use tacky glue to glue all the card stock covers to the chair. Glue the bottom cover to the bottom of the chair. Apply tacky glue to the bottom edge and glue the extra paper to the chair. Trim off the triangles at the corners. Use the arm roll cover pattern to cut your batting. I use Thermolam Plus, no iron, from Pellon. Walmart used to carry this, no more, at least for now. A thin batting will work, buy this from a bolt. Don't buy a quilt batting in a plastic bag, that will be too fluffy. Apply tacky glue to the arm cover. Gently press your batting onto the arm. Leave about an 1/8" gap under the arm. This will insure a crisp line of paper. Cut out enough paper to fit over the arm. Use the arm roll cover pattern as a guide. Begin gluing under the arm. You can do both sides like this now. Leave this to dry for a while. You will pull on this a bit, not as much as you would if using fabric but you will pull and this needs to be dry. After the glue is dry you may begin to cover the arm. Pull the paper over the arm. Cut a slash at the beginning of the back. Carefully pull the paper over the arm and mark the corner with a pencil. The firmer the pull the less wrinkles we will deal with at the front and back of the arms. Cut out a square from the corner you marked. Cut notches in the paper so it can fit over the curve. Glue the paper to the seat base and to the back of the chair Cut a slash into the corner. Trim off the extra paper at the end of the arm to about a 1/8". Cut notches around the curve of the arm. Glue the paper down to the front of the arm. This is the front. This is the back. Cut a piece of foam core a 1/4" wide to fit into the back of your chair. Glue this piece into the back of the chair. This piece tips out the bottom of the back cushion. To make the side covers use card stock. Place the card stock on the chair, lining up the top with the bottom of the dowel and the side with the front of the chair. Trace around the bottom and the back. Cut this out. Dry fitting and trimming if needed. Apply glue stick to the side cover and press onto the wrong side of the paper. Cut out the corners as in the picture. Glue the top and the bottom to the card stock. Glue the side cover onto the chair. Cut notches out from the extra paper and glue the paper to the back of the chair. Cut notches from the paper and glue the paper to the front of the chair. Dry fitting the back cushions. I have an alternate back pattern for those that do not to want to make a two part back cushion. The top edge of the back cushions need to be softened. I do this with my thumbnail. This is how they should look. The backs will have three layers of batting. The first layer is about a 1/4" smaller all around. Apply tacky glue to the foam core and glue the first layer on. The second layer is the same size as the cushion. The third layer is cut to size every where but the top. The top is pulled over the top of the back. The third layer on the front of the cushion. Apply a little tacky glue to the edge of the batting on the sides and bottom. Don't apply glue at the top. Place the cushion into the chair and trim off the extra. I've got both cushions with batting. They have both been trimmed. Cut paper large enough to cover the cushion. Begin with gluing up the bottom. Trim as shown in the picture. Cut notches in the curved area and glue the paper to the foam core. Set the cushion into the chair and cut a slash at the top to match the where the back is dipped. Apply glue to the top of back and to the bit of foam core on the seat base. Glue your back cushion into the chair. This is what the back should look like. Trim the paper and cut notches out. Glue the paper to the back of the chair. Getting ready to glue the other back cushion in. The other back cushion is in the chair. The paper is trimmed and the notches are cut. The paper is glued down. Looking good. I wanted to show you a close up of the texture of the paper. Trace the back pattern onto card stock to make a back cover. Apply glue stick to the back cover and glue it to the wrong side of the paper. Cut notches along the curved areas. Apply tacky glue to the card stock and glue the paper down. Apply tacky glue to the back of the chair and glue the back cover to the chair. Trace the front cover pattern onto card stock and cut out. Apply glue stick to it and glue it to the wrong side of the paper. Trim around the front cover cutting notches around the curved areas. Apply tacky glue to the card stock and glue the paper down. Leave the top un-glued. Apply tacky glue to the front of the chair and glue the front cover on. Glue down the paper that is at the top of the front cover to the top of the seat base. Dry fitting my seat cushion. The first layer of batting for the seat cushion is about a 1/4" smaller all around. The second layer fits all around. Apply tacky glue and glue the first and second layers onto the seat cushion. The third layer is glued to the bottom of the cushion. This will go up the front and over the top. The top is not glued down. Cut out enough paper to cover the cushion. Glue the front and back to the bottom of the cushion. Make sure the batting is trimmed to the foam core. If any batting is left hanging over it will make it difficult to glue the paper down or fabric for that matter. Fold the sides as in the picture and glue down. Fold the paper down and glue. Trim off the extra. Carefully remove any glue before trying your cushion. Yes, I am making piping. Apply tacky glue to the edge of the paper. Smooth the glue out to the edge of the paper. I use size 10 crochet thread. Press the thread onto the glue. Fold the paper over the thread. The thread has to be in the very fold of the paper. I fold with one hand and push the thread over to the right with the other thumb. This tightens the thread and makes it easier to get it into the fold. I don't know if that helps you or not. For fabric I use my nails to seal the thread down. For the paper I found that setting the edge of this ruler close to the thread works better. Don't slide the ruler, set it down and move on. Flip the paper over and do it on the other side. I did this a couple of times on both sides. Cut your piping away from the paper. Apply glue to the seam where the back cover meets the chair. Start at the bottom back and over the arm, over the top, over the other arm and down to the other back corner. I apply glue to the seam where the front cover meets the chair and apply the piping to the front of each arm. Apply glue to the edge of the seat cushion and apply the piping. I only apply piping to the front half of the bottom of the cushion. This is an option. I added a piece of piping along the seam where the two back cushions meet. The piping is on. Fourteen to sixteen inches is what I used for the length of the ruffle. I had to glue two pieces of paper together. Make the overlap about a 1/8". Larger and it will interfere with your gathers. I first turned a hem and glued it down. Measure from the bottom of the hem 1". Draw your line on the right side of the paper. Fold on that line. Trim off the paper to 1/2". Apply glue to the edge. Smear the glue towards the cut edge. We don't want too much glue in this tube. This is 26 gauge covered wire, I eventually switched to 20 gauge covered wire because the 26 gauge would not push through my tube. Go ahead and fold the paper over and glue it down. So we've made a hem and a rod pocket for the wire to be threaded into. You can see my 20 gauge wire now. Carefully thread the wire through the tube, gathering a little bit as you go. The paper will not push together a long bunch of gathers. When you have the length and the amount of gathers you like cut the wire and bend it back as in the picture. I have both ends bent, the paper is covering the wire a bit on the left. I made a deep ruffle for this chair, I thought it fit with the spirit of the chair. Apply tacky glue along the front edge. Press the ruffle into the glue, holding it a bit to tack. I had to have my end seam on the side because I made my overlap too large and it interfered with my ruffling! When I came to the end I straightened out my ending wire and glued the paper to it. I then cut the wire so that it butted up to my beginning ruffle. So, how did you like that? You know I am going to use this in my attic. I liked the experiment and could see me using the paper again if I found something that was "just the thing". Have fun, Expand on it, Make it better . . . Just Keep Making Minis!! Talk to you later, Kris


We have lived in our house for just over 3 years and until recently the walls in our staircase were totally empty. My Grandma had donated some boxes of things for our small group's garage sale a few months ago and in one of the boxes I found a collection of miniature chairs. Empty staicase wall? Not anymore... I have considered spray painting them all the same color in the future. But for now I think they are kind of funky and fun the way they are.

It’s a brand new year, and one of the promises we made to ourselves would be to reconnect with our hobbies. For some of us, that means setting aside more time for art, writing, and building boats. While for others that means rededicating themselves to the honorable pursuit of awesome thrift store goods.

Tiny Chair With Woven Seat: This tutorial shows you how to make a tiny and cute traditional looking chair with a woven seat. Warning this can get a bit fiddly. It's too small and thin to use clamps, but luckily the chair doesn't have to carry a lot of weight so it's still str…

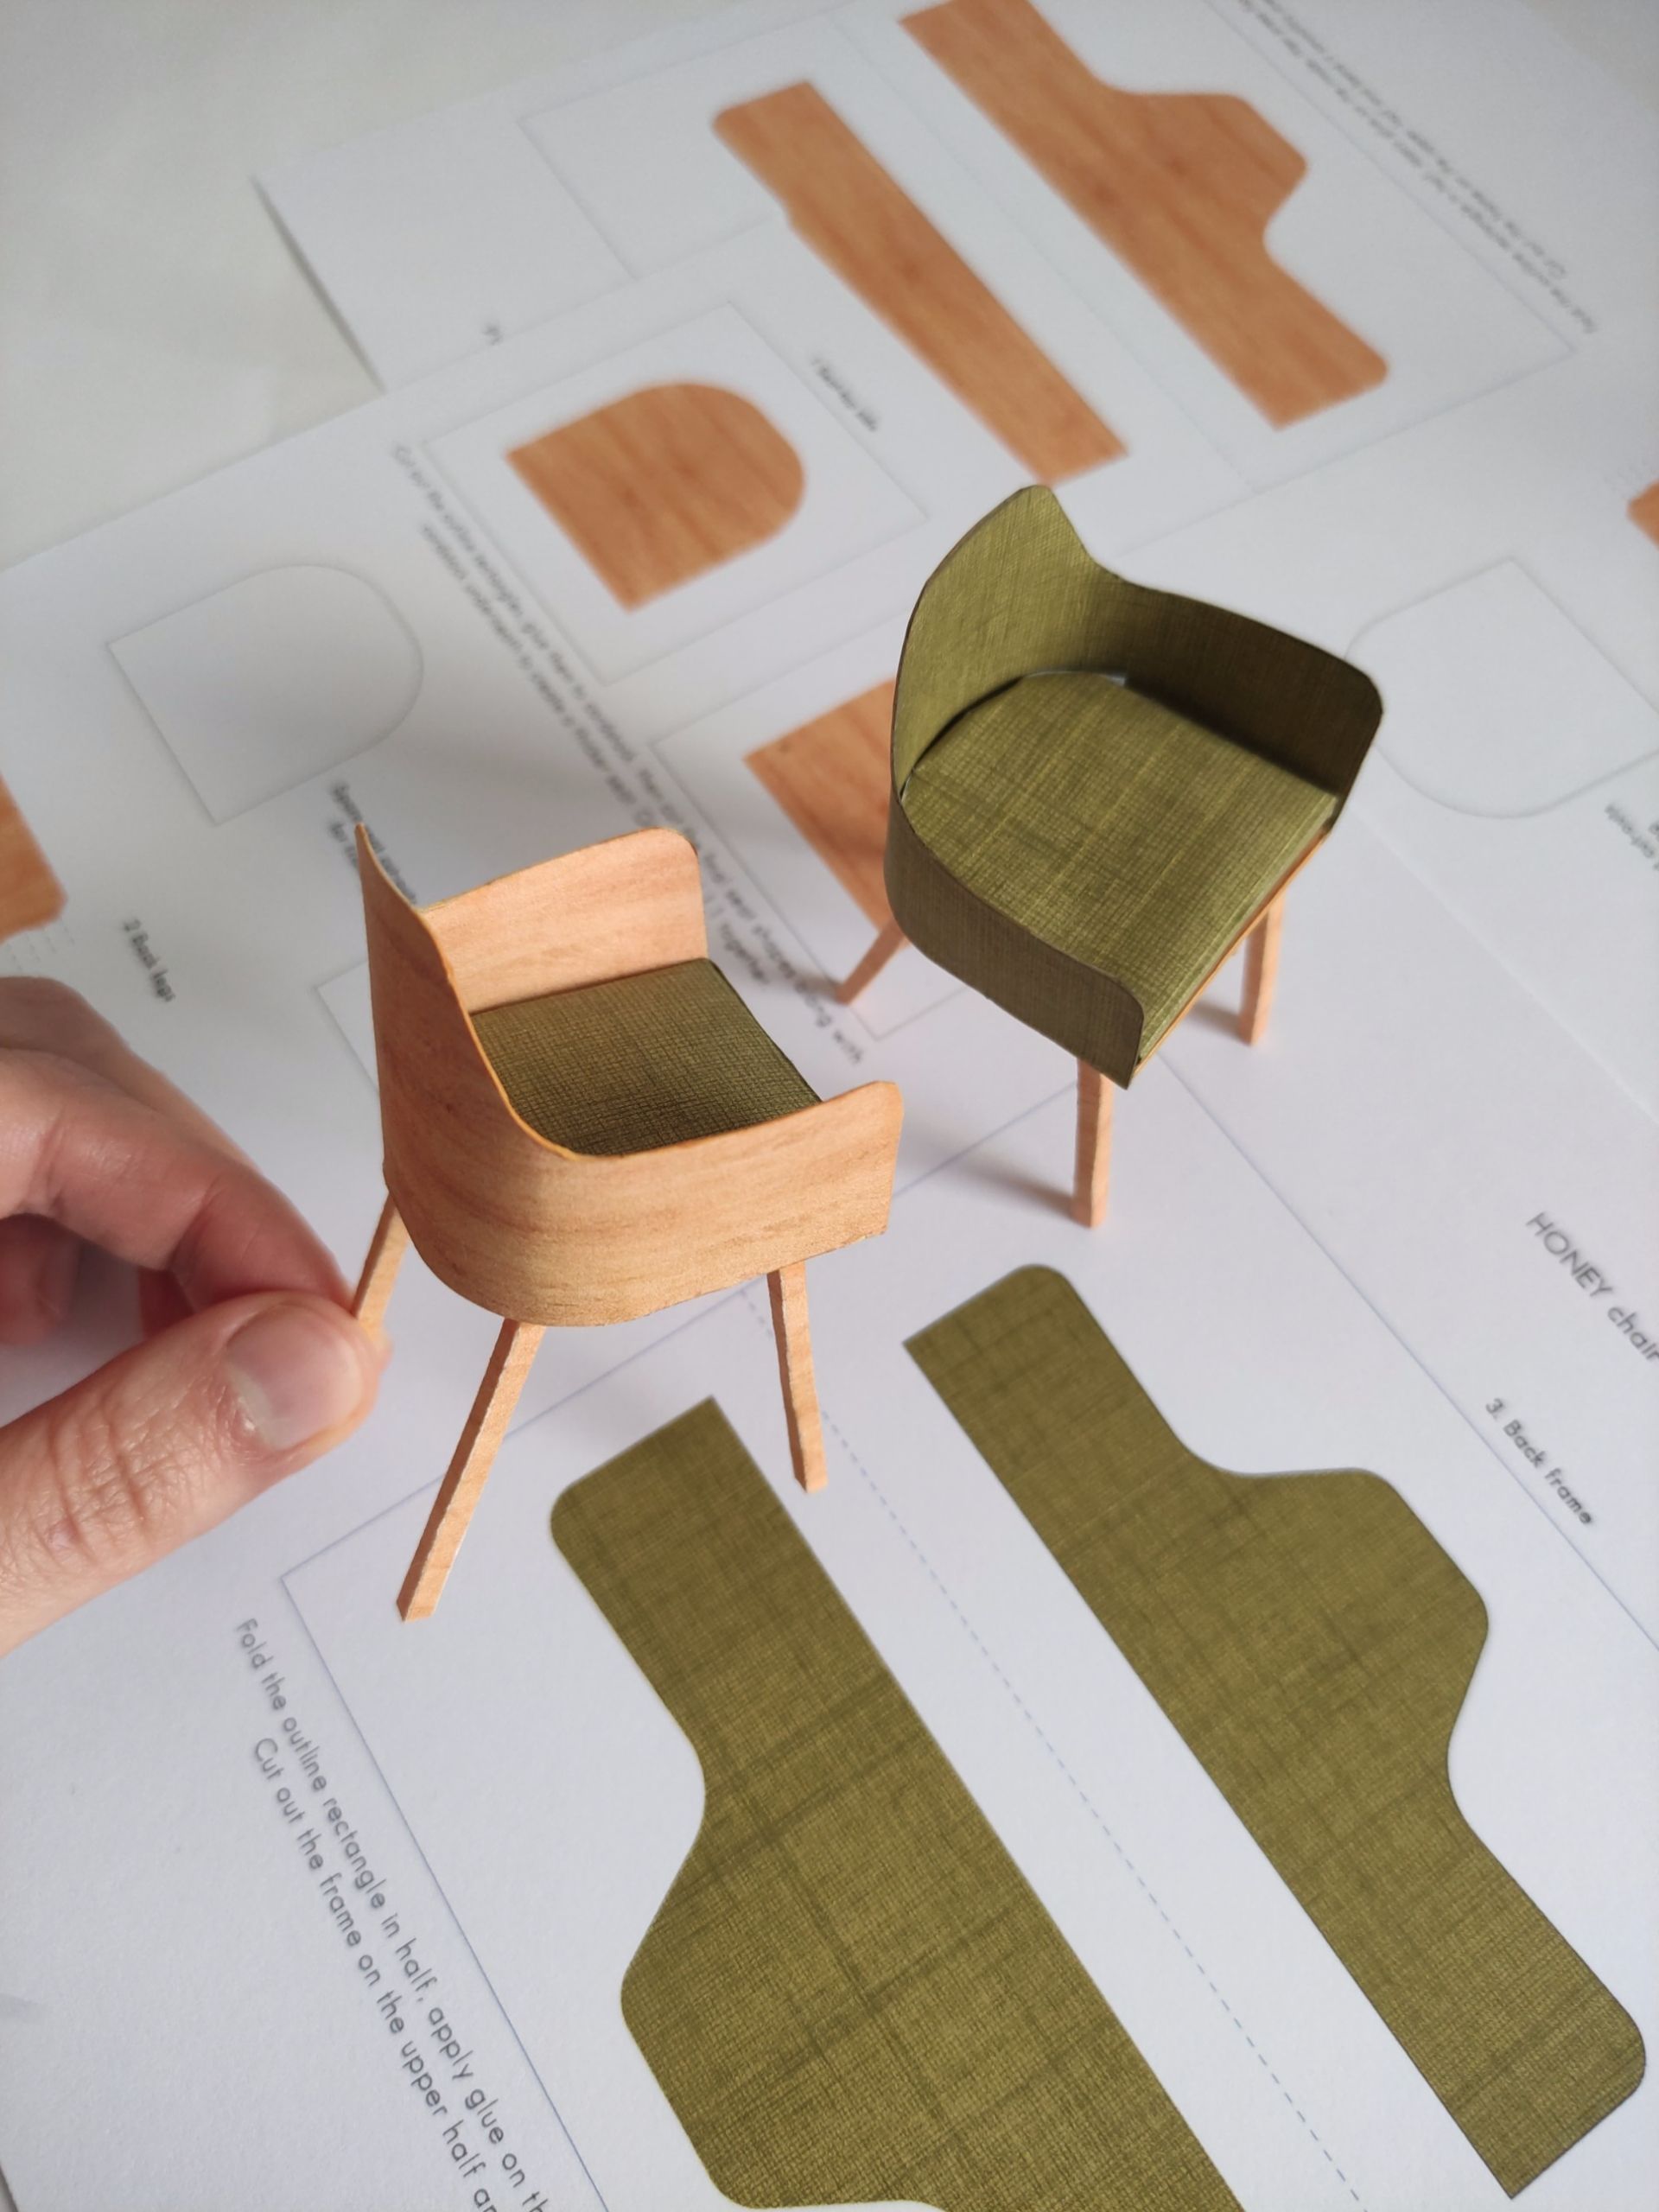
Introducing the Riley chair, a mid-century MCM style miniature for your 1:12 or 1:16 modern dollhouse. Tutorial (with video) and SVG files!

Where do I begin? I began wishing for the beautiful furniture I saw displayed in Nutshell News so long ago. Always anxious for the next issue to be delivered, hoping that there would be an article in it with directions for making upholstered furniture. At last, July 1994, "Do it Yourself", page 94, Ray Whitledge publishes an article "A Sofa from Scratch". This is a very good starting place, it's where I started and I am thankful to Mr. Whitledge to this day. I am going to try to give you a starting place in this tutorial. I am using some of Mr. Whitledge's technique and I've changed the pattern. I started out today on Google Images, using the key words "living room upholstered chairs". Lots of images came up. For you, beginners, I began looking for a certain design: a skirt, no legs; no "T" cushions; simple lines. I know, "That's so boring, Kris." You've got to walk before you can run. You can do so many variations of this once you get used to making upholstered furniture. I found what I was looking for plus measurements. Measurements are very important and the more measurements listed the better off you will be. Full-size furniture measurements aren't chiseled in granite, that's to say you don't have convert your miniature exactly to the full-size measurements. Changes can be made and sometimes should be made. This started out to be a tutorial on drafting from full-size furniture. I started making changes to the pattern size, some just arbitrary, that's when I stopped and decided to give you a pattern and show you how to make a chair and let you go from there. Converting full-size measurements are certainly an excellent place to start. I recommend going out to a furniture store with your tape measure in hand and taking a few standard measurements like: heights of backs of different styles, side to side widths, widths of arms, width and depth of seats, height of arms from floor, height of seat cushion from floor and any others I may have forgotten. Take a few pictures if you can. Keep these measurements in a notebook for quick reference. Keep in mind that the full-size furniture we have now is a larger scale than furniture from the 19th century. Doll house rooms are smaller that our full-size rooms. With that knowledge we know that adjustments must be made. This is a picture of my "Ethan Allen" room box. I made mock ups of the furniture from poster board to see if I had to change the sizes. The pieces are just simple shapes representing the size. If I need to adjust, I know it now, not after I've spent hours making that special piece that just won't fit. I have a very good book to recommend, I hope it's still available, maybe there are used ones on Amazon. The name of the book is How to Build Miniature Furniture and Room Settings by Judy Beals. The front of the book says, "Techniques for building and modifying furniture kits, scratch building and upholstering furniture, and a step-by-step guide to building, decorating, and wiring a 19th century room box. That says it all, lot's of questions answered. This book has patterns for a wing chair and Queen Anne settee. She uses 3/16" bass wood for the body of the upholstered furniture, what a coincidence . . . . . foam core is 3/16" thick and you can use it instead. This is the chair I found to draft and build. I did change the back to an upholstered back, not a loose pillow back. Something you can do later. This pattern can be modified with a round top back, camel back, keep the square corners of the back but give the top of the back an arc; you can have the arms sweep out, you can make the rounded part of the arm larger; if you have access to legs you can make the seat base thinner and leave the skirt off and add legs; you can widen the chair to make a sofa; you can lengthen the seat to make a chaise; as always have fun, expand on it, make it better . . . . I did want to show you how I begin. I always write the conversion of 1 inch scale down. You would think after all of these years I would have it memorized, just lazy I guess. Before we start I want to talk about fabric. It is my opinion that the reason that a piece of furniture fails is because of fabric. There are lots of pretty fabrics out there, not so many for miniatures. Do yourself a favor and begin with simple cotton. I would even go so far as to say you should make the first chair from muslin to get the feel of doing this. I want you to be successful and that's the better choice for the first chair. I make all of the "first" pieces from muslin or white-on-white fabric just to see if everything is all right. I am not ashamed to say that there has been more than a few chairs in my garbage can because things just didn't work out the first time. When you do want to make the chair for a setting try looking at the quilting cottons first, something floral, not patterns that you will have to match. Think of the size of a 1 inch scale doll's hand for the largest size of the flower. Take your sample chair with you to drape the fabric on so you can see what the fabric will look like. Try to stay out of the other departments for now, you will fall in love with something that is, "Just the thing!" and it may be very hard to work with. Glue failure, raveling and fabric being too thick are just a few of the problems you could have. Save that for a little later. I could confuse you with more stuff, but I think you would be better served if I just started you building. Here are the pattern pieces. I put a lot of the information on the pieces for you. I print the pattern on card stock and keep the pattern pieces in zip lock bags with the name of the pattern on the bag. Load the pattern into Paint, I have a 1 inch square in the upper right corner. I have instructions for transferring the patterns at the left of the post, Things to do, Things to see, HOW TO RE-SIZE THE PATTERNS. I will attempt to write instructions for transferring these patterns to Paint. There are four pictures. Left click on the top picture of the front and back. The picture will come up in a new screen. Right click on the picture. This will open a window. Left click on "Copy Image". Move the cursor down to the left corner of your computer screen, to your Windows start button and left click. This opens a window of your programs, left click on Paint. The Paint program should open up. In the tool bar left click on the "paste" icon. The picture of the front and back should appear. I did not have to re-size this pattern, the reason, I know not. I did have to re-size the others. I am going to go through the instructions to re-size. In the tool bar left click on the "select" icon. Draw a box around the patterns. In the tool bar left click on the "re-size" option. A window will open up. This can be a trial and error for a few times. Use percentage, not pixels. As an experiment type 50 in both of the boxes and left click on O.K. Print out your result. If it is not what you want, there are 2 arrows in the tool bar. These arrows point right and left, if you left click on the arrow that points left it will restore what you began with. Left click on the arrow that points left and restore your front and back pattern. I have printed out the patterns and these are the percentages I used: the front and back printed out the right size; for the seat cushion and inside arm cover I typed 45 in both of the boxes; for the back cushion I typed 48 in both of the boxes. I don't know if you will use the same percentages. I hope this helps. If you can not do this print out the patterns and go to a photo copy store and do a trial and error there to get your sizes correct. We are going to make the seat base first. For gluing the chair together I use Tacky glue. Cut from 3/16 inch foam core 4 pieces 2 11/16" x 2 1/4". This foam core is available from Michael's. ALSO,Cut from mat board 2 pieces the same size. Michael's sell mat board back in the framing department. Apply the glue and I smear the glue by moving the pieces around on each other. Be sure you get the glue out to the edges. I used my square to make sure all of the pieces are lined up. Make sure you have good contact and all of the pieces are glued together. Trace the front and back onto mat board. Trace the front onto the back. We need to have the lines on the back to glue to that's in another step. This really matters when you have big sweeping arms and you need a line to follow. Cut your front and back out. Glue the front and back to the seat base. Glue them to the 2 11/16" sides. You should have a 1/16" of front and back left on each side. This extra is for the mat board sides to fit into. From 1/2" dowel cut 2 pieces to fit between the arms. Use tacky glue to glue the dowels into place. Use clamps to secure until dry. Supports for the arms are cut from foam core. Cut 4 pieces to fit between the arms and 5/16" wide. Glue the foam core together one on top of the other, from 4 pieces you now have 2. Glue the supports onto the seat base under the dowels. This supports the card stock cover we are going to glue on next. This is your arm cover pattern. I've put "Dry Fit" on this. You need to always dry fit the pattern first, see if you need to make changes. You are not machines and your chairs will not always be cut out the same, there will be small differences in every chair. I am trying to show you how to curve the arm cover card stock pattern. If you curve it first by pulling the pattern over the edge of the table with your hand on it, it will curve without creasing. You can get a good curve. Dry fit the pattern. Take note of any adjustments you need to make when you draw your actual arm covers, don't change your pattern. Trace the arm cover pattern onto card stock and cut out. Here are my arm covers. Curve them and dry fit again. Apply and smear the tacky glue onto the supports, dowel, back (on the line) and on the front edge. Glue the card stock arm covers onto the chair. If the foam core supports were not under the dowels the arms would be very delicate and easy to mash when we upholster. I do not give a pattern for the sides. I use mat board for the sides. Place a strip of mat board up to the side of the chair under the dowel and behind the front. Trace along the bottom and back of the chair. I've measured 1/16" in on one side, this is the thickness of the back. The mat board has to fit between the front and back pieces. Apply glue to the seat base, front, back and under the dowel and glue the side onto the chair. Your chair is built. This is my sample chair, I used white-on-white fabric to cover it, like muslin it is easy to work with. I also dye the white-on-whites, you get a very pretty tone-on-tone fabric. I use Rit dye. "Why is Kris showing us a rag in a sour cream container?" This is a wet wash cloth, keep it handy for wiping glue off of the fabric and your hands. For a bottom cover set the chair on card stock and trace around the bottom. This is the side that is going to be glued to the bottom of the chair, mark it, mark the front. Cut it out. I use this glue stick to glue the fabric to the card stock. I have found that a sheet of photo paper is great for using as a mat when I apply the glue to the card stock. I can go over the edge and get glue onto the photo paper and the glue dries and I can use the photo paper over and over again, as you can see. The glue doesn't dry fast enough if you use regular paper, it stays sticky. Turn your bottom cover over and apply glue stick. Press your card stock bottom cover onto the wrong side of the fabric. Trim around the card stock. Apply tacky glue to the bottom of the chair, smear it around to cover the whole bottom. Line up your edges and glue the bottom cover onto the bottom of the chair. Smooth the bottom on with your hand. Apply tacky glue to the chair and fold up the extra fabric. I use Thermolam Plus for the batting or padding in my furniture. I buy this from Joann's Fabrics. Joann's usually keeps it by the cutting tables in a rack with the quilt batting. Measure the length of the arm and cut the Thermolam Plus this width. Cut it long enough to go from the seat base over the dowel to just under the dowel. Apply and smear the tacky glue onto the card stock arm cover. Lay the Thermolam Plus onto the arm cover. The Thermolam Plus is glued to just where the dowel stops. Both pieces of Thermolam Plus are glued on. Cut 2 pieces of fabric 2 3/4" x 3 1/4". On the wrong side measure 1/4" on one long side and draw a line. Cut "V" notches to that line. Match the line you drew to the back and glue the end to the side up under the dowel. I have glued both pieces of fabric onto the sides. I have taken a picture of the glue on the back and seat base before I've smeared it so you can see where I have applied it. Be sure to smear the glue to get an even coat and no glue oozes out where you don't want it to. Pull your fabric over the top of the arm, pull tightly and press down into the glue. Apply tacky glue to the back and press the fabric into it. If you are finding you have too many wrinkles around the dowel lift the fabric off the side and pull a little bit and re-glue to the side. This should take the extra fabric out. Make a diagonal cut to the corner of the seat base. Showing what the diagonal cut should look like. Cut "V" notches around the dowel. Apply tacky glue to the front and glue the extra fabric down. In this picture I am showing how I pulled up the fabric from the side and pulled on it a little bit to take the extra fabric out and could smooth the notches around the end of the dowel. You will also have trouble getting the notches to glue down if you have any of the Thermolam Plus hanging over the edge. The fabric has been glued onto the arms. There are other ways of finishing the front of the arms, like accentuating the gathering but not today. Cut a strip of foam core 1/4" wide and 1 3/4" long. This is the spacer for the back cushion. Glue this piece into the back of the chair. This will make your back cushion slant and look comfortable. Measure the length of the side of the chair. Measure the height of the side of the chair. Transfer your measurements to card stock and cut out side covers for your chair. Apply glue stick to the card stock and press the side cover onto the wrong side your fabric. Trim and cut the corners like I have. Apply tacky glue to the top and bottom and fold the extra fabric over to secure. *Just a reminder, when I say apply tacky glue, I want you to smear and smooth the glue so you don't have any glue oozing out, even if I don't write in the directions. You do not need to smooth the glue stick. Apply tacky glue to the side of the chair, be sure to smooth the glue out before you apply the card stock side cover. Smooth the side cover with your hand. Apply glue to the front and back of the chair and press the extra fabric onto the glue. Trace the front pattern onto card stock for a front cover. Cut the front cover out. Apply glue stick to one side and press onto the wrong side of fabric. Trim the fabric like I have done in the picture. Apply tacky glue to the card stock and fold and glue all sides but the top that will be glue onto the seat base. Apply tacky glue to the front of chair and press the front cover onto it. Apply tacky glue to the top of the seat base and glue the extra fabric down. Dry fit the back cushion pattern and make note of any changes that should be made to the final back cushion. Trace the back cushion pattern onto 1 layer of foam core and cut out. Dry fit again. I am carefully bending the top mat board back to tip it out. I know most of you don't have the machines to cut the angle on the seat base as I would have done. This little bend makes the chair look not so boxy from the side. There will 4 layers of Thermolam Plus on the back. Cut out a piece of Thermolam Plus the size of the back cushion and trim off about a 1/4" all around. The second pieces is even all around except at the bottom, it's still 1/4" shorter. The third piece is even all around. Apply tacky glue to the back cushion and glue the Thermolam Plus onto the back cushion starting with the smallest, second and then the third piece. The fourth piece is cut even with the bottom and around the arms. Leave extra at the sides and top to glue onto the edge of the foam core. Apply tacky glue to the edge of the foam core and press the Thermolam Plus onto it. Trim corners and trim even with the back of the foam core. Cut a piece of fabric 4 1/2" x 5". The 5 inches is going from the top to bottom of the back cushion. Trim the fabric like I have done in the picture. Use tacky glue to glue the extra fabric at the bottom onto the back cushion. Trim as I have in the picture. Glue the extra fabric into the arm area. Don't worry if your fabric doesn't come over to the back, as long as you have fabric glued to the side of the foam core the raw edge will be hidden. Apply tacky glue to the top of the back and to the side of the spacer. Put your back cushion into the chair. Square corners used to be a problem. I want to show you a nice way to finish them. Glue the sides of the fabric to the back of the chair. I show the top glued down, too, and I do that but this method lifts and glues a couple of times so if you want you can leave the top un-glued for now since the top isn't long like a sofa would be. Fold your fabric over like I have mine, pull tight. The corner isn't folded exactly like you would a present, but close. Bring the top over, also bring some of the fabric from the first fold to get the final fold on the corner. It won't have a diagonal fold like the end of a wrapped present. Stick a little glue into that fold. Trim out all of the extra fabric. Glue down the top of the fabric. Be sure to trim out the bulk. This is what you should see. This is a perfectly acceptable finish for square corners. I will use this on upholstered seats, the ones without a cushion. Beginning to look good. Dry fit the back pattern and make note of any changes you need to make on the final back cover. Trace the back onto card stock for a back cover and cut out. Apply glue stick to the back cover and press onto the wrong side of fabric. Trim around the back cover like I have shown in the picture. Apply tacky glue to the card stock back cover and fold the extra fabric over and glue down. Glue the back cover to the back of your chair. Some of you might not like the seams showing. If you don't this is the time to add boxing to the back. Measure the width of the corner. Do not include the back cover. You want the boxing to be glued just next to the back cover. I measured 3/8". I drew my lines on the wrong side of the fabric and I will cut the strip out. I applied a little glue into the seam where the side of the back meets the top of the arm. I used a toothpick to push the end of my boxing into that seam. Apply tacky glue to the edge of the back cushion, smear smooth and press the boxing into place. Do not pull any loose threads, cut them. Make sure the boxing is glued all along the edges. You can glue piping or other trim along the raw edge. Just another view. Dry fit the seat cushion pattern and take note if any changes need to be made. Trace the seat cushion onto 1 layer of foam core and cut out. Dry fit the seat cushion. There are 3 layers of Thermolam Plus on the top and 1 layer on the bottom of the seat cushion. Cut the first piece 1/4" smaller all around and the second piece is cut even all around. Use tacky glue to glue the Thermolam Plus onto the seat cushion starting with the smaller piece. Cut a strip of Thermolam Plus the width of the seat cushion. This is glued to the bottom of the seat cushion. Bring the end of the Thermolam Plus up the front of the seat cushion and onto the top. Trim the Thermolam Plus even with the sides and back. Cut a piece of fabric 2 1/2" x 3 1/2". Use tacky glue to glue the extra fabric from the front and back to the bottom of the seat cushion. Apply tacky glue to the fronts and backs at the ends. Smear some of the glue onto the fabric. Fold the extra fabric over just as you would when wrapping a present. Press the little "ear" of fabric left at the bottom. Get the fabric glued together. Only do this on the bottom of the seat cushion. You are looking at the front of the seat cushion, you can see the fullness from the Thermolam Plus. You can also see the little "ears" at the bottom that I have pressed together. I haven't folded the top down, yet. I have applied the tacky glue, I haven't smeared it, yet. Smear it into the tips that will be the top corners. This is a side of the seat cushion. I have cut off the bottom "ears" of fabric. The piping will cover that seam. Apply a little more glue into that top corner fold a press together with your fingers to make it less noticeable. Measure the corner of the seat cushion for boxing. I know this looks like it's almost a 1/2" wide. It looks better if you cut the boxing less than that. You can experiment, but I usually cut my at 3/8". Cut the boxing just like you did for the back cushion. Glue it on using tacky glue. At this point I add my piping. I have a tutorial showing "How to make piping for a pillow" in the listing at the left. Cut card stock strips 11/16" wide for the skirts. I usually have my piping on at this point, my fault, I forgot. You will see piping on the chair in the pictures after I show you how to make the skirts. So make believe I have piping on the front and I've set my card stock strip up to the front to measure the length for the front skirt. Cut the card stock to the length of the front. Apply glue stick to one side and press onto the wrong side of your fabric. Trim the extra fabric as I have in the picture. Apply tacky glue to the card stock and fold the extra fabric over to secure. How did that piping get there? Apply glue to the top edge of the skirt and smear smooth and press onto the front of the chair. Set the strip of card stock up to the side of the chair and measure the amount you need. Cut it and apply glue and fabric. Apply a line of tacky glue to the top edge, smooth it out. Glue on the side skirt. Measure for the other side. Cut the card stock, apply glue stick and fabric. Glue the side on. Measure for the back last and repeat what you did for the rest of the skirts. When you have the all the skirts on you can apply piping to the top edge of the skirts. Here are pictures of the finished chair. I hope you give it try. As always, Have fun, expand on it, make it better . . . . . . . . Just keep making minis! Kris


Get more from nimu1326 on Patreon

This is the chair from the Vintage Kitchen, I have several pictures of this room box on the blog, one picture is in the July 29, 2009 posting. I've been asked to make a tutorial for this chair several times, I avoided it because it's tricky. Even now, when I made the samples for you I held my breath when the bending began. I didn't have another piece of aluminum if this failed. I am making the table next month so you will have a matching set. This set is in my full-size kitchen, so I took the measurements from it and converted to 1 inch scale. This chair uses 3/32 inch aluminum tubing. I used to get it from Micro Mark, they only sell by the box of 15 now, at least that's what their web site listed. Now, if your first try at bending this chair is successful, consider yourself lucky, but 15 pieces is way too many unless you are using this as a club project. I have found a site that sells the K & S Engineering aluminum tubing in smaller amounts, www.hobbylinc.com They sell 3/32 inch aluminum tubing in a package of 3 for 1.59, I would purchase 2 packages, just in case. For the table you will need 1 package of 1/16 inch aluminum tubing, 6 pieces for 1.59 and 1 package of 1/8 inch aluminum tubing, 3 pieces for 1.89. Look under "building supplies". Of course, if you have a hobby shop that specializes in models and trains they might have this tubing. I used basswood for the seats and backs on the original chairs. If you have access to a scroll saw and can cut the wood, I would use the wood. The seat is 3/32 inch thick basswood and I sanded the saddle into the seat. The back is cut from 1/16 inch thick basswood. After I cut out and sanded the edges round I dampened the back and let it dry over a glass, something that had the right size bend. I held it in place with rubber bands. Let this dry overnight. Then I painted with Rustoleum white oil base paint. For this tutorial I am using mat board for the seats and backs. I mentioned earlier, if you are successful on the first try consider yourself lucky. This goes fast, you'll have a chair in no time, if your bends are correct. Don't try to move the bends too much, aluminum only bends once. I don't use the "tube benders". They are more trouble than they are worth. We will make a bending jig. You'll need a scrap of wood, a piece of a 2 x 4 or maybe a piece of plywood, at least 1/2 inch thick. On a piece of paper draw your chair shape. Use a square. From top of back to seat is 1-1/4 inches; back of seat to front 1-1/4 inches; top of seat to floor 1-3/8 inches and the last measurement is 1-1/16 inches. Now, round off the corners, I did this freehand, if you want to use a circle template, go ahead. Cut this pattern out and glue it to your scrap of wood. Next, you are going to need some brads. These are small nails with NO heads. Mine are probably 5/8 inches long. The picture above is my original bending jig from maybe 10 years ago, never throw out your jigs or forms, you will need them again. See the little brads? Yes, they look like nails, but you can't have heads on them or you won't be able to get the tubing off after you've bent it. Carefully hammer the brads into the wood on your rounded lines. Do you see how mine are very, very close together? You have to do this so the tubing won't crimp. This is your first bending jig for the chair, you have one more to make. On another piece of paper draw an "L" with your square, each leg is 9/16 inches long. Round it's corner also. Glue this piece to the scrap of wood also, glue it about 10 or 12 inch away from the first pattern. Carefully hammer the brads onto the rounded line. Again, this is my original jig with all of my notes. You see I made some mistakes the first time, and when you see me bending you will notice that I had the two jigs too close together. To keep the tubing from crimping insert a wire large enough to fill the inside of the tube. I had 18 gauge covered wire on hand. I had to unravel the thread on it, but it fit into the 3/32 inch tubing just fine. The tubing is 12 inch long. Use your craft knife and with the wire inserted, cut the tubing to 11-1/16 inch. I am cutting the tubing. Cut the wire a little shorter than the tubing. Straight pins are used to cap the ends of the tubing so we need room for those. We are ready to bend. Hold the tubing at the top of the jig, the tubing is going to want to move away from the brad, hold onto it. Please forgive the picture quality, I had help. I've made the first bend at the back of the seat. THEN, I moved the tubing so that it is on top of the second bend's brads, look carefully and you can see this. In this picture you can see how I moved the tubing to be on top of the second bend. I've made the bend and I am down to the bottom. I've made the third bend. I am marking on the tubing a line to indicate the end of the pattern. I've removed the chair and now it's on the next jig. The mark you made should be at the first brad. This is a picture from the top and I am bending around the brads. I am marking the tubing again indicating the end of the pattern, this is also the center back. At this point you could cut the chair at the center back, it's much easier this way, but you have a seam that would have to be glued. I've repositioned the chair. Can you see the chair on the right, the center back line is matching the one on the pattern? We are still looking at everything from the top. I've made the second bend for the bottom of the chair. Now it gets complicated! I do not know how to explain this, but here goes . . . take a straight edge, your ruler, but it's got to be flat and thin, that's why I have mine turned over, push it against the curve and make a mark on the other side of the chair's tubing. This is not exact, this is going to be your trial chair. Remember, you can cut the chair at the center back. I've gone back to my first jig, see the chair is standing up on it's bottom. I've lined up the mark I made with the first brad. After I made the first sample chair, I found that I needed to move the chair back, maybe a 1/16 inch from the brad. We are still looking from the top. The back bottom of the chair is on the left and I am beginning the bottom bend. Yes, it's not on the same plane, we are going to twist the second side into position. Are you sure you wanted these instructions? I've continued around the brads. REMEMBER, to move the tubing after the second bend so that it's under your brads at the back of the seat. If all went well you should be ending at the beginning mark on your pattern. Carefully lift your chair off of the jig. Carefully twist the other side of the chair into position. You have one try at this. Here are my two samples, and my original chair. You can move the aluminum tubing a bit, but don't worry it to death, it will break. All of this just takes minutes to do. Transfer the patterns at the top of this posting to a program that you can change sizes in. When you get the 1 inch square to measure 1 inch, you have the patterns correct. As I mentioned earlier, if you have basswood and can cut it, use it. If not we are going to use mat board for this tutorial. I bent the chair back using a form, this is a circular Altoids tin. Wrinkles will appear on the surface of the mat board. To cover them, because it very hard to get rid of them, cut a piece of paper or card stock to fit over the front of the back after it's bent. This should be a lot easier than trying to sand and paint them out, like I tried to do. Glue the paper with yellow carpenter's glue while the back is in it's bent position. Hold until set. Find some straight pins with large heads, or you can punch circles to cover the open ends of the tube. I had some small nails I used for the samples. I sanded the edges half round and then gave everything a coat of Delta's PermEnamel Gloss Glaze to seal. Let dry. A picture showing the half rounded edges. I painted the mat board with Delta's PermEnamel white paint, several times, sanding with 320 grit paper in between coats. We are trying to imitate metal so we want a very smooth surface. After you are satisfied with the surface give everything a coat of Delta's PermEnamel Gloss Glaze. I glued the backs and seats on with instant glue, be careful of your position, you don't have much time to reposition. Yes, this chair is a little daunting, but you can do it, just take a deep breath!! I will be posting the table next month. Have fun, expand on it, make it better, Just keep making MINIS!!!!!


Get more from nimu1326 on Patreon

1/12 Artist-made Chair by Creative Compulsion. Crafted in a simple, modern style, this chair will fit in with most interiors! 1.75” x 1.5” x 2.75” Send me a message at the time of purchase to select your customizations. Standard Customizations include: Custom Paint Job Custom Gold Leaf Distressing Custom Decals Custom Branding Customization is an added cost of about $10 per item. *Item is not a toy. This is a collector's piece and should not be given to children under the age of 8*


Please note before you start reading this older post that I have long since included a version in the Methods section, under Making realistic models, which can be accessed above. That version may h…

Furnish your dollhouse office space with the Dollhouse Miniature Walnut Swivel Desk Chair. This finely crafted replica, featuring a walnut finish, adds a touch of classic elegance to your miniature setting. The realistic design and attention to detail make it a perfect addition for creating an authentic and stylish atmosphere. 1:12 scale - 1" scale
