

I like the Octonauts show, I think it's cute, educational and not annoying like some children's cartoons. I create a round-up of free print...

Celebi & Venusaur-GX · Team Up (TEU) #1 … Celebi V · Sword & Shield (SSH) #001 … Celebi · Neo Revelation (N3) #3 … Celebi · Triumphant (TM) #3 … Celebi · Shining Fates (SHF) #003 … Dark Celebi · Hidden Legends (HL) #4 […]

Fortnite is all the rage right now and Jezrael was very specific about all the elements he wanted for his Fortnite Party!
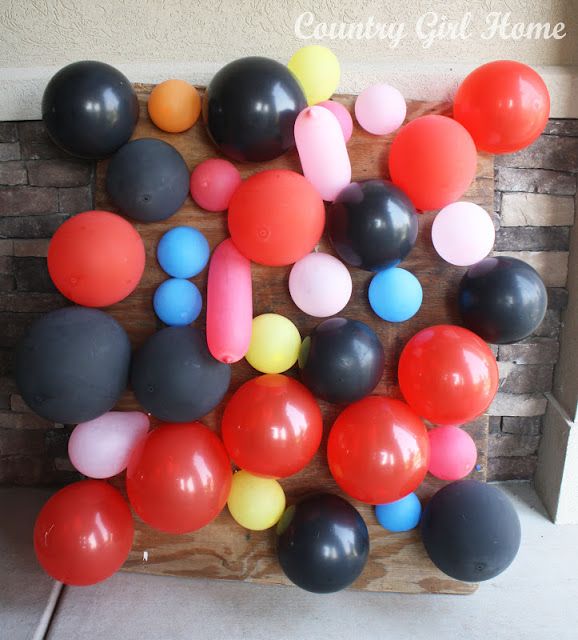
Okay my 8 year old son is crazy about NINJAGO anything. So as you can see that is what he picked for the theme of his party. Thank goodness for the web,. There is not a ton of places sell Ninjago party stuff, so I had to rely on pinterest and other sources to make my own. I just typed in "free Ninjago printable s" on BING and all sorts of pictures pulled up. (including coloring pages that kept my kids busy while I did all this). These are the three main ones I used. You can buy personalized invites on Etsy but I am way too cheep for that. So I just saved these pictures to my Photoshop and then sent them to Costco in the sizes I wanted which was way inexpensive 13 cents each 4x6 and the quality was really good. This is the picture I used for the invites. I printed out the party information with this cool Asian font "Japonesa" from DaFont.com I got all the info from Jaimee at Craft, Interrupted.com The invitation really set the mood for the party and tells people what your kids is interested at that time for gift ideas. These were so easy and inexpensive. I got wallet sized pictures of these(above) and put them on red bags from the dollar store. I used this picture (below) for the eyes on the balloons. Cut along where the yellow and red then taped to the different color balloons. I got a TON of ideas for this awesome mommy she was super creative and very helpful and even gives a few printable of her own, that I know took some time. Like this one below for cup cake toppers SO CUTE!!! Be sure to check out her site it really is AWESOME! Again it is http://www.craftinterrupted.com/ (This printable is from her site so be sure to go check it out.) Here are some fun games we played. I tried to use what I had around the house. These are Pringles cans covered in paper and we topped with balloons and the kids had to use their ninja stars to hit them off. I made so many origami Shurkins (ninja stars) and then spray painted them silver. This was a huge hit! We used darts to hit the balloons it was so fun and it got harder as more got hit. I used red plates and silver table cloths. I made these swords out of paint sticks yes! people paint stir sticks!! we painted them silver then used electrical tape for the handle made it a little thicker at the top and bottom. The kids had some serious sword fights with these and they didn't hurt anything or anyone. I use Juice boxes from Costco covered them in paper and added some of Jaime's (craftinterrupted.com) cute little circle printables to them. Easy peasy!! Here is the set up..Don't laugh at the cake. I am not a baker by all means. I had no idea that it didn't matter how much RED food coloring you put in your frosting it wont be a deep red! I learned so this cake was a little more bright reddish/pink. Here are our little ninjas! For the headbands I just used muslin I had on hand and cut them into strips. Each kids got a gift bag, a ninja balloon, sword and ninja star to take home. Thanks for visiting!!

22nd August 2011 Leroy's Army Party Leroy was turning six. We had had a very rough year with 3 large Earthquakes and over 8500 aftershocks. We decided to still go ahead with a party for Leroy but because of the state of our land we hired a place for the party for the first time. We hired Wigram Airbase. Leroy sent out invitations to his friends. Invitation (Can you decipher the morse code?) At Wigram All the children met at Wigram where they were given Dog Tags with their names to wear and flight suits to put on. All the presents were loaded into a wooden airoplane and taken away for safe keeping. All the children were marched outside for drills, then a turn on the obstacle course. They were all having so much fun. Learning to Salute Lining up for the obstacle course When the kids had completed the obstacle course we marched over to the Andover Plane. Leroy lead the way up into the plane. Everyone was buckled in and then over the PA the sound of the plane taking off started. A minute into the flight all kids were told to take cover as the engine had stopped and the plane was going down. We were then preparing to jump out of the aircraft. EVACUATE! When everyone was safe on the ground we proceeded to have a tour around the old bunkers Then we went to the Pacific War Simulator Room which had sound and light effects. This was a great experience taking shelter behind the trenches so we were not blown up. Roll Call to make sure everyone was safe Friends at the end of the tour Austin, Marquess, James, Jamal, Roman, Brayden, Leroy, Keegan & Levi Then it was time to eat. All food was provided as part of the hire. Menu Skinny Fries & Cheerio Bombers Blasted with Tom Sauce Shortbread Fighter Cookies Jet Fighter Jellies & Ice-cream Tubs Bottle of Jet Fuel (kids Keri Sipper Juices or Calci Yum Milk) Birthday Cake A tanker for Leroy made by Mum. Blowing out the candles After opening presents from the wooden airoplane we then looked around the muesum at all the old aircrafts and war memorabilia Loot Bags All kids went home with a balloon, Propeller Toy, Parachute Man, Build a Helicoptor set and lollies. * Leroy had a fantastic Army birthday and everyone who attended had a great time too.

"Happy A Million Dreams"

It's NNerf pistolen review; wat is het, welke leeftijd en leuke spelletjes zoals Fortnite, Mega, Elite, Modulus en Zombie of opbergen.

King Piggy Cake From Angry Birds

So, my fourth child turned four this month. He really wanted to have a Super Mario Bros party, and well that's what he got! I started planning back in September. I searched numerous websites looking for ideas. When I found something I liked I would print out a picture and make a note in my folder on the website I got the idea from and my additional thoughts about the idea. I had a pretty thick folder by December! My main goal was to have a party that knocked it out of the park, but was easy on the wallet as well. The easiest way to do this was by being creative and making a lot of the things myself. I thought it might be helpful to make a list of the things I made and what it cost. So first, lets talk sweets! I made cupcakes, chocolate Mario mustache pops, sugar cookies, and a cake. To be honest, we didn't need the cake but my husband really felt like we should have one. The night before the party I slapped one together. I had made a super Mario cake for my nephew almost a year ago, so I just kind of went off of that. I used my sisters chess set for the characters to put around the cake. I had most of the fondant I needed so it really didn't cost me anything other than the cake mixes. I made the sugar cookies about a week early and kept them in an airtight container. Again, I had everything I needed on hand so no additional cost there. I had to use a skull cookie cutter for the 1up mushrooms. They were the worst sugar cookies I have made. I had problems with my never-fail recipe. Go figure! But it was no big deal in the end. They still tasted great, and the kids loved them. I made the cupcakes a week early, and I put them in the freezer. On the morning of the party I sat them out and let them thaw a little before frosting them. I used some butter creme frosting my mother had made and had extra of. My mother helped me with the toppers and cupcake wrappers. She has a cricut, so she used the cupcake cartridge to cut them out. The paper was purchased at Hobby Lobby when it was on sale for 50% off. It was about .15 cents a sheet. I used the paper for the pennant banners, his name banner, decorative hangings, and cupcake wrappers. I bought 28 sheets for a little over $4. The toppers were made by using images I downloaded. http://kotaku.com/5391337/hi+res-new-super-mario-bros-wii-art-at-your-disposal/gallery/ I used a 2 inch punch to make the background on solid color paper (that I already had), and a 1 3/4 inch punch to cut out the pictures I printed out of the characters. I bought a package of lollipop sticks and plastic wraps at walmart for $2. I used the plastic sticks for the cupcake toppers, and I used the wrappers for the chocolate mustaches. For the chocolate mustache pops I had to order a mold from amazon. It cost $5 with the shipping. The chocolate was purchased at walmart for a little under $3. I used the plastic wraps that came with the sticks I bought for cupcake toppers to wrap them. I chose a longer lollipop stick I found at hobby lobby ($2) for the mustaches, because I wanted the kids to be able to hold them up to their face. I tied them with green curling ribbon. Now for the decorations that I made. The first thing I made was a name banner. I used my mom's cricut to cut out large circles in solid colored paper. Then we cut out smaller circles in the striped paper I purchased. I also cut a some circles I had made on my computer using the images I downloaded that said "Happy 4th Birthday." Then we cut out the letters of my sons name in red using the cricut. I cut out several extra circles in solid colors and the striped paper to use for hanging decorations. I bought 2 spools of ribbon from the clearance section at HL for $1.50 each. I used the ribbon to string the banner together. I also took some red tulle and ribbon I had to use in between the letters. The rest ribbon was used with other ribbon I had to go on the jars of candy on the candy buffet. I also cut out two pennant banners from my striped paper using the cricut. Then I made the hanging decorations out of the extra circles that I cut. I printed out the character, then I cut them out and mounted them on the circles. I also printed out characters that I just cut out and taped on to the left over long lollipop sticks. Everything was printed on white card stock. I paid $4 for a very large package, and I have plenty left over for my daughters party! I also bought a package of full sheet labels that I used to print out my labels my candy bags and "thank you" boxes. I also printed out little candy bar wrappers. That stuff is not cheap, so I used it sparingly. It was $11 for 25 sheets. Once again I have plenty left over for the next party. I just picked out the round 2 inch label template, and put my design in it and printed it out. Then I used a 2 inch punch to cut the stickers out. Very easy. Now, I really think that the things that gave the party a big wow factor were probably the easiest and cheapest things to make! The tissue poms were really neat looking. I found them on Martha Stewart's website. I bought 5 colors of tissue paper from walmart for $1.50 each ($7.25 total). There is enough paper to make two of every color in a pack, but I only made one of each. I hung them from fishing line, and it looked like they were just floating in the air. The other big wow factor that was very inexpensive was the balloon towers. I took two pieces of my husbands foam from work and cut them into 9x9 inch squares (about 3 inches thick). I covered them in red masking tape so I didn't have foam balls everywhere. Then I took a pole that I unscrewed off of a mop and a broom and I screwed it down into the center of the foam. This was the base for my balloon towers. The rest was as simple as blowing up balloons, tying them together and twisting them around the pole. When I got to the top I used a little balloon pump (HL $1.75) to fill up the two mylar balloons I had purchased from Celebrate.com ($5) and taped them to the top. The balloons were $1.25 a package and I had 5 different colors ($6.25 total). Expenses so far: Paper (28 sheets)- $4.00 Lollipop stick & wrap pkg- $2.00 Chocolate mustache mold- $5.00 Chocolate Melts- $3.00 Long lollipop sticks- $2.00 Ribbon (2 spools)- $3.00 Card Stock- $4.00 Sticker Paper (labels)-$11.00 Tissue Paper Poms- $7.25 Balloon Towers-$11.25 Total: $52.50 Ok here is a list of the other party paper products I purchased: From the dollar store- red paper plates $3 yellow cups $3 orange plastic utensils $3 yellow and blue plastic square tubs-$2 From Walmart- orange & green paper sacks- $3 red & blue boxes-$3 multi-colored shreaded paper- $1 From Celebrate.com- napkins (2 pkgs)- $6 Total: $24.00 I also printed these cute little question boxes. I did make them a little bigger than what they were when I found them. I will try to find the link to them. I cut them out, taped them together and put gold chocolate coins in them. Very cute! I bought the coins at Walmart after Christmas. They were in a little mesh bag. They were marked down to .25 cents a bag. I bought 12 bags for $4. Now for the candy buffet. Try to look around your home and find as many glass containers as you can. I used triffle dishes, vases, cannisters, etc. However, if you don't have anything that would work there is the option of buying some containers. I ended up purchasing a few extras, because I didn't have enough to hold all the candy I had bought. I searched high and low for the best price and found that Walmart was almost unbeatable in price. They sell the 2 gal glass jar with lid for $9.98, 1 gal glass jar for 6.98, and the 1/2 gal jar for 4.98. I didnt use any of the 2 gal jars. They were just too big. Hobby Lobby can have a good price too if you can catch one of their 50% of glass sales. I bought 3 of the 1 gal jars and 2 of the 1/2 gal jars to go with what I already had. I spent just over $30. I know that seems like a lot, but I knew I would get good use out of them. Being the mother of five children I throw a lot of parties so I plan on using them quite a bit! I printed out cute little sign for each jar. I gave a character to each candy. For example: Princess Peach's Pixie Sticks, Toad's Twizzlers and so on. That brings me to the candy! I started planning this party in September, so by the time halloween rolled around I knew I neede to stock up on candy. The morning after halloween I went up to Walmart and started filling my cart. I bought candy that was not packaged in halloween wrappers. I bought inexpensive cany that I could get alot of for a little price. My picks were: twizzlers, pixie sticks, dum dums, starbursts, and skittles. Then after Christmas I went back to Walmart and bought the red & green m&ms, several packages of ring pops, gold coins, kisses, and a few large red & green swirly suckers. I spent about $35 in all. Sounds like a lot, but it takes a lot to fill up those jars. Not to mention that there was plenty left over for me to have several more parties without having to spen anymore money on it. I will, however, switch out the red & green m&m's for future parties. It just so happened that red & green went well with our theme. Candy Buffet expensences: Jars- $30 Candy- $35 Total: $65.00 My last BIG expense was the standup Mario. It was about $50 after I paid for shipping. Crazy, I know. But, my son just LOVED it! And it really added to the party decor. The way I justified it to my husband was that I might be able to sell it after the party was over on craigslist. We will have to see about that. Grand Total: $192.50 All in all it was a GREAT party! Just to see the look on my sons face made it worth it! I have already been working on my daughters 1St birthday that is coming up in May. Can't wait! MORE PICTURES TO COME! DON'T FORGET TO CHECK THEM OUT.

A personal blog for bored family members

This is how to make a cute ladybug cupcake! They are so fun to make for birthdays or a baby shower. With just a few ingredients and treats you can transform a normal cupcake into an adorable ladybug complete with edible eyes and dots. Great idea when baking with kids.

Oddish · Crown Zenith (CRZ) #001 … Gloom · Crown Zenith (CRZ) #002 … Bellossom · Crown Zenith (CRZ) #003 … Tangela · Crown Zenith (CRZ) #004 … Tangrowth · Crown Zenith (CRZ) #005 … Scyther · Crown Zenith (CRZ) #006 … Sunkern · Crown […]

The Army Lego Tank Cake – this is what you make for a 9 year old boy when he’s in to WW2 game & lego! My favourite little guy is the cool one wearing the Ray bans! Another cake out of my comfort zone :-/ but pleased with the end result!

Never have I ever made such an important birthday cake at such short notice! This cake needed to represent the five-year-old recipient's loves and, whilst I was unable to complete them all, I managed most. Here was my list of loves for this little dude: Chocolate Favourite colours are green and blue Skateboarding Ninja Swords Dirtbikes American YouTube Vlogger, Stephen Sharer and "Share The Love" I was unable to source a moto-x dirtbike topper for this cake, but I hope the little BMX bike will be a happy substitute. So, let's have a look at how this seriously last minute cake turned out ... Chocolate ... ✅ Check This is my second chocolate cake this week, and mmmmm it looks, tastes and smells are good as the first one. Once more, my chocolate sponge recipe did not fail me and neither did the delicious chocolate buttercream. Fave Colours ... ✅ Check Blue fondant with blue toppers, with a little bit of green colour on the skateboard. Skateboarding ... ✅ Check Awesome skateboard cake topper Ninja swords ... ❌ Fail OK, so I failed on this one, but I've pretty much got the rest sorted I think. Dirt Bikes ... ✅ Check, well, sort of Finding a dirtbike cake topper was hard at such short notice, but I think this little BMX should be a pretty cool substitute. And, with it being a wonderful blue one, I think I just might be forgiven - I hope 'Share the Love' ... ✅ Check and double check! The young man's Dad sent me the 'Share The Love' logo but, as it was such poor quality and would have pixelated on printing, I got my 'digital enhancer' working on it to prevent this happening. The printed icing sheet topper was then cut to shape and affixed to the top of the cake. Once that dried, following the scourge of all cakers, humidity, I made a few cupcakes for good measure. Chocolate chip cupcakes with vanilla and chocolate frosting. Yum!

When I started planning K’s Ocotnauts Party, I had this big idea that the goodie bags should include a themed gift from each member of the crew. But my big thing with goodie bags is no junk. Everything in the bags must be useable and fun. I have a big ... Read More

Free Minecraft party templates, food ideas, DIY decorations, birthday invitations, games, labels, and more! Plan an epic birthday party!!

Van Andel Arena is West Michigan's premier entertainment destination for concerts, sports, comedy and family fun! Home to the Grand Rapids Griffins hockey team.

Camo Hunting Vest

If you have a Paw Patrol fan and want to throw a Paw-ty. Check out this DIY Paw Patrol Party, with fun suggestions on food, activities and a Patroller Cake!

Torte Onkel Scrooge Heute habe ich für euch eine richtige Motivtorte!!! Ich liebe diese Torte! Ich finde sie so toll – vielleicht wegen den Onkel Scrooge oder noch Dagobert Duck genannt– die erste umgedrehte Figur, die ich gemacht habe, die (fast) frei über die Torte schwebt! Das ist so cool! Ich habe bei der Planung der Torte mehrmals hin und her überlegt, ob ich nicht den sicheren Weg nehmen sollte und die Figur sitzend oder stehend mache! Aber wo ist der Spaß dabei? Vor allem aber ging es darum, Dagobert Duck darzustellen und der Sprung ins Goldmünzenpool ist für mich seine typische Geste! Wenn ich an Onkel Scrooge denke, dann stelle ich ihn mir genauso vor – selig vor Glück in seinen Geld springend! Als ich mich dann für diese Position der Figur entschieden habe, war der Rest auch schnell klar – die Torte sollte als seinen Geldspeicher aussehen,- quadratisch, grau und mit vielen Schilder. Im Voraus habe ich den Aufleger mit den Geldbergen und Dagobert gemacht. Ich habe eine dünne quadratische Tortenplatte (17x17cm) genommen und auf sie Hügel aus Ricecriespies (Cerealien und Marshmallows) geformt, die ich dann mit gelben Fondant überzogen habe. Der einen Hügel ist größer als der anderen gemacht, denn er sollte dazu dienen, den Lollipop-Stiel für die Figur sicher zu halten. Ich habe dann doch 2 Lollipop-Stiele genommen (20cm lang) und diese in ca. 60° Winkel in den Berg reingesteckt. Dann konnte ich schon mit der Aufbau der Figur anfangen – das war die erste Figur, bei welcher ich zuerst die Hände modelliert habe. Danach kamen die Armen, den Oberkörper und den Unterkörper. Die Beine habe ich erstmals 24 Stunden trocknen lassen bevor ich sie mit Hilfe von Zahnstocher in den Unterkörper gesteckt habe, genauso die Füße – erstmals trocknen, dann anbringen: so haben kleine Elemente mehr Stabilität und die Erdanziehung kann sie nicht „lang“ ziehen! Der Kopf habe ich zuletzt gemacht und in den schon etwas getrockneten Körper mit Zahnstocher befestigt. Danach konnte ich mich beim Ausstechen von kleinen Kreisen austoben, denn ich habe gefühlt 1000 davon gemacht. Gott sei Dank habe ich mir vor kurzen einen Ausstecher gekauft, der auf einmal ca. 20-30 Kreise ausstechen kann, sonst wäre ich bald verzweifelt gewesen. Ich musste jedoch jeden einzelnen Kreis auf den Geldhaufen kleben, einige davon kamen auf Basteldraht und konnten somit in den Luft „fliegen“ als der Onkel Scrooge in den Geld eintaucht! Dann habe ich den Münzen noch einen Goldschein verpasst (mittels essbare Goldpuderfarbe) und der Tortenaufleger war erstmals fertig. Im Voraus habe ich auch 4 graue Quadrate (17x17cm) ausgeschnitten und gut 2-3 Tage trocknen lassen – die sollten die Wände der Geldspeicher werden und ich wollte, dass sie stabil und gerade nach oben stehen. Man muss die Quadrate auch mal umdrehen, damit sie von beiden Seiten trocknen können. Dann habe ich sie mit grauen Streifen und bunte Schilder dekoriert. Ich habe einen Marmorkuchen nach dieser Rezept (2,5er Menge) gebacken und daraus drei quadratischen (16x16cm) Kuchenstücke bekommen, die ich übereinander mit Ganache geschichtet habe. So habe ich einen ca. 15cm hohen quadratischen Kuchen bekommen, den ich mit Ganache bestrichen und mit gelber Fondant eingedeckt habe. Ich habe ein paar Schaschlik-Spieße in den Kuchen gesteckt, die das Gewicht der Aufleger besser stützen können, so dass der Kuchen drunter nicht platt gedrückt wird, denn den Goldschatz und auch die Figur haben auch ihren Gewicht Dann noch etwas Grass und lose Goldmünzen und fertig war die Torte! Da ich die Torte für meinen Chef gemacht habe und sie zur Arbeit bringen wollte (20km mit Bus und Bahn) habe ich mir für den Transport eine Stütze von Spyroporkugel und ein Stück Schwamm gebaut, die die Figur der Onkel Scrooge festhalten sollte, damit diese nicht hin und her schwank und dadurch vielleicht zur Schaden kommt. Ich muss sagen, meine Konstruktion hat super gut gehalten und die Torte ist heil ans Ziel gekommen. Und wie gefällt sie euch? Zuckersüße Grüßen Valentina Торта Чичо Скрудж Днес искам да ви покажа моята последна бутикова торта! На мен тя сташно много ми харесва! Особено фигурата на чичо Скрудж – това е първата фигура, която моделирам с главата надолу и която се рее (почти) свободно над тортата! Това е толкова готино! Когато обмислях дизайна на тази торта доста се чудих, дали да не взема сигурният път и да направя фигурата седнала или стояща! Но къде е удоволствието в сигурните неща? Преди всичко обаче исках да направя торта с чичо Скрудж и неговата типична поза е скокът му в морето с пари! Или поне моята първа асоциация за него е този скок! Затова реших да опитам да го направя така – по средата на скока му, щастлив сред цялото му богатство. След като бях решила как ще изглежда фигурата, другото беше лесно за плануване - тортата трябваше да бъде квадратна, с формата на неговата постройка сейф, където най-богатият анимационен герой си държи парите. Предварително можах да направя купчините с пари и фигурата на чичо Скрудж. За тази цел използват един квадратен тортен картон (17х17см), върху която направих хълмчета от ризон и разстопен маршмелоу. Покрих тези хълмове с жълт фондан. Единият хълм е нарочно по-голям, трябваше да е достатъчно стабилен, за да мога да забия в него дръжката за близалки, на която исках да изграждам фигурата. В крайна сметка използвах дори две дръжки за близалки, за по-голяма сигурност, които забих в 60градусов ъгъл в хълма. Това беше първата фигура, която започнах да моделирам от дланите! След това направих ръцете, торса, долната част на тялото. Направих краката и ги оставих за 24 часа да изсъхнат преди да ги закрепя към тялото с помоща на клечки за зъби, по същият начин и стъпалата - първо оставяме да изсъхнат и после ги прибавяме, така не може земното привличане да ги „удължи“! Главата е закрепена също с клечка за зъби към вече поизсъхналото тяло. След това имах честта да направя около 1000 малки кръгчета. Слава богу, че си купих наскоро една джажа за изрязване на кръгчета, която прави наведнъж към 20 - 30 кръгчета, че иначе нямаше да издържа! Но пак всичките кръгчета са ми минали през ръцете, за да ги залепя върху хълмовете, някои от тях сложих на тел за да могът да летят във въздуха, когато чичо Скрудж се гмурне в парите! Накрая напудрих монетите със златен прах за ядене и поставката беше готова! Предварително можах да направя и стените на сейфа - изрязох 4 сиви квадрата с размери 17х17см и ги оставих за 2-3 дена да изсъхнат, като се обръщат от време на време за да изсъхнат от двете стани. Това го направих, за да получа прави стени, стоящи стабилно нагоре. След това ги украсих с още сиви ленти и различни цветни табелки! И сега за сладкиша - направих един мраморен кекс по тази рецепта (2,5пъти даденото количество) и получих 2 квадратни блата с размери 16х16см, които слепих с крем Ганаж. Така се получи един доста висок (15см) квадратен сладкиш, който намазах с крем Ганаж и покрих с жълт фондан. Сложих няколко дървени шишчета за допълнителна стъбилност, за да не се смачка сладкиша под тежестта на парите и фигурата. Накрая направих малко захарна трева и паднали монети и тортата беше готова! Тъй като тази торта беше предназначена за моят шеф и трябваше да я пренеса 20 километра с автобус и влак, си направих една допълнителна конструкция от една стиропорена топка и парче дунапрен, за да защитя фигурата при превоса. Беше ме страх, че тя може да се счупи както си подскача нагоре и надолу, докато я пренасям. Моята кострукция свърши много добра работа и фигурата и тортата пристигнаха както подобава! И на вас как ви харесва тортата? Захарно сладки поздрави Валентина

“Rabbit Magic” and DIY Magician’s Hat and Wand This book is a book that is filled with fun. The illustrations are filled with adorable bunnies and fantastic expressions all drawn-up in attractive colors. The story itself is pretty great too. It is about a rabbit who is a magicians assistant and is very good at...Read More »

Malachi has been planning and dreaming of a Lego party with his friends for no less than two years now. We didn’t schedule it in though, because I figure, why act in haste? Also, there is the fact that planning and throwing parties is really not my gift and I very much do not enjoy it. As […]

“Dairy free, gluten free chocolate cake covered with chocolate icing, decorated with lego pieces and chocolate lego bricks.Chocolate cupcakes with nuttelex icing, decorated with chocolate leg…
